Create an exit-intent survey
Survey your visitors right before
Most visitors leave online stores without buying — and without explaining what stopped them. Catching them before they leave creates an opportunity to understand what happened. That’s where exit-intent surveys come in.
An exit-intent survey appears right before visitors leave and asks what they were looking for, what felt unclear, or what stopped them from completing the purchase.
If you want to add an exit-intent survey to your Shopify store, you can use the app called GSC Email Marketing + Popups. The app lets you choose a survey template, customize the question and answer options, and publish it on the pages you want to monitor. The survey will appear only when visitors are about to leave the page, helping you collect feedback without interrupting the shopping experience. You can display it sitewide or target specific pages like products, collections, and the shopping cart.
The cart abandonment exit survey appears when a visitor with items in their cart is about to leave the store or exit the shopping cart page without checking out. Because these shoppers have already shown strong purchase intent, this is usually the highest-performing exit survey type, with more responses and clearer insights than general sitewide surveys.
The goal of this survey is to ask what stopped the visitor from completing the purchase. Common answer options include high shipping costs, unexpected total price, lack of product reviews, or missing product details like images and descriptions. You can also include an optional text field for anything not covered by the preset answers.
The product and collection page exit survey targets visitors who are browsing products, comparing options, but leaving without adding anything to their cart. At this stage, they are usually still exploring and not ready to buy. The goal is to understand their intent rather than focus on checkout barriers.
The survey uses a simple intent-based question like “What best describes your visit?” with preset answer options such as just browsing, comparing products, looking for the best price, or looking for specific product information. This helps you understand how people are interacting with your store and why they are not moving further into the purchase process.
The post-browse experience exit survey targets visitors who leave the store without engaging deeply, such as viewing multiple products or adding anything to their cart. These are often first-time or early-stage visitors. The goal is to understand what prevented them from exploring further rather than focusing on purchase intent.
Such surveys typically use a simple experience rating format or a small number of preset options, and an optional text field. This low-friction format is intentional. New visitors who haven’t engaged deeply are unlikely to fill out a detailed form, but a single-click response with an optional comment still produces useful feedback without creating resistance.
This app is fantastic. It helps us get feedback from our customers (those that buy and also those that choose not to) without being too intrusive. Very easy to set up.
Art Store shopifyCollecting responses via exit-intent surveys is only useful if you act on what they tell you. Most answers fall into two groups: things you can fix in your store, and signals about how people were shopping.
Responses from the first group point directly to problems in your store. For example, if visitors mention high shipping costs, you can test a clearer free shipping threshold or an exit-intent popup offering a free shipping coupon. If people say there isn’t enough product information, it’s usually a sign that product pages need stronger descriptions, images, or FAQs.
Responses from the second group describe shopper intent rather than issues with your store. “Just browsing” or “Comparing options” usually means the visitor wasn’t ready to buy yet, but may respond better to follow-up emails or remarketing. “Looking for the best price” can signal that discounts or value-focused messaging might help convert them later.
If you’re using the GSC app, you can turn survey responses into follow-up actions automatically. You can add an email field directly to the survey, and visitors who choose to leave their email will be added to your contact list. From there, they can be tagged based on their answers and enrolled in relevant email sequences.
Exit-intent surveys work best when they ask a single question. Multi-question surveys significantly reduce completion rates because visitors are already leaving and won’t invest time in longer forms. A single click is realistic — anything more and most people will skip it entirely.
Most visitors won’t type out feedback when they’re about to leave. Predefined answers make it easy for them to respond in seconds and also make results easier to compare over time. You can still include an optional comment field for extra detail, but the main interaction should be quick tap or click responses.
Your survey questions should match where the visitor is in their shopping journey. On cart pages, focus on checkout barriers. On product and collection pages, focus on browsing behavior or purchase intent. Reusing the same question everywhere makes responses less relevant and harder to act on.
| Page | Visitor behavior signal | Exit survey question example |
|---|---|---|
| Product page | Items not added to cart | Anything missing on this page? |
| Collection page | Product comparison | What are you looking for today? |
| Cart page | Checkout hesitation | What stopped you from completing your order? |
| Homepage | Expectations mismatch | What were you hoping to find today? |
Always include a clear way to dismiss the survey. If visitors feel blocked or forced to respond, it creates a negative experience. Even a dismissal is useful feedback — it tells you they weren’t interested in engaging at that moment.
Don’t show the survey repeatedly to the same visitor. Most stores avoid showing it again for at least a week after dismissal and longer (or permanently) after a submission. Repeated popups don’t improve data quality and can hurt trust.
Small changes in wording can significantly affect response rates. Testing different versions of your question or answer options helps you find what people actually respond to. Even a short test period can show clear patterns in engagement.
Great app — a must have for your ecommerce store. Using this app I got more insights about my audience and my store as well.
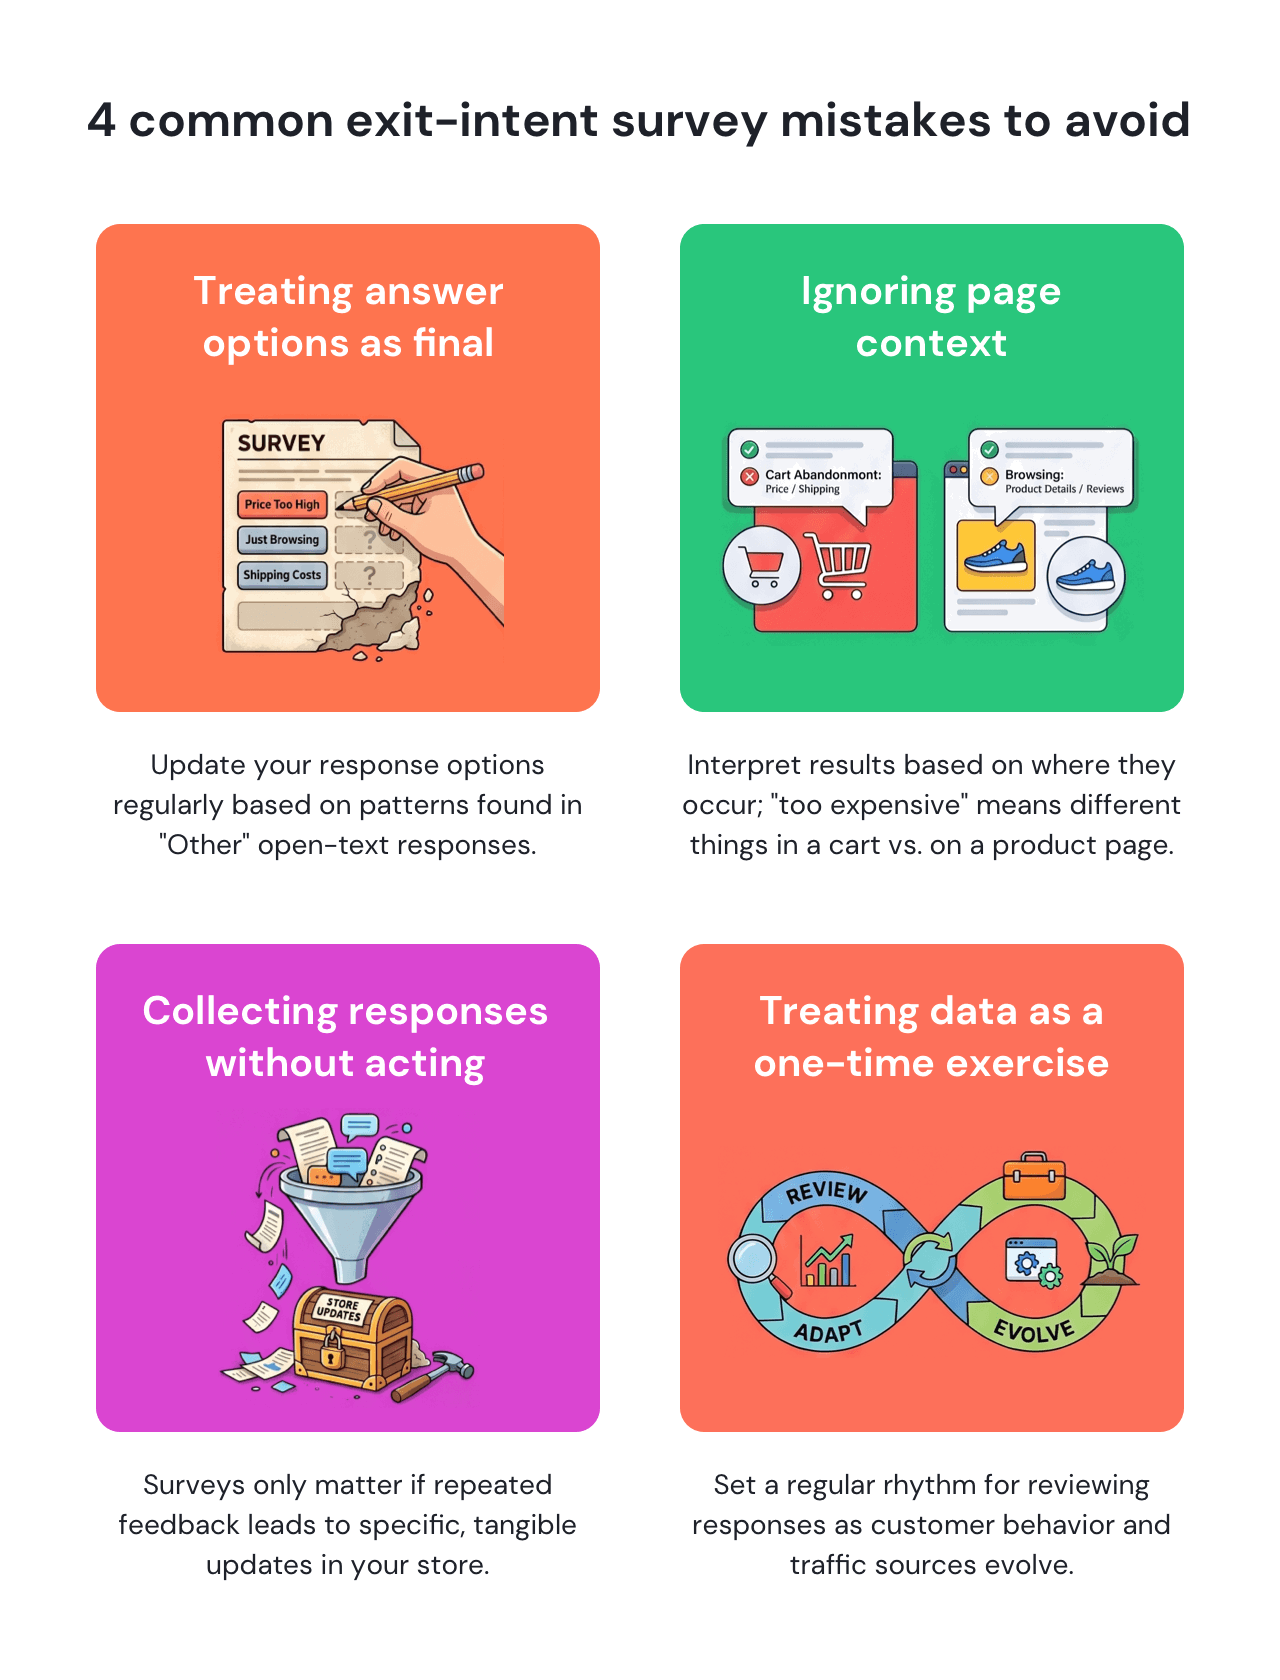
Wellness store shopifyIf most responses end up in the “other” field, your preset options aren’t reflecting real customer language. After a few dozen responses, review patterns in open-text answers and update the options to match what shoppers are actually saying. This should be an ongoing process, not something you set once and forget.
The same answer can mean different things depending on where it comes from. “Too expensive” on a product page often reflects pricing perception, while in a cart survey it may reflect unexpected total cost. Traffic source and device also matter: visitors coming from paid ads and organic traffic, desktop and mobile devices often behave differently. Always interpret responses in context, not as standalone signals.
Surveys lose value if they’re only reviewed once and never revisited. Customer behavior changes over time as traffic sources, product availability, and pricing evolve, so the patterns you see today may not hold in a few months. Set a regular rhythm for reviewing responses and updating your store based on what you learn.
The exit-intent survey you’ll add to your Shopify store will only matter if it leads to changes in your store. If repeated feedback points to the same issue, it should result in a specific update. Otherwise, your survey responses become something you track without making changes.
If you want to add an exit-intent survey to your Shopify store, GSC Email Marketing + Popups makes it easy to set one up without any technical work. The app includes ready-made survey templates based on the most common use cases, so you can get started without designing anything from scratch. Just pick a template, adjust the question, and choose where it should appear in your store.
You can also control who sees the survey using Shopify-specific targeting rules. For example, you can show it only to visitors viewing certain products, customers with specific items in their cart, or shoppers who haven’t purchased before. This helps you keep the survey relevant instead of showing it to everyone.
All responses are collected in the dashboard, where you can review answers and segment contacts. If a visitor leaves their email, you can tag them based on their response and automatically follow up with an email sequence, turning feedback into a way to re-engage potential customers instead of just collecting data.
Find GSC Email Marketing + Pop ups in the official Shopify App Store, and see how it works.
The best question depends on the page where it appears. On product and collection pages, visit-intent questions like “What best describes your visit today?” usually work better than directly asking why someone is leaving. On the cart page, focus on checkout friction with questions like “What stopped you from completing your purchase?” For first-time visitors who didn’t engage much with the website, broader feedback questions about the browsing experience tend to produce more useful responses.
Exit-intent surveys work best on pages with high abandonment rates and strong purchase intent, especially product pages and the cart page. Collection pages, landing pages, and the homepage can also be useful if they receive a lot of traffic but convert poorly.
The most common Shopify exit-intent surveys include visit-intent surveys on product and collection pages, cart abandonment surveys, and general post-browse feedback surveys for first-time visitors. Each format is designed for a different stage of the shopping journey, from early exploration to checkout abandonment, and helps uncover different types of friction depending on where the visitor exits.
A purchase intent survey can pop-up on exit intent, but it usually asks visitors what they came to the store looking for rather than why they’re leaving. On product and collection pages, questions like “What best describes your visit?” with options such as comparing products, looking for the best price, or looking for quality help identify where shoppers are in the decision process and how to follow up effectively.
A post-purchase survey appears on the order confirmation page and measures satisfaction among visitors who completed a purchase. An exit-intent survey targets visitors who are leaving without buying, making it a tool for diagnosing conversion friction rather than measuring post-purchase experience.
Nina De la Cruz is a content strategist at Getsitecontrol. She is passionate about helping small and medium ecommerce brands achieve sustainable growth through email marketing.
Exit-intent popups are one of the most effective ways to stop first-time visitors from disappearing for good.
Here’s why that matters: nearly 3 out of 4 customers never return even after making their first purchase — which means you often only get one shot at converting them.
That’s where exit popups shine: by showing the right message at the right moment, you can turn abandoning visitors into subscribers, buyers, or valuable leads.
An SMS popup is an on-site form that asks visitors for their phone number, usually in exchange for a discount, early access, or another exclusive perk. For brands expanding into text marketing, it’s one of the fastest ways to grow an SMS list while purchase intent is high.
Most SMS popups are simple. A visitor enters their number, agrees to receive texts, and joins your contact list for future campaigns.
For new ecommerce store owners, choosing a high-converting Shopify theme is essential to starting strong.
These themes eliminate the need for multiple apps by offering built-in tools to streamline conversion optimization. And most importantly, they pay for themselves shortly after launch.
In this guide, we’ll review the highest-converting Shopify themes to help you increase revenue, lower bounce rate, and deliver a seamless shopping experience.
Subscribe to get updates
Get beginner-friendly tips for growing your online business.