The email editor: templates, content blocks, personalization, and Shopify product feeds
This guide covers everything you need to know about creating and designing emails in Getsitecontrol. It walks you through the email editor from start to finish, covering templates, content elements, inbox settings, link management, personalization, and previewing. The email editor is used both for broadcast campaigns and for automated email sequences.
- 1. Opening the email editor
- 2. Choosing a template
- 3. The editor layout
- 4. Inbox elements
- 5. Header
- 6. Body
- 7. Footer
- 8. Content elements
- 9. Managing links
- 10. Previewing the email
- 11. Personalization
- 12. AI text generator
- 13. Checklist before sending
- 14. Common mistakes to avoid
Opening the email editor
The email editor opens whenever you create or edit an email, whether that is a broadcast campaign or an email within an automation. For broadcasts, you access it from the Broadcasts tab by clicking + Create broadcast. For automations, it opens when you add or edit a Send email action inside an automation workflow. In both cases, the first step is selecting a template to work from.
Choosing a template
Before the editor opens, you are presented with a template gallery. From here, you can start with a minimalist blank template and build from scratch; choose one of the premade email templates organized by category and use case; reuse a previously created email or a template you have saved; or, on paid plans, import a custom HTML or ZIP template from an external source.
Regardless of your starting point, every aspect of the template is fully customizable once it is open in the editor. Emails can be saved as templates at any time for future reuse, so that successful designs can be repurposed across multiple campaigns.
AI-adapted template previews
When browsing the gallery, you can preview any template in two modes: Original, which shows the generic version, and Adapted, which automatically tailors the template to your store or website. The adaptation adjusts the language, store name, logo, coupon codes, social links, and overall tone to match your brand before you even open the editor. This gives you a more realistic preview of what the finished email might look like and reduces the manual customization required after selecting a template.
The editor layout
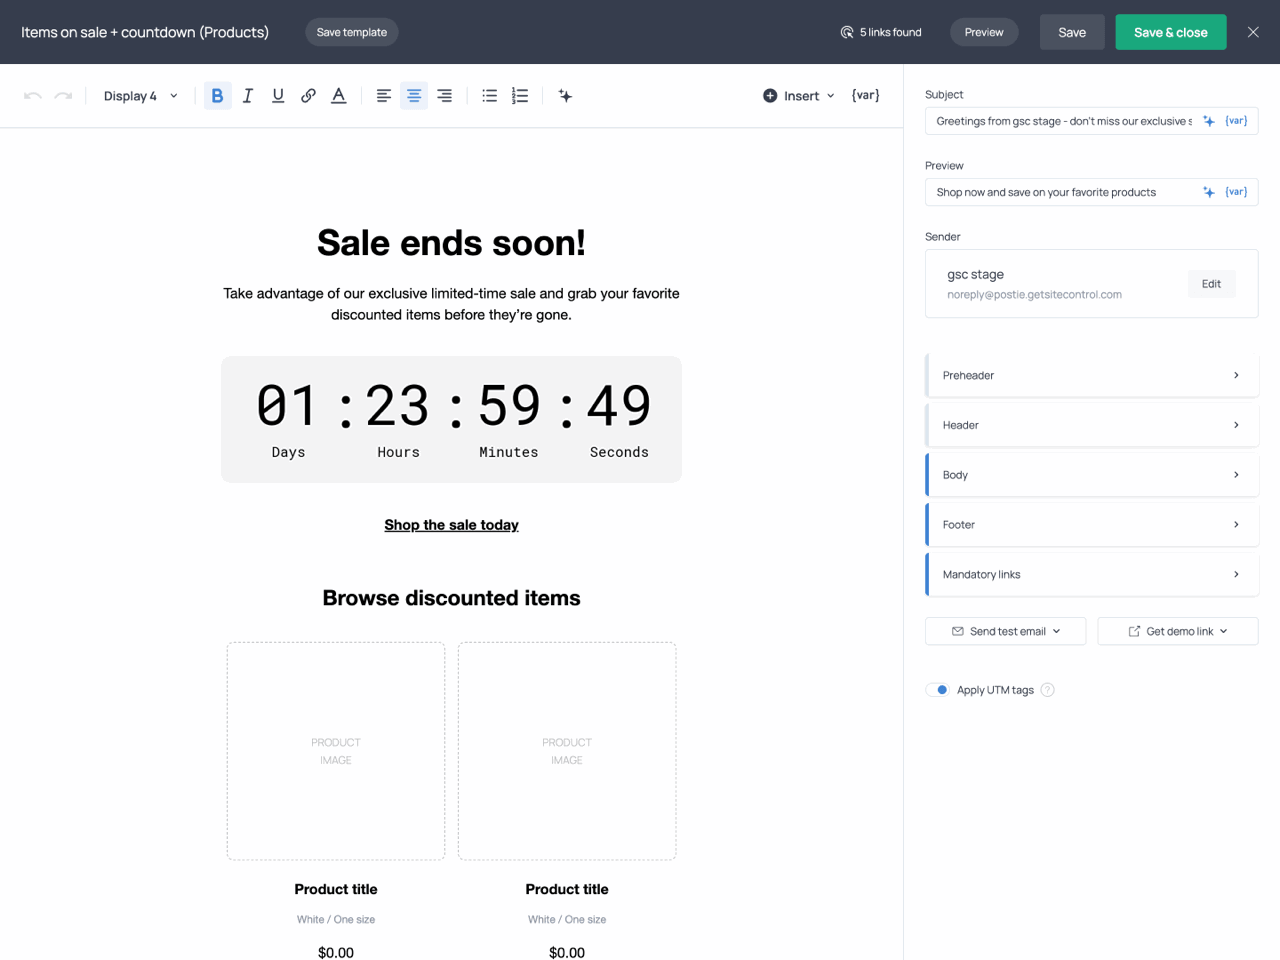
The editor is divided into three main areas. The central area shows a live preview of the email as you build it. At the top of the editor, you will find the toolbar, which includes text formatting controls, the Insert menu for adding new content elements, the {var} menu for inserting personalization variables, and the Preview button. On the right side of the screen, the navigation panel lists the structural sections of the email: Preheader, Header, Body, Footer, and Mandatory links, as well as the inbox elements: Subject, Preview, and Sender. When a structural section (such as the Header) or an email element (such as a countdown timer) is selected, its settings appear in the right-hand panel.
Inbox elements
The inbox elements control how your email appears in the recipient’s inbox before it is opened. These include the subject line, preview text, and sender information. Since recipients see these elements before they read the email itself, they play a key role in whether the email gets opened and trusted.
Subject line
The subject line is the main text recipients see in their inbox. It should clearly reflect the purpose of the email and give recipients a compelling reason to open it. You can insert variables into the subject line using the {var} menu, for example to include the subscriber’s name.
The editor includes a built-in AI assistant to help you improve existing subject lines by rewriting them, shortening or expanding them, fixing grammar, adjusting the tone, translating them into another language, or generating completely new alternatives. And if you want to experiment with subject lines outside the editor, you can use the free Email subject line generator available on the Getsitecontrol website. Simply describe your email, choose a tone, and the tool will generate multiple subject line ideas you can use as a starting point.
Preview text
The preview text appears alongside or below the subject line in most email clients, providing a second line of context that complements the subject. It is an opportunity to add detail that encourages recipients to open the email, completing or reinforcing the message of the subject line.
Sender information
The Sender section lets you define the name that recipients will see in the From field, as well as the reply-to address where responses will be delivered. By default, emails are sent from Getsitecontrol’s shared sending domain, which means inbox placement depends on that domain’s reputation rather than your own.
For stronger deliverability and brand consistency, you can connect your own domain in the Email settings section of the dashboard by adding the required DNS records with your domain provider. These records include SPF, DKIM, and DMARC authentication entries, which prove to receiving mail servers that your emails are legitimately sent from your domain. Once verified, you can select your custom domain as the sender within the email editor, for both broadcasts and automation emails.
Header
The Header is the topmost visible section of the email and is typically where your logo and navigation links appear. It can be enabled or disabled and configured to display a logo, a navigation menu, or both. The logo can be uploaded directly in the editor and linked to any page on your website, while the navigation menu can contain multiple links to give recipients quick access to important content. Several layout options are available to control how these elements are arranged within the header. In addition to its content, you can customize the header’s appearance by adjusting its width, spacing, borders, corner radius, and colors to match your brand.
Body
The Body is the main content area of the email, where you create the message recipients will see after opening it. It can contain text, images, buttons, product recommendations, coupons, countdown timers, and other content designed to inform, engage, or convert your audience.
In addition to adding content, you can customize the overall appearance of the body to match your brand. This includes typography, colors, spacing, borders, and other styling options that affect how the content is presented.
The body is built using content elements, which can be added, arranged, and customized individually. The available elements are covered in more detail in the next section.
Footer
The Footer appears at the bottom of the email and typically contains supporting information about your business. It helps recipients identify the sender, access important pages, and connect with your brand through additional channels.
Depending on your needs, the footer can include navigation links, business details such as your company address, and links to your social media profiles. Including this information not only makes your emails more useful to recipients but can also help you comply with email marketing regulations that require businesses to identify themselves and provide contact information.
Like other sections of the email, the footer can be customized to match your brand. You can adjust its layout, alignment, colors, spacing, borders, and other styling options to create a consistent design throughout the message.
Content elements
Content elements are the individual building blocks placed inside the body of the email. They are added using the Insert menu in the toolbar. Each element has its own settings that appear in the right-hand panel when it is selected.
Image
Adds a static image or animated GIF to the email. Images can be used to showcase products, highlight promotions, reinforce branding, or break up large sections of text. You can upload your own file, use an external image URL, or select media from the built-in gallery. Each image can optionally link to a page of your choice, turning it into a visual call to action. You can customize its presentation by controlling its size, alignment, spacing, borders, corner radius, and background styling, allowing it to blend naturally with the rest of the email.
Button
Adds a call-to-action button. Buttons are the primary interactive element in an email and should clearly direct the reader toward the intended next step, whether that is visiting a product page or returning to a checkout session. In automation emails triggered by a Shopify checkout abandonment, a Continue checkout action is available for buttons, directing the customer back to their saved checkout session so they can complete the purchase without starting over. You can customize the button label, link, colors, size, alignment, and border radius.
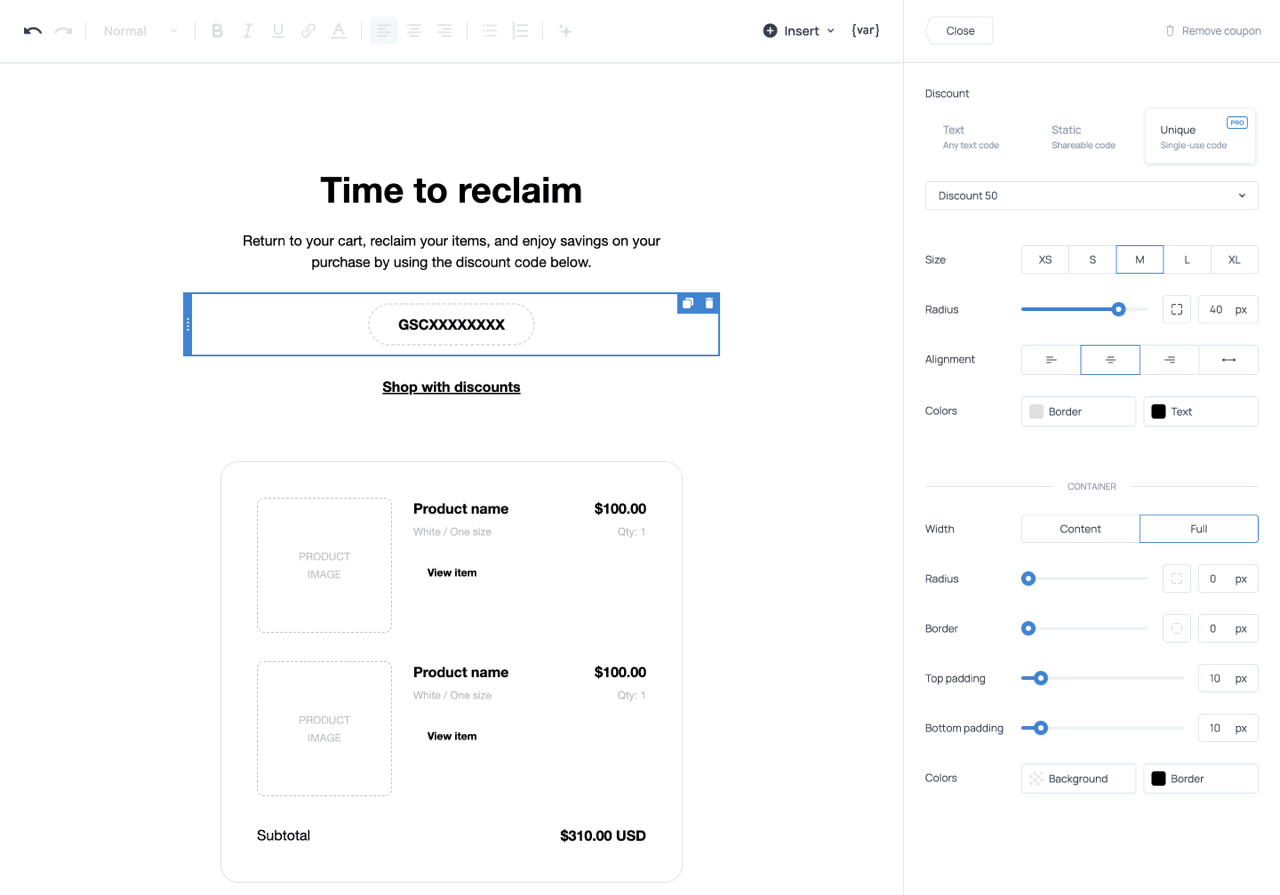
Coupon
Displays a discount code in a visually distinct, styled box within the email, making it easy for recipients to notice and copy. For Shopify stores, the coupon element supports both shareable codes selected from your existing discounts and dynamically generated single-use coupon codes. Each unique code can only be redeemed once, preventing code sharing, improving conversion tracking, and making the offer feel more personal.
Divider
Adds a horizontal separator between sections of content. Dividers organize longer emails by creating visual breaks between different topics, offers, or calls to action, making the content easier to scan. You can customize the divider’s appearance, including its width, thickness, style, color, spacing, and container styling.
Text banner
Adds a standalone text section to the email. It can be used for headings, descriptions, announcements, promotional messages, or any other content that benefits from being separated from surrounding elements. Text banners are particularly useful for structuring longer emails and creating a balanced mix of text and visual content. You can customize the banner’s typography, colors, spacing, and border to match the rest of your email design.
Slideshow
Displays multiple images within a single section of the email. Slideshows are useful for showcasing products, highlighting different features of a single product, presenting multiple offers, or adding visual variety to your email without taking up excessive space.
You can choose how the images are displayed using several layout presets, including Slideshow, Carousel, and Overlay (picture-in-picture). Each slideshow can also be linked to a destination URL. Additional settings allow you to customize the transition behavior, timing, appearance, and container styling.
For Shopify stores, slideshows can also be populated automatically using dynamic product feeds. Instead of selecting images manually, you can display product images pulled directly from your store catalog. Available feeds include bestsellers, on-sale products, newly added products, and products from a specific collection. The displayed products update automatically as your catalog changes. Shopify stores also gain access to ecommerce-specific actions, allowing customers to buy a product instantly, add it to their cart, or apply a discount code directly from the slideshow.
If you’d like to experiment with slideshows outside the editor, you can use the free Image slideshow GIF generator available on the Getsitecontrol website. The tool lets you create animated slideshows from multiple images, customize their appearance, and download the final GIF to use anywhere you like.
Animated text banner
Adds a moving text strip to the email. It can be used for short promotional messages, announcements, discount reminders, or other messages that need highlighting. You can add multiple messages, choose icons to display alongside them, and select the animation type, such as scrolling or sliding. The animated text can also be linked to a destination URL, or, for Shopify stores, assigned ecommerce actions such as Buy now, Add to cart, or Apply discount. Its appearance can be customized by adjusting the font, size, spacing, direction, blink effect, colors, width, background, borders, and corner radius.
If you need a standalone version of this element, you can use the free Scrolling text GIF generator available on the Getsitecontrol website. It allows you to create animated scrolling text GIFs, customize their style and animation settings, and export them for any use.
Countdown
Adds a ticking countdown timer to the email, displaying the time remaining before a promotion expires, a sale ends, or an event begins. Countdown timers create a sense of urgency and encourage recipients to act quickly. You can configure the timer to count down to a specific date and time or use an evergreen countdown, where the timer starts individually for each recipient. The displayed units can be customized to show days, hours, minutes, seconds, or any combination of these, along with optional labels. The timer’s appearance can also be tailored to match your email design, including its style, typography, alignment, colors, animation effects, spacing, and container styling.
If you want to create countdown timers to use outside the editor, you can take advantage of the free Countdown timer GIF generator available on the Getsitecontrol website.
Product cards
Display products directly inside the email, including product images, names, prices, and links. Product cards allow recipients to browse products and navigate to relevant product pages directly from the email, reducing friction in the shopping journey.
For Shopify stores, product cards can be populated automatically using dynamic product feeds. Instead of manually selecting products, the editor pulls product information directly from your store catalog. Available feeds include bestsellers, on-sale products, newly added products, products from a specific collection, and personalized product recommendations based on each customer’s purchase history. As a result, different recipients may see different products in the same email. Shopify stores can also display star ratings from supported review apps, adding social proof directly within the email.
Like other content elements, product cards can be customized to match your email design, including their layout, colors, spacing, buttons, and overall appearance.
Automation-specific product elements
For Shopify stores, automation emails include additional product elements that display products associated with a customer’s activity. These elements are available only for certain automation triggers and are populated automatically based on the products involved in the corresponding event. The Abandoned items element dynamically displays the products a customer left in their cart, and is available in Checkout abandonment emails. The Purchased items element displays the products included in a completed order, used in post-purchase follow-up emails. The Fulfilled items element displays the products included in a fulfilled shipment, used in post-fulfillment emails.
| Email type | Recommended elements |
|---|---|
| Promotional campaign | Image, Animated text banner, Button, Coupon, Countdown |
| Product launch | Image, Slideshow, Product cards, Button |
| Flash sale | Animated text, Coupon, Countdown, Product cards |
| Newsletter | Image, Text banner, Button |
| Checkout abandonment (Shopify) | Abandoned items, Coupon, Continue checkout button |
| Order confirmation (Shopify) | Purchased items, Order ID variable |
| Shipping confirmation (Shopify) | Fulfilled items, Order URL variable |
| Post-purchase follow-up (Shopify) | Purchased items, Product recommendations |
| Customer win-back (Shopify) | Dynamic feed (bestsellers), Coupon |
| New arrivals alert (Shopify) | Dynamic feed (newest) |
Managing links
Link checker
The editor includes a built-in Link checker that automatically scans the email for missing or broken URLs across all text links, buttons, and visual elements. If an issue is detected, a warning appears at the top of the editor prompting you to fix it before continuing. This prevents campaigns from going out with broken links that would reduce conversions and signal low quality to mailbox providers.
UTM tags
The Apply UTM tags option automatically appends UTM tracking parameters to every link in the email when enabled. This allows you to track campaign traffic and performance in Google Analytics or similar tools without manually tagging each URL. The UTM parameter values are configured in the Email settings section of the dashboard, where you can define defaults for Source, Medium, Campaign, Content, and Term, and use variables to dynamically populate them with campaign-specific data such as the email name, subject line, or send date. Separate UTM tag settings are available for broadcasts and automations, keeping their traffic data distinct and allowing you to analyze each campaign type independently.
Previewing the email
Preview window
While designing the email, the Preview button at the top of the editor opens a full preview of the finished message. The preview allows you to switch between desktop and mobile views to verify that the layout is readable and well-proportioned on both device types. It also includes a light and dark mode toggle. When recipients use an email client or device with dark mode enabled, the client may adjust certain colors and visual elements automatically. This can affect contrast between text and background and the visibility of images, logos, and buttons. Reviewing the email in dark mode ensures that all elements remain legible regardless of the recipient’s display settings.
Test email
In addition to the in-editor preview, you can send a test email to a real email address before launching the campaign. This allows you to see the finished message in an actual inbox and identify layout, formatting, or rendering issues that may not be visible in the editor preview.
Keep in mind that some dynamic content, such as automation-specific product recommendations or order information, may only be fully populated when the email is sent through a live automation.
Share preview link
Generate a preview link to share the email with colleagues, clients, or other stakeholders for review before sending. Anyone with the link can view the saved version of the email. Variables and dynamic content remain visible as placeholders in the shared preview and are only replaced with actual content in real emails.
Personalization
Using variables
The {var} menu lets you insert variables into text elements, subject lines, preview text, button labels, and URLs. Variables follow the format {{variable}} and are replaced with real data when the email is sent.
Available variables include standard contact details such as email address, phone number, first name, last name, and full name, as well as any custom fields you have created and collected data for. Additional variables are available in certain Shopify automation emails. Checkout abandonment emails support a Checkout URL variable, which directs customers back to their saved checkout session. New order and Fulfilled order automations also provide Order ID and Order URL variables, making it easy to reference a specific order and link customers to it.
Handwritten signatures
Another way to make emails feel more personal is to include a handwritten-looking signature. This can help create a more human, one-to-one feel, especially in welcome emails, newsletters, founder messages, and customer follow-ups.
To create a signature, you can use the free Calligraphy text generator available on the Getsitecontrol website. The tool lets you generate a signature-style image from any text and download it as a PNG file. You can then add the signature to your email using an image element.
AI text generator
The editor includes a built-in AI writing assistant that can generate, rewrite, or refine text directly inside the editor. You can use it to improve existing copy, adjust the tone, shorten or expand a section, fix grammar, or generate alternative variations. This speeds up the process of adapting template content to your brand’s voice and current campaign without rewriting everything from scratch.
Checklist before sending
- Step 1Review the subject line and preview text.
- Step 2Use the Link checker to review all links and ensure they are present, functional, and leading to the correct pages.
- Step 3Preview the email on desktop and mobile devices.
- Step 4Preview the email in dark mode to check readability and contrast.
- Step 5Send a test email to verify the final appearance in a real inbox.
- Step 6Verify that personalization variables are formatted correctly.
- Step 7Check that coupons, product feeds, recommendations, and other dynamic content are working as expected.
- Step 8Confirm that the sender name and reply-to address are correct.
Common mistakes to avoid
Neglecting inbox elements
Even the most beautifully designed email will underperform if the subject line, preview text, or sender information are unclear. Since these elements are the first things recipients see in their inbox, take the time to review them carefully before sending.
Overloading the email with content
An email that contains too much text, too many images, or an excessive number of content elements can quickly feel cluttered and overwhelming. Instead of trying to communicate everything at once, focus on a single message and use visual elements strategically to support it. A clean, well-structured layout makes it easier for recipients to scan the email and understand its purpose.
Ignoring mobile devices
A large portion of email opens happen on mobile devices. Always review your email in the mobile preview to ensure that images, text, buttons, and spacing remain easy to read and interact with on smaller screens.
Using competing calls to action
When every section asks recipients to do something different, engagement can suffer. Whenever possible, guide readers toward a single primary action and use supporting content to reinforce that goal.
Forgetting to test dynamic content
Variables, product feeds, coupon codes, and automation-specific elements are populated when the email is generated for a specific contact. While the editor preview can help verify the layout, some dynamic content can only be fully validated by triggering the automation under real conditions. Before activating an automation, make sure to test the workflow and confirm that personalized content appears as expected in the delivered email.
Skipping the final review
Small mistakes such as broken links, incorrect sender information, missing images, or formatting issues can negatively affect the recipient experience. Use the Link checker, preview modes, and test emails to perform a final quality check before sending.