Email broadcasts: sending strategies, performance tracking, deliverability, and conversions
Email broadcasts are one-time email campaigns sent to a selected group of subscribers. Unlike automated emails, which are triggered by subscriber behavior or predefined workflows, broadcasts are sent intentionally to deliver a specific message at a defined time and to a selected audience. They are commonly used for time-sensitive communications such as announcements, promotions, product launches, newsletters, or company updates.
When used strategically, broadcast campaigns can support revenue growth by directing subscribers toward specific actions, such as visiting a webpage, exploring products, or taking advantage of limited-time offers. They also generate valuable engagement data. Metrics such as opens, clicks, and other interactions show how subscribers respond to different messages and can be used to optimize future campaigns.
The following sections explain how to create a broadcast, select the audience, choose the appropriate sending mode, evaluate and improve campaign performance.
- 1. Creating the broadcast
- 2. Selecting the audience
- 3. Choosing a sending mode
- 4. Scheduling the broadcast
- 5. Tracking performance
- 6. Resending the broadcast
- 7. A/B testing broadcasts
- 8. Improving deliverability
- 9. Driving engagement and conversions
- 10. Common mistakes to avoid
- 11. Troubleshooting broadcasts
- 12. FAQ
Creating the broadcast
Creating a broadcast campaign begins with building the email that will be sent to subscribers. Broadcasts are created from the Broadcasts tab of the dashboard using the +Create broadcast button, which opens the email editor where you select the starting template and design the content.
Choosing a template
The first step when creating a broadcast email is selecting a template that provides the initial structure of your message. You can begin with a minimalist template and build the message from scratch, select one of the premade email templates provided by the platform, or reuse an existing email or previously saved template. On paid subscription plans, it is also possible to import a custom template in HTML or ZIP format.
Regardless of how you start, templates are fully customizable. Layout sections, visual styling, and content elements can all be modified to support the purpose of the campaign and reflect your brand. Emails can also be saved as templates for future use, allowing successful designs to be reused across multiple campaigns.
Designing the email content
Once a template is selected, you can design the email by adding and arranging content elements in the editor. Common elements include text blocks, images, and CTA buttons, which structure the layout, organize the content, and guide subscribers toward the primary action.
The editor also supports conversion-focused elements that make the email more dynamic and attention-grabbing. These include Countdown timers, Animated text banners, Slideshows, and Product cards.
In Shopify stores, product cards can feature dynamic product feeds, such as best-selling products, on-sale items, new items, products from a specific collection, or recommendations based on purchase history. The latter are personalized for each customer, so every email will be unique and tailored to the customer’s interests. These feeds automatically populate product details, eliminating the need to manually select products or enter their information. Product cards can also display star ratings, providing social proof to encourage purchases.
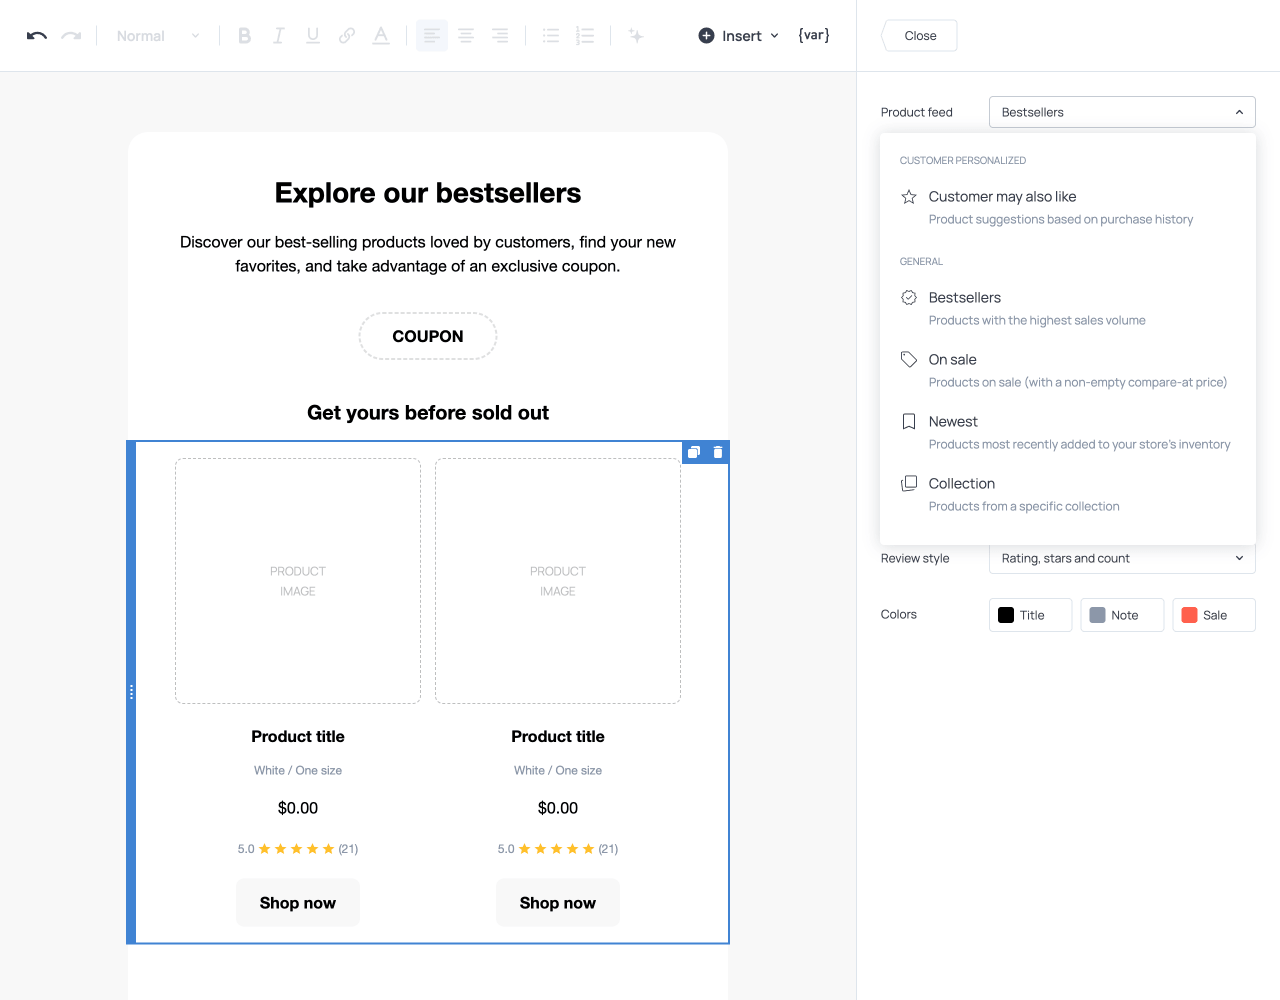
Broadcast email featuring best-selling product feed with star ratings
Previewing the email
While designing the email, you can use the Preview option to check how it will appear across different environments. The preview allows you to switch between desktop and mobile views to ensure that the layout remains clear and readable on all devices. It also includes a light and dark mode option. In dark mode, colors are adjusted automatically by email clients, which can affect the visibility of images, logos, and buttons. Reviewing the email in both modes ensures that all content remains visible regardless of the recipient’s display settings.
Managing and tracking links
The editor provides tools to ensure links in the broadcast are both functional and properly tracked. A built-in Link checker scans the email for missing or broken URLs, including links used in the text and visual elements. If an issue is detected, a warning appears at the top of the editor prompting you to correct the link before continuing. This prevents broadcasts from being delivered with broken links that could affect conversions, user experience, or sender credibility.
The Apply UTM tags option automatically adds UTM parameters to every link in the broadcast. This allows you to track campaign traffic in analytics tools such as Google Analytics without manually adding tracking parameters to individual URLs.
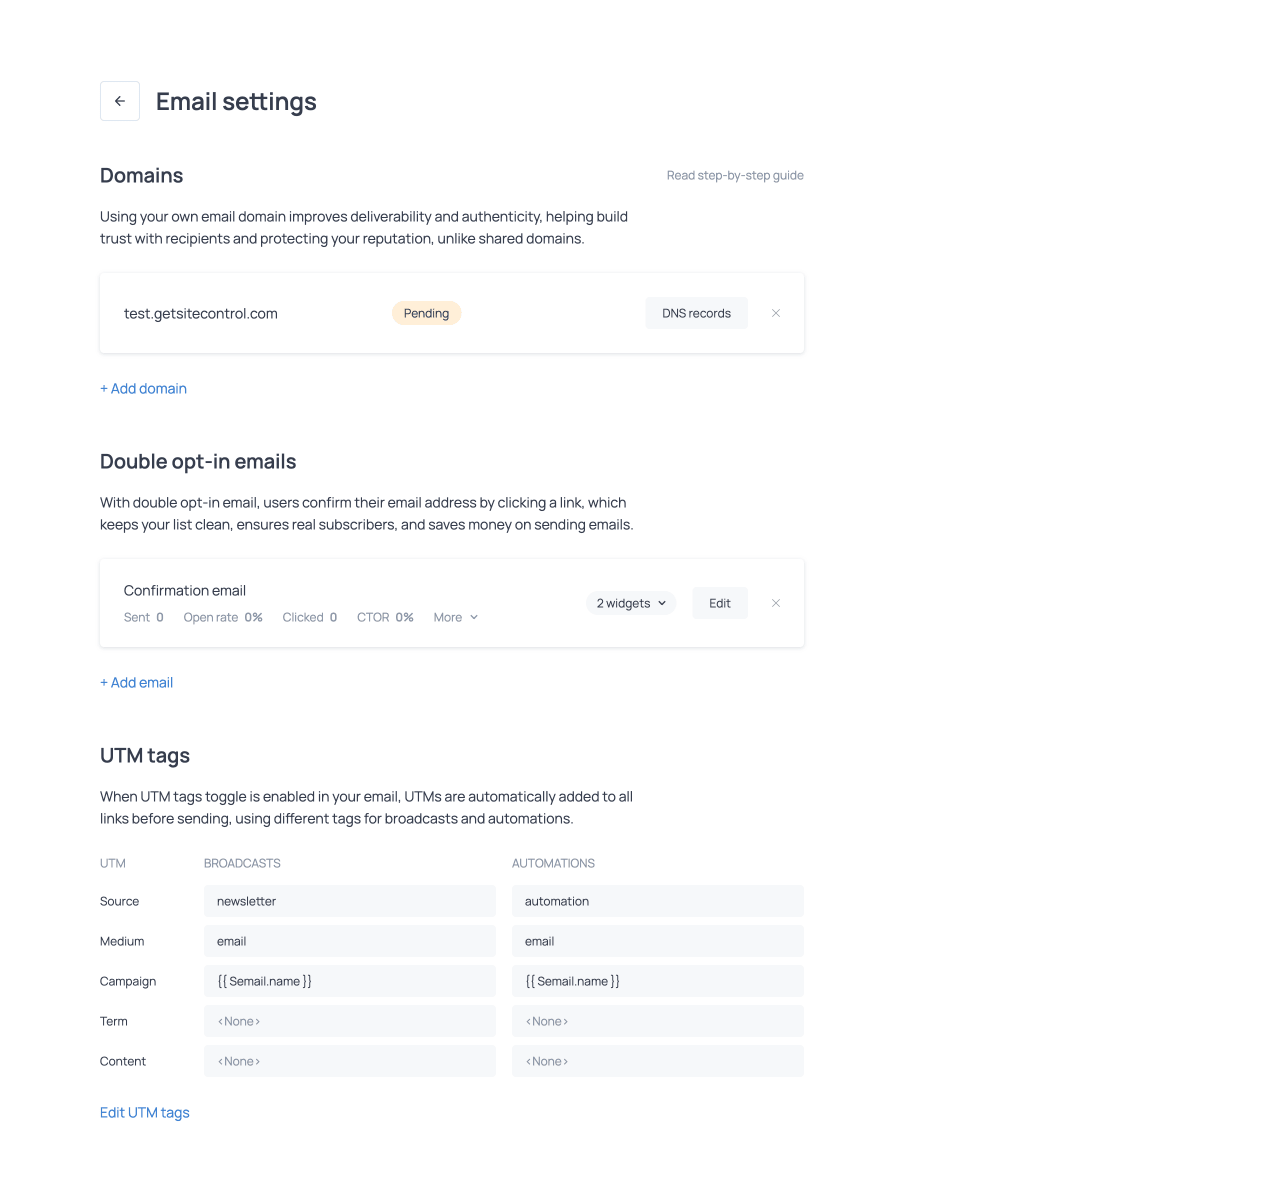
The UTM parameters are configured in the Email settings, accessible from the Sites tab of the dashboard (Store for Shopify users). Here, you can define default values for common UTM parameters such as source, medium, and campaign. These fields can include variables that dynamically insert campaign information into the tracking parameters, such as email name, email subject, or email date. The section features separate UTM tag settings for broadcasts and automations, allowing you to track each type of campaign independently.
Defining inbox elements
In addition to the content of the email itself, broadcast campaigns include several elements that determine how the message appears in the recipient’s inbox.
Subject line
The subject line is the main text displayed in the recipient’s inbox. It tells recipients what the email is about and helps them decide whether to open it. For this reason, it should be concise and relevant, and clearly reflect the content of the message.
Preview text
Preview text is the line of text that appears next to or below the subject line in many email clients. It provides additional context about the message to complete or reinforce the subject.
Sender information
The sender information identifies who the email is from. In the Sender section of the email editor, you specify the name that will appear in the inbox, as well as the reply-to address where you’ll receive responses.
By default, you’ll send emails from Getsitecontrol’s shared sending domain, postie.getsitecontrol.com. Alternatively, you can register and verify your own domain in Getsitecontrol. Then, you’ll be able to set your custom domain as the sender of your broadcasts and specify the exact email address recipients will see in the inbox.
Testing the email
Before proceeding to audience selection and sending, the email can be tested to verify how it appears in the inbox. Testing emails allows you to identify layout or formatting issues that may not be visible in the editor, ensuring the message is displayed correctly across email clients.
Selecting the audience
Audience selection determines which contacts will receive the broadcast. The platform provides two ways to define the recipient list: selecting existing segments or targeting contacts who meet specific conditions.
Targeting contacts from segments
This option allows you to send the broadcast to an existing audience segment. Segments are predefined groups of contacts that share characteristics or behaviors. When using this option, you simply select the segment or segments you want to target, and the broadcast will be sent to the contacts that belong to them. This approach is useful when you have already created segments for specific marketing purposes, such as contacts grouped by engagement level, location, or interest in particular products.
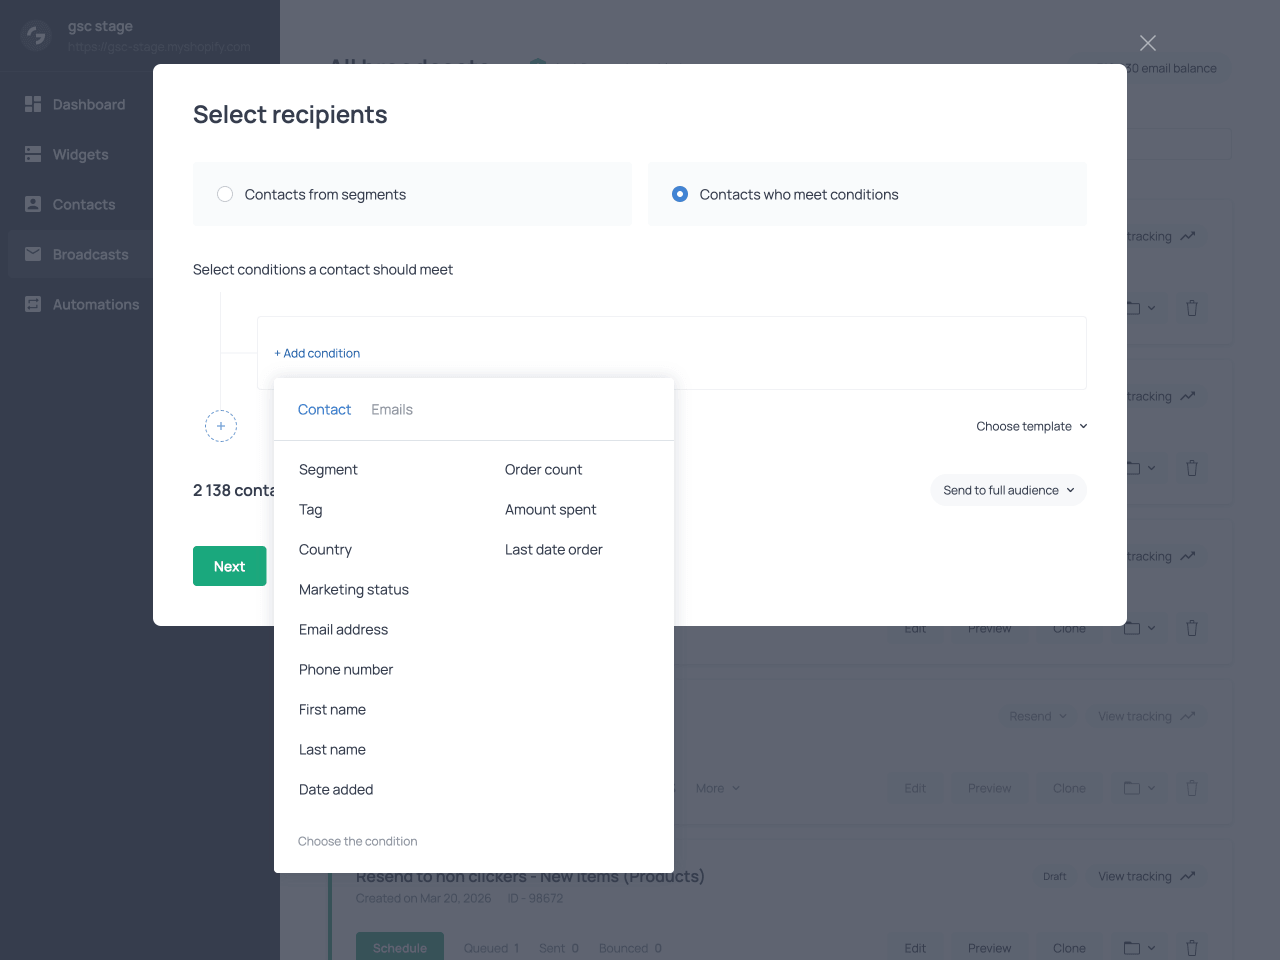
Targeting contacts who meet conditions
This option allows you to define the broadcast audience by applying conditions directly during campaign setup. Instead of selecting an existing segment, this method creates a segment on the spot for the broadcast by specifying the conditions that contacts must meet.
Conditions can be combined using AND and OR operators. The AND operator requires contacts to meet all specified conditions, while the OR operator requires contacts to meet at least one of them. The available conditions fall into two main categories, outlined below.
Contact-based conditions
Contact-based conditions allow you to define the broadcast audience using information stored in the contact profile. These conditions evaluate attributes such as email address, phone number, name, country, assigned tags, marketing status, segment, and the date the contact was added. For Shopify stores, additional attributes are available, including the number of orders placed, the total amount spent, and the date of the most recent order.
Custom fields can also be used in audience conditions. Once created, custom fields appear alongside other contact attributes and can be used to filter broadcast recipients in the same way. Their values can be collected through forms, provided during contact imports, or passed through webhook requests.
In practice, contact-based conditions are often used to narrow the broadcast audience to contacts who share specific characteristics, such as contacts from a particular country, customers who have placed multiple orders, or contacts assigned to a certain tag or segment.
Selecting an audience using contact-based conditions
Email interaction conditions
Email interaction conditions define the broadcast audience based on how contacts have interacted with previous email campaigns. These conditions evaluate whether a contact has received, opened, or clicked an email, how many emails they have interacted with, and the date of the most recent interaction.
Email interaction conditions are often used to target recently engaged contacts, re-engage contacts whose activity has declined, or exclude contacts who have already received or interacted with a previous email.
Premade audience templates
To simplify audience targeting, the platform provides premade audience templates based on common condition combinations. These templates allow you to target specific groups of contacts without manually configuring multiple conditions.
Examples of available templates include all subscribers, subscribers who joined recently, subscribers who have opened or clicked emails recently, or subscribers who haven't received a single email.
For Shopify stores, additional templates that rely on customer purchase data are available. These include customers who bought recently, VIP customers, customers who placed a large number of orders, or subscribers who clicked on emails recently but have not made a purchase. All templates can be customized by adding or removing conditions.
Full audience vs Selected portion
With both audience selection methods, you can decide whether to send the broadcast to the entire audience that matches the selected segments or conditions, or to a smaller portion of that audience.
Choosing Full audience sends the broadcast to all contacts included in the segments or conditions. Choosing Selected portion allows you to reduce the audience size by targeting a subset of contacts. This is useful for testing campaign content, warming up a new sending domain, prioritizing highly engaged contacts, or managing sending volume. With this option, you can specify the exact number of contacts to include in the broadcast and choose how they are selected. The available selection options are outlined below.
| Selected portion | Description |
|---|---|
| Newest | Most recently added contacts |
| Oldest | Earliest added contacts |
| Hottest | Contacts with the highest number of opens and clicks |
| Random | Randomly selected contacts |
Choosing a sending mode
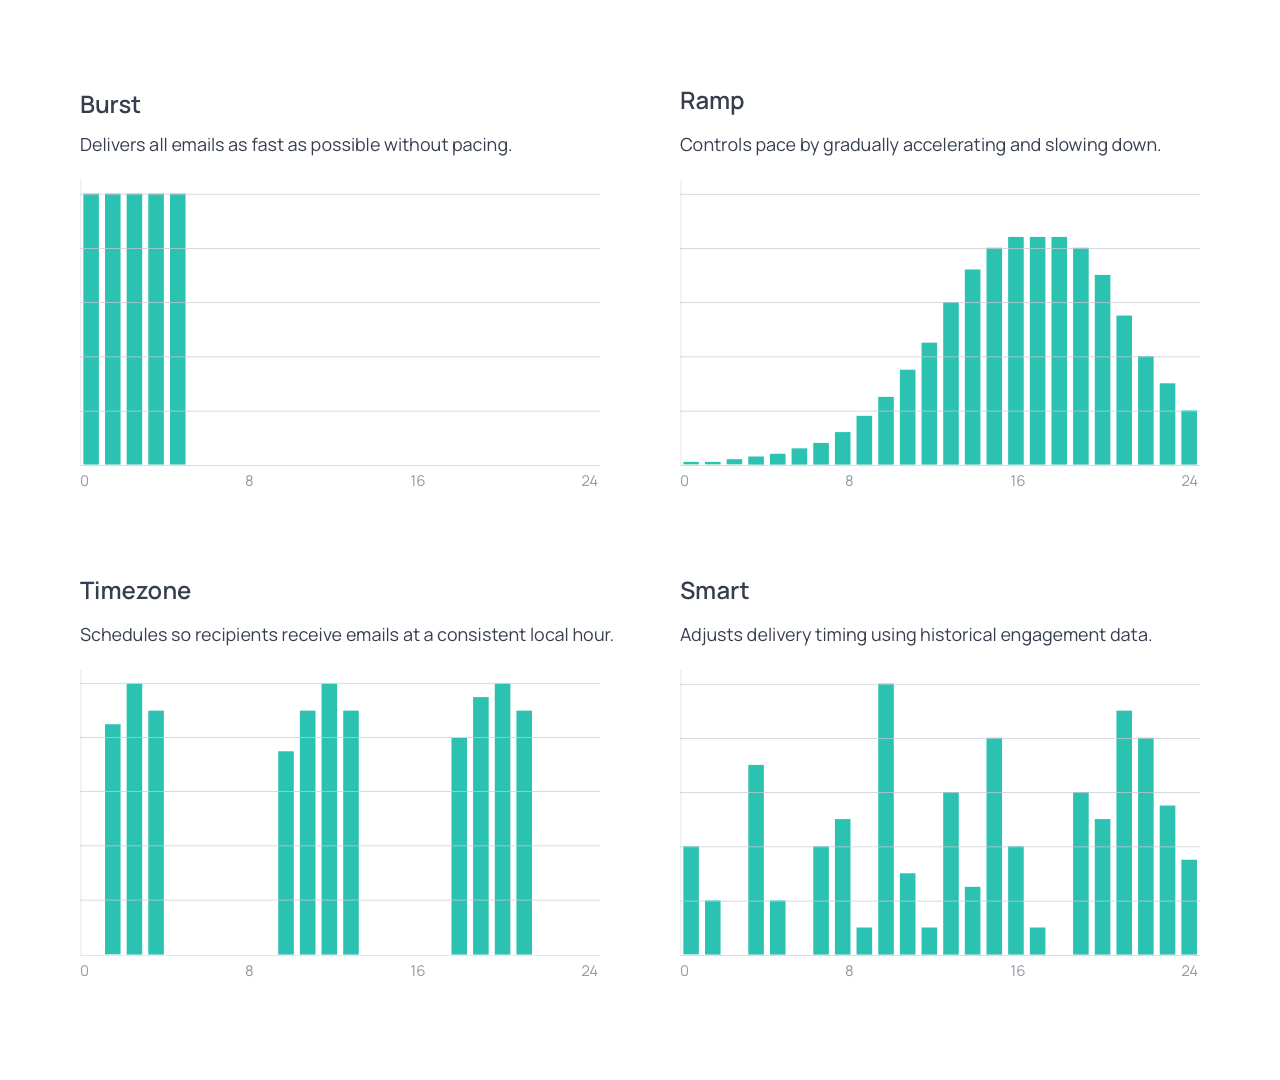
The sending mode determines how broadcast emails are delivered, including the sending pace and the timing of delivery. Different modes use different strategies designed to balance speed, deliverability, and engagement depending on the campaign goal and the audience targeted. The available sending modes and their use cases are outlined below.
Burst
Burst delivers all emails immediately at the maximum available sending speed. This mode does not apply pacing and prioritizes rapid delivery over traffic smoothing.
Burst is typically used for urgent or time-sensitive campaigns that need to reach recipients as quickly as possible. Because emails are delivered at full speed, this option is recommended only for fully warmed sending domains and engaged audiences.
This mode includes a Traffic balancing option. When enabled, the system distributes recipients to reduce spikes in traffic. More engaged (hot) contacts are targeted first, and less engaged (warm and cold) contacts are introduced gradually, to avoid triggering spam filters. Recipient domains such as Gmail, Yahoo, and Outlook are targeted evenly throughout the send, preventing surges toward a single provider. This supports deliverability without slowing down delivery. The traffic balancing feature is only available on paid subscription plans.
Ramp (Pro)
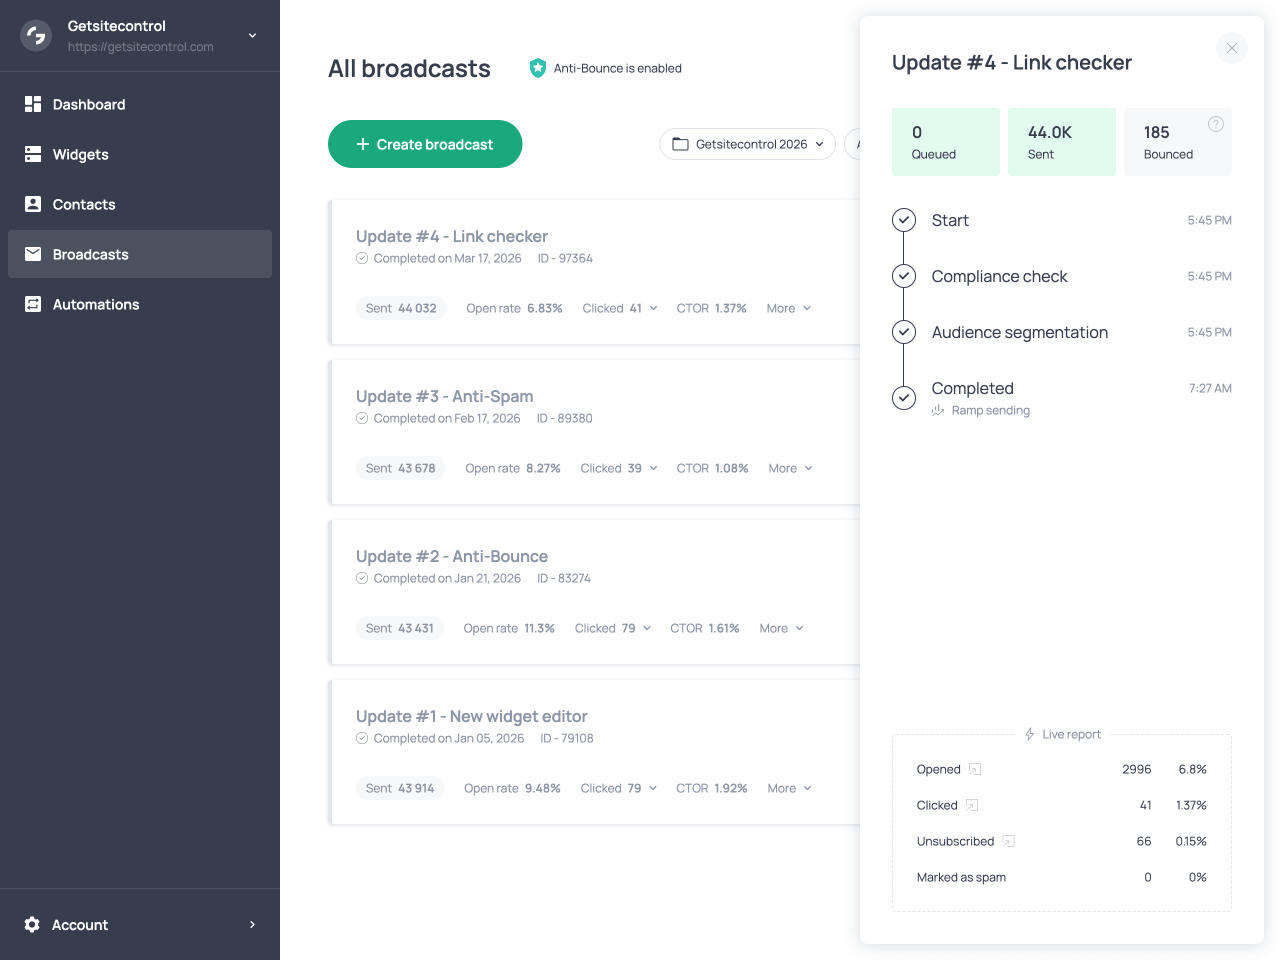
Ramp gradually adjusts the sending speed across a defined delivery window. The sending rate increases progressively, then slows down toward the end of the campaign. This approach creates a natural sending pattern that supports deliverability. The delivery window can be configured to 12, 24, 36, or 48 hours, allowing you to control how gradually the campaign is distributed.
Ramp is commonly used for regular campaigns, audiences that include less active subscribers, or new sending domains that require warming up. This sending mode is only available on paid subscription plans.
Timezone (Pro)
Timezone sends emails according to each contact’s local time. The broadcast is delivered within a 24-hour window so that every contact receives the message at the scheduled hour in their time zone. For example, if the campaign is configured for delivery at 10 AM, each contact will receive the email at 10 AM in their local time.
This mode is useful for time-sensitive promotions or announcements that need to reach contacts at a consistent time across different regions. Timezone is only available on paid subscription plans.
Smart (Pro)
Smart sends emails at the time each contact is most likely to engage, based on past interaction data. Emails are delivered within an adjustable delivery window at the predicted optimal time for each contact. The delivery window can be set to 4, 8, 12, or 24 hours. This approach improves open rates and click rates by aligning delivery with individual behavior. Smart sending is recommended for campaigns targeting warm or highly engaged audiences. It is available on paid subscription plans only.
| Mode | Strategy | Best for |
|---|---|---|
| Burst | Sends emails immediately at maximum speed with no pacing. | Urgent or time-sensitive campaigns for fully warmed domains and engaged audiences. |
| Ramp | Gradually increases and decreases sending speed to maintain a natural sending pattern. | Regular campaigns, colder audiences, or warming up new sending domains. |
| Timezone | Sends emails at the same scheduled hour in each contact’s local time zone. | Time-sensitive campaigns that need to reach contacts at a consistent local hour. |
| Smart | Delivers emails at the predicted best time for each contact based on engagement data. | Campaigns targeting warm or engaged audiences to maximize open and click rates. |
Scheduling the broadcast
After selecting a sending mode, you can choose to start the broadcast immediately or schedule it to begin at a specific date and time. For the Ramp, Timezone, and Smart modes, the selected date and time mark the start of the sending window. During this window, each email is delivered according to the rules of the chosen mode. This scheduling flexibility allows you to prepare campaigns in advance while ensuring delivery follows the chosen sending strategy.
Alternative broadcast creation
Broadcast campaigns can also be created starting from the Contacts section of the dashboard. In this case, first you define the audience by applying filters to the contact list. Once the relevant contacts are displayed, you select them all and click the Send email button to create the broadcast. This opens the email editor, where you choose a template and proceed to design the email. After the email is created, the process continues with selecting the sending mode and scheduling the broadcast, as described in the sections above.
| Method 1 Starting from the email | Method 2 Starting from the audience |
|---|---|
| Create broadcastDesign email (template, content, inbox elements)Select audience (segments or conditions)Choose sending modeSchedule or send broadcast | Select contacts in the Contacts tabClick Send emailDesign email (template, content, inbox elements)Choose sending modeSchedule or send broadcast |
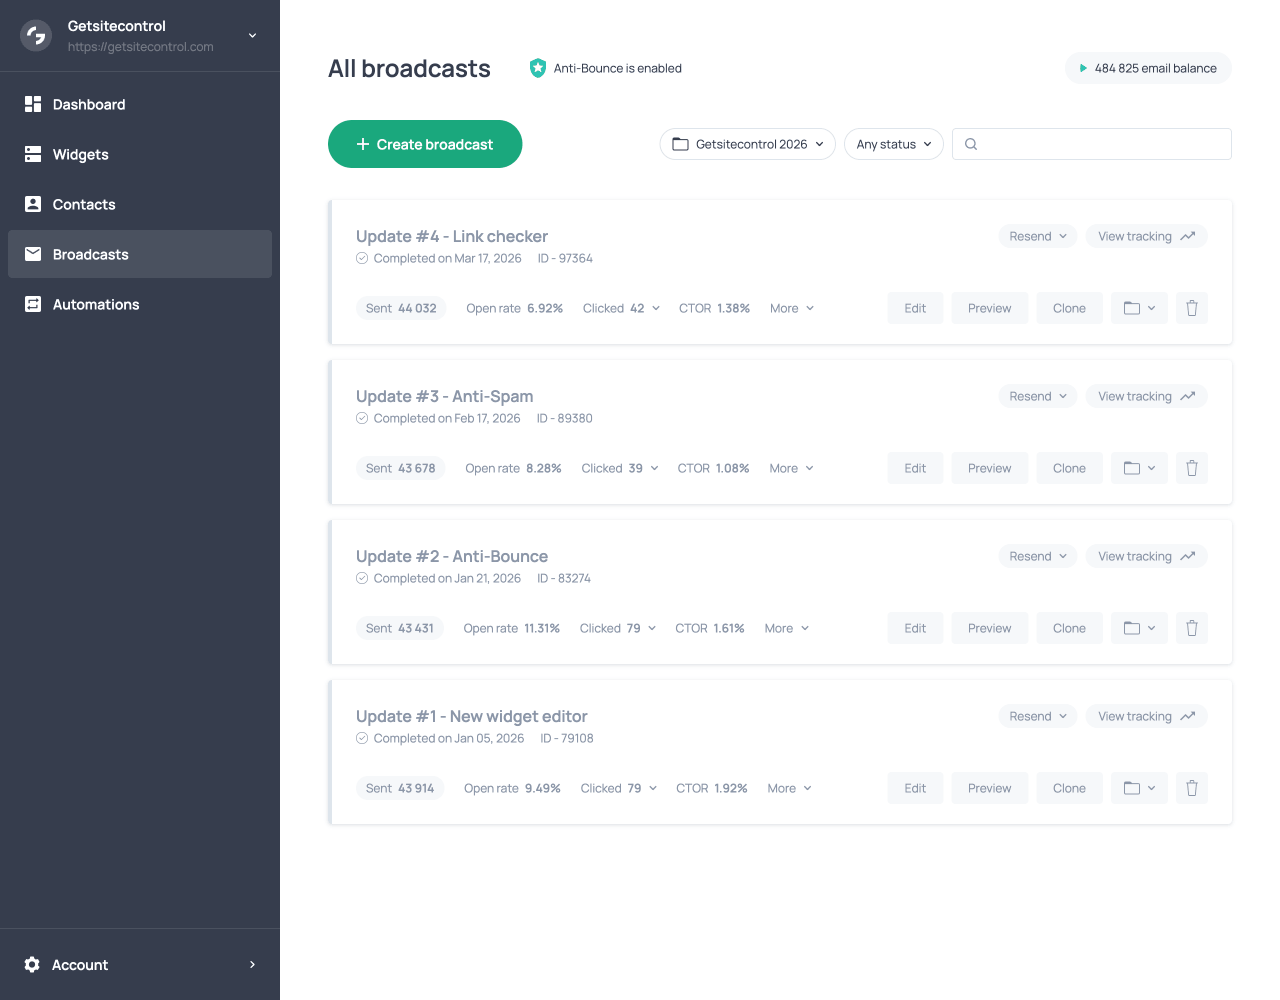
Tracking performance
Live delivery tracking
After a broadcast is launched, its delivery progress can be monitored in real time using the tracking panel, which you can open by clicking View tracking on the broadcast card. This panel displays a timeline with key stages of the sending process, including when the broadcast started, when the compliance check was completed, and when audience segmentation was applied.
At the top of the panel, counters show the number of emails queued, sent, and bounced. These values update in real time, allowing you to monitor delivery while the broadcast is running.
At the bottom of the panel, the Live report section displays real-time engagement data as contacts interact with the message. This section shows counts and percentages for contacts who have opened the email, clicked a link, unsubscribed, or marked the email as spam. Each metric can be opened to view the contacts associated with that interaction.
Performance metrics
Once the broadcast has finished running, its performance can be reviewed from the broadcast card in the Broadcasts tab. Each broadcast card displays a set of statistics that provide an overview of the campaign’s performance. These include the number of emails sent, the open rate, the number of clicks, and the click-to-open rate (CTOR). Additional delivery and engagement metrics are available under the More dropdown menu on the broadcast card. These include the number of delivered emails, bounced messages, unsubscribes, and spam reports.
Many of these metrics are interactive. For example, selecting the Clicked metric on the broadcast card displays a breakdown of all links and buttons in the email, including their URLs, labels, and the number of clicks each received. Metrics under the More dropdown provide contact-level details. Selecting the Clicked metric there opens the list of contacts who clicked links in the broadcast. This allows you to understand which elements generated engagement and how different audience segments responded to the campaign.
Recap: setting up and launching a broadcast
- Choose a template and design the email content.
- Enter subject line, preview text, and sender information.
- Check links, preview, and test the email.
- Select the audience using segments or conditions.
- Choose the sending mode based on timing and audience.
- Schedule the broadcast or start it immediately.
- Monitor delivery and engagement in the tracking panel, then review performance metrics after completion.
Resending the broadcast
The Resend option allows you to send the broadcast again to a subset of contacts. This option is available from the broadcast card in the Broadcasts tab. It is commonly used as a follow-up strategy to reach contacts who did not open or click the original message, to increase visibility and engagement. It can also be used to improve results when a broadcast does not perform as expected. When resending a broadcast, you can choose from the following options to target different subsets of contacts.
| Resend option | Description |
|---|---|
| Resend to non-openers | Sends the broadcast to contacts who received the email but did not open it. |
| Resend to non-clickers | Sends the broadcast to contacts who opened the email but did not click any links. |
| Resend to non-recipients | Sends the broadcast to contacts who were eligible but did not receive the email, for example those who subscribed after the original campaign was sent or those excluded by a partial send. |
After selecting an option, a new broadcast is created based on the original campaign. Before launching the resend, you can review the email and adjust its content. For example, it is common to update the subject line or preview text to improve open rates.
Once the email is ready, the resend follows the same workflow as any other broadcast. You can send it to the full audience or to a selected portion, choose the sending mode, and schedule the delivery.
A/B testing broadcasts (Pro)
While the resend option allows you to improve performance after a broadcast is sent, A/B testing helps you identify the most effective version in advance. It compares multiple versions of a broadcast by sending them to a percentage of the selected audience first and then delivering the best-performing version to the rest. This feature is typically used to test variations in subject lines, sender information, content, layout, or calls to action. A/B testing is available on paid subscription plans only.
Flexible variant setup
Variants are created using the Add variant option on the broadcast card, with each variant representing a separate version of the email that can differ in subject line, sender domain, sender information, and email content. Getsitecontrol uses a flexible A/B testing approach that allows you to create fully independent variants without limiting what can be changed. The system detects what differs between variants and uses those differences to evaluate performance. This makes it possible to test any combination of changes without predefined constraints.
Test configuration
A/B testing is enabled from the broadcast card, and its settings are configured when scheduling the broadcast. At this stage, you define what percentage of the selected audience will be used for testing and how long the system should wait after sending the test variants before selecting a winner (to allow time for contacts to interact with the email). The selected percentage is split evenly across all variants. For example, if 30% of the audience is used for testing with three variants, each variant is sent to 10%. A/B tests are always sent using the Burst mode with Traffic balancing enabled.
Intelligent winner selection
After the variants are sent to the test percentage of the audience, the system waits for the defined period to collect engagement data. It then evaluates the results and selects the best-performing version. The winning variant is then delivered to the remaining audience. Performance metrics for each variant, such as open rate, clicks, and click-to-open rate, are available during the test and after the broadcast is completed for further analysis.
Manual winner selection
The winning variant can also be selected manually before the waiting period ends using the Choose winner option on the broadcast card. This allows you to conclude the test early and send the chosen version to the remaining audience.
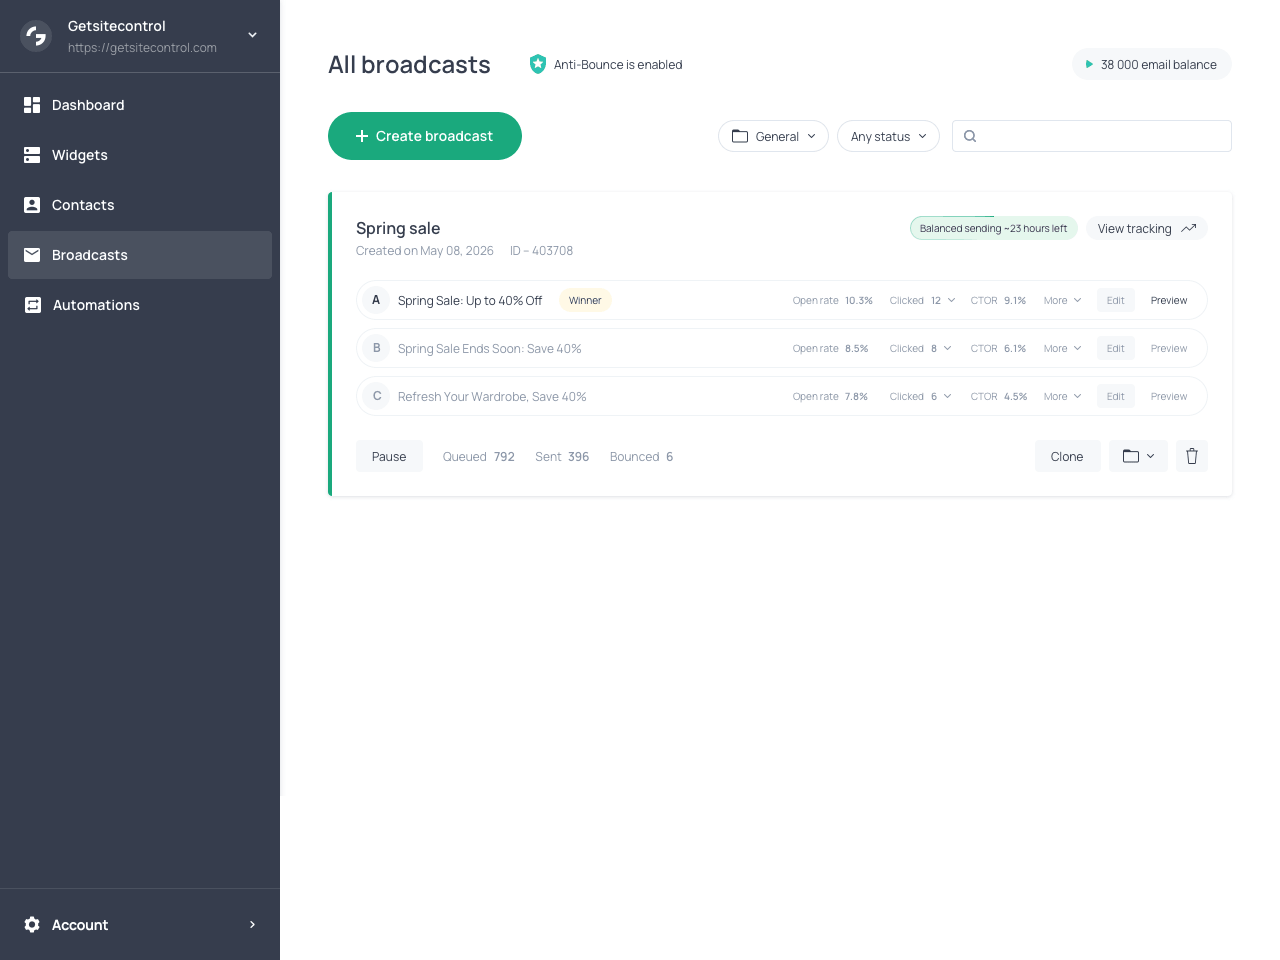
Broadcast card with active A/B test showing variants and their open, click, and CTOR metrics
Improving deliverability
Email deliverability is the ability of a message to reach the inbox rather than being filtered into spam or other folders. This is the foundation of any broadcast campaign: if your emails do not reach subscribers’ inboxes, they cannot be opened, clicked, or generate website visits or purchases. Mailbox providers such as Gmail, Outlook, and Yahoo determine inbox placement by evaluating sender reputation, authentication records, sending patterns, and recipient engagement. For this reason, Getsitecontrol provides several built-in features to support good sending practices, protect sender reputation, and ensure that your emails reach subscribers’ inboxes.
Choose the right sending mode
Broadcast campaigns allow you to choose a sending mode that determines how emails are distributed across recipients. Selecting the appropriate mode maintains natural sending patterns, supports sender reputation, and reduces the risk of messages being filtered into spam.
The Ramp mode gradually increases and decreases the sending speed during the campaign’s delivery window. This creates a sending pattern that looks natural to mailbox providers. This mode is useful when sending to larger audiences, less active contacts, or from a new domain that is still building its reputation.
The Smart mode distributes emails across the delivery window at the times each recipient is most likely to engage. By sending messages when recipients are keen to open or interact, this mode improves the engagement signals that mailbox providers use to evaluate sender reputation.
When using Burst mode, the Traffic balancing option reduces sudden spikes in sending activity, which mailbox providers consider suspicious. With this option enabled, delivery starts with more engaged (hot) contacts, while less engaged (warm and cold) contacts are introduced progressively. At the same time, emails are evenly distributed across Gmail, Yahoo, and Outlook, avoiding concentration on a single provider.
Send from your own domain
Sending broadcasts from a verified custom domain is one of the most important steps for maintaining strong deliverability. By default, if a custom domain is not configured, emails are sent using Getsitecontrol’s shared domain. In this case, deliverability depends on the reputation of the shared domain, which is not under your direct control.
When you send emails from your domain, mailbox providers associate your messages with your brand and evaluate them based on your own sending reputation. By building your reputation over time, you can achieve more consistent inbox placement.
To use your own domain, configure and verify it in the Email settings section of the dashboard by adding the required DNS records with your domain provider. These records include authentication mechanisms such as DKIM, SPF, and DMARC, which confirm that your emails are legitimately sent from your domain.
Once the domain is verified, you can select it as the sender for your broadcast campaigns. In addition to improving deliverability, using your own domain strengthens brand recognition, because recipients consistently see it in the sender address.
Keep bounce rates low with Anti-Bounce
Getsitecontrol includes a built-in Anti-Bounce feature that validates email addresses before sending. This is useful for contacts collected without validation, imported from external sources, or that have become outdated over time. When enabled, the system checks each address and identifies potential problems before the message is delivered. Each validation uses two emails from your sending balance.
By filtering out invalid addresses before sending, Anti-Bounce keeps your bounce rate low or near zero. Since mailbox providers monitor bounce rates when evaluating sender reputation, maintaining a low bounce rate improves overall deliverability and ensures that your broadcasts reach the inbox.
Collect valid contacts at signup
It is equally important to ensure that only legitimate addresses are added to your contact list in the first place. Features such as Double opt-in emails and Google reCAPTCHA maintain list quality at the point of signup. Double opt-in requires new subscribers to confirm their email address before being added to the list, preventing mistyped or fake addresses from entering your database. ReCAPTCHA blocks automated bot submissions, stopping invalid contacts from being collected through signup forms.
Target relevant audience segments
Mailbox providers evaluate how recipients interact with emails. Messages that are opened, clicked, or otherwise engaged with are more likely to be treated as relevant, while emails that are ignored or marked as spam can negatively affect sender reputation.
For broadcast campaigns, engagement depends largely on how the audience is selected. Using segments or conditions allows you to target contacts based on their activity and interests, ensuring the campaign reaches subscribers who are likely to engage. Sending broadcasts to relevant audience groups generates stronger engagement signals and improves overall deliverability.
If a campaign does not achieve the expected level of engagement, you can use the Resend option to retarget subscribers who did not interact with the original message. This can improve overall engagement without repeatedly sending to already engaged contacts.
Timing also plays a role. Using sending modes such as Smart or Timezone delivers emails when recipients are more likely to open and interact with the message, further strengthening engagement. Personalization reinforces this effect. Using variables to include subscriber data in the email subject line or body, such as the subscriber’s name, can make the message feel more personal and increase interaction.
Use clear and balanced email design
In broadcast campaigns, emails are sent to many recipients at once. Mailbox providers evaluate these messages in bulk, looking for patterns across the entire send. If the email structure appears problematic, for example too many large images, unclear content, or inconsistent formatting, this can affect how the entire campaign is classified, increasing the risk of landing in spam and harming sender reputation.
Maintaining a clear structure with a balanced use of text and visual elements ensures the message is easy to understand across email clients, even if images don’t load properly. Well-structured content also makes it easier for recipients to understand the purpose of the email and take action. To achieve this with minimal effort, you can use our premade templates as a base for your emails. The templates are designed according to email best practices, with a clear structure, balanced layouts, mobile-friendly formatting, and prominent calls to action.
It is also important that the subject line reflects the content of the message. Misleading or overly aggressive wording, excessive punctuation, or a mismatch between subject and content can reduce trust and negatively impact deliverability.
Driving engagement and conversions
While deliverability determines whether a broadcast reaches inboxes, performance depends on how subscribers interact with the message once it is opened. Unlike automated emails, which are part of a sequence, broadcasts are standalone messages. This makes clarity and focus especially important. The content, structure, and visual elements of the email should work together to make the message easy to understand and the next step obvious. In other words, broadcasts need to communicate value quickly and guide subscribers toward a clear action.
Focus on a single goal
Each broadcast should center around one primary goal. Whether the campaign promotes a product, announces a sale, or shares an update, the message should be structured around a single action you want subscribers to take. When multiple messages compete within the same email, the result is often unclear and less effective. A focused structure helps subscribers quickly understand the purpose of the email and reduces hesitation in taking action.
Guide attention toward the CTA
The layout of the email should lead the reader toward the call to action. Clear headings, concise text, and logical flow structure the message so that the most important information stands out. Call-to-action buttons should be visually distinct and easy to find. Supporting elements such as images, banners, or highlighted sections can reinforce the main message and direct attention toward the desired action.
Use dynamic elements to draw attention
Broadcast emails compete for attention in crowded inboxes, so incorporating dynamic elements helps highlight key content and maintain interest.
Countdown timers underline time-sensitive offers or upcoming events, creating urgency and encouraging immediate action. Animated text banners draw attention to important messages and direct focus toward the call to action.
Product cards allow you to present products directly within the email, including images, pricing, and links. For Shopify stores, product cards can be populated automatically using dynamic product feeds such as best-selling products, discounted items, or products from a specific collection. They can also display customer ratings, which add social proof and reduce hesitation. Featuring a detailed product feed in the email allows customers to evaluate an offer without leaving the email.
Slideshows display multiple products or visuals within a single section, showcasing more options without overwhelming the layout. This maintains clarity while increasing the chances that recipients find something relevant and click through.
Match the message to the audience
Broadcast performance depends on how well the message resonates with the audience. Thanks to segmentation and condition-based targeting, the content can be adapted to reflect subscriber behavior, interests, or purchase history. For example, campaigns sent to highly engaged contacts can focus on new offers or updates, while broadcasts targeting less active contacts may require stronger incentives.
Align sending mode with campaign timing
Choosing the appropriate sending mode is not only important for deliverability, but also plays a key role in driving conversions. The timing and distribution of a broadcast directly affect when recipients see the message and how likely they are to open, click, and take action. Different sending modes support different campaign goals. The examples below illustrate how each mode can be used in practical scenarios.
| Scenario | Sending mode |
|---|---|
| Flash sale starting now | Burst |
| Limited-time discount ending soon | |
| Product launch announcement to active subscribers | |
| First campaign from a newly verified domain | Ramp (Pro) |
| Campaign sent to a large, mixed-engagement list | |
| Re-engagement campaign for inactive subscribers | |
| Seasonal promotion sent to a global audience | Timezone (Pro) |
| Newsletter scheduled for 10:00 AM in each region | |
| Event announcement sent to a global audience | |
| Promotion sent to recently engaged subscribers | Smart (Pro) |
| Campaign where maximizing open rate is the priority | |
| Follow-up campaign targeting active users |
Common mistakes to avoid
| Mistake | Consequence |
|---|---|
| Not defining a clear objective for the broadcast | The message becomes unclear, reducing engagement and click-through rates |
| Targeting the wrong audience or not using segmentation | Emails are less relevant, leading to lower engagement and potential damage to sender reputation |
| Sending to the full audience without considering engagement level | Increased risk of low engagement, higher spam complaints, and reduced deliverability |
| Using the wrong sending mode for the audience or campaign type | Unnatural sending patterns or poor timing can reduce inbox placement and engagement |
| Not testing a broadcast before launch | Formatting issues, broken layouts, or missing elements may reach recipients and harm credibility |
| Not using the link checker | Broken or incomplete links may go unnoticed, preventing users from taking action and thus reducing conversions |
| Overloading emails with too many images or unclear structure | Emails may be flagged by mailbox providers and filtered into spam |
| Using misleading or overly aggressive subject lines | Reduced trust, lower open rates, and increased spam complaints |
| Ignoring broadcast tracking after launch | Missed opportunity to identify issues early and adjust future campaigns |
| Not using the resend option after low engagement | Missed opportunity to reach additional recipients and drive more engagement |
| Sending to unverified or low-quality contact lists | Higher bounce rates and long-term damage to sender reputation |
Troubleshooting broadcasts
| Issue | What to do |
|---|---|
| Low open rate | Review the subject line and sender information, then resend the broadcast to non-openers with an improved subject line. |
| Low click rate | Simplify the message, make the call to action more prominent, and ensure it is clearly visible within the layout. |
| Low engagement overall | Refine audience targeting using segments or conditions, or send to a more engaged portion of contacts. |
| High unsubscribe rate | Review audience selection and adjust the message to match the expectations of the recipients. |
| High bounce rate | Enable Anti-Bounce and review the quality of your contact list, especially imported or older contacts. |
| Emails landing in spam | Use a more gradual sending mode such as Ramp, review email structure, and ensure your sending domain is properly authenticated. |
| Missing or incorrect tracking data | Verify UTM settings and ensure the Apply UTM tags option is enabled in the email editor. |
| Links not working in the email | Use the link checker and send a test email to confirm all links are correct and functional. |
| Lower performance than expected after sending | Use the Resend option to target non-openers, non-clickers, or contacts who did not receive the original broadcast. |
FAQ
Broadcast vs automation: what’s the difference?
Broadcasts are one-time campaigns sent to a selected audience at a specific moment. Automated emails are sent automatically when a subscriber performs a specific action or meets certain conditions, such as signing up, making a purchase, or clicking a link.
When should I use a broadcast?
Broadcasts are best for time-sensitive communication such as promotions, announcements, product launches, or newsletters. Automations are better suited to automatically send messages in response to subscriber actions, such as welcome emails, order confirmations, or follow-ups after a click or purchase.
What are segments vs conditions?
When selecting the recipients for a broadcast, you can either use segments or conditions. Segments are groups of contacts that you create in advance based on specific criteria. Choosing segments means selecting from audience groups you have already set up. Conditions allow you to define the audience directly during broadcast setup, without using a predefined segment. This lets you build the target audience on the spot for that specific broadcast.
Can I send to part of my audience?
Yes. After you select recipients using segments or conditions, you can send to the full filtered audience or to a selected portion based on criteria such as newest contacts, most engaged contacts, or a random sample. This is useful for testing, warming up a domain, or controlling sending volume.
How do I choose the right sending mode?
The choice depends on your campaign goal and audience. Use Burst for urgent messages, Ramp for gradual and safer delivery, Timezone for consistent local delivery, and Smart to optimize engagement based on recipient behavior.
How can I check my email before sending?
You can use the Preview option in the editor to check how the email looks on desktop and mobile devices, as well as in light and dark mode, to ensure all elements remain visible across different display settings. You can then send a test email to review how the message appears in a real inbox, to identify layout or formatting issues that may not be visible in the editor. A built-in link checker automatically scans the email for missing or broken URLs and alerts you to fix them before sending.
Why is sending from a custom domain important?
Sending from your own domain allows mailbox providers to evaluate your campaigns based on your own sender reputation rather than a shared one. As you build your sender reputation, you can achieve and maintain stable deliverability.
Why are my emails going to spam?
This can happen due to poor sender reputation, unverified sending domain, low engagement, or issues with email structure. Using a verified domain, choosing the right sending mode, and maintaining a clean contact list can improve deliverability.
Can I track contact interactions?
Yes. During and after a broadcast, performance metrics provide insight into how recipients interact with the campaign. Most metrics are clickable and open detailed lists of contacts who opened, clicked, unsubscribed, or marked the email as spam.
How does UTM tracking work in broadcasts?
When enabled, UTM tags are automatically added to all links in the email. This allows you to track visits and campaign performance in analytics tools without manually adding tracking parameters.
How can I use data to improve future broadcasts?
Metrics such as opens, clicks, and interaction history can be used to identify engaged and inactive segments. This data can guide audience selection, sending strategies, and content adjustments in future campaigns.