Contact management: fields, tags, segments, filtering, and contact history
The Contacts section in Getsitecontrol is your central database. It includes all contacts who have submitted one of your forms or have been imported from an external source, and it gives you the tools to organize and manage them.
With proper contact management, you can keep your audience data structured, group contacts based on their attributes and behavior, and target them more effectively in your campaigns.
Fields store specific data about each contact, such as their name, location, or any custom information you collect. Tags let you label contacts based on their preferences, source, or actions. Segments use conditions based on fields, tags, and activity to create dynamic groups that update automatically as your audience changes.
This article describes the Contacts section and explains how to work with the contact list, fields, tags, segments, and the individual contact card with the contact’s history.
- 1. The contact list
- 2. Fields
- 3. Tags
- 4. Segments
- 5. The contact card
- 6. How it all works together
- 7. Segments and email performance
- 8. FAQ
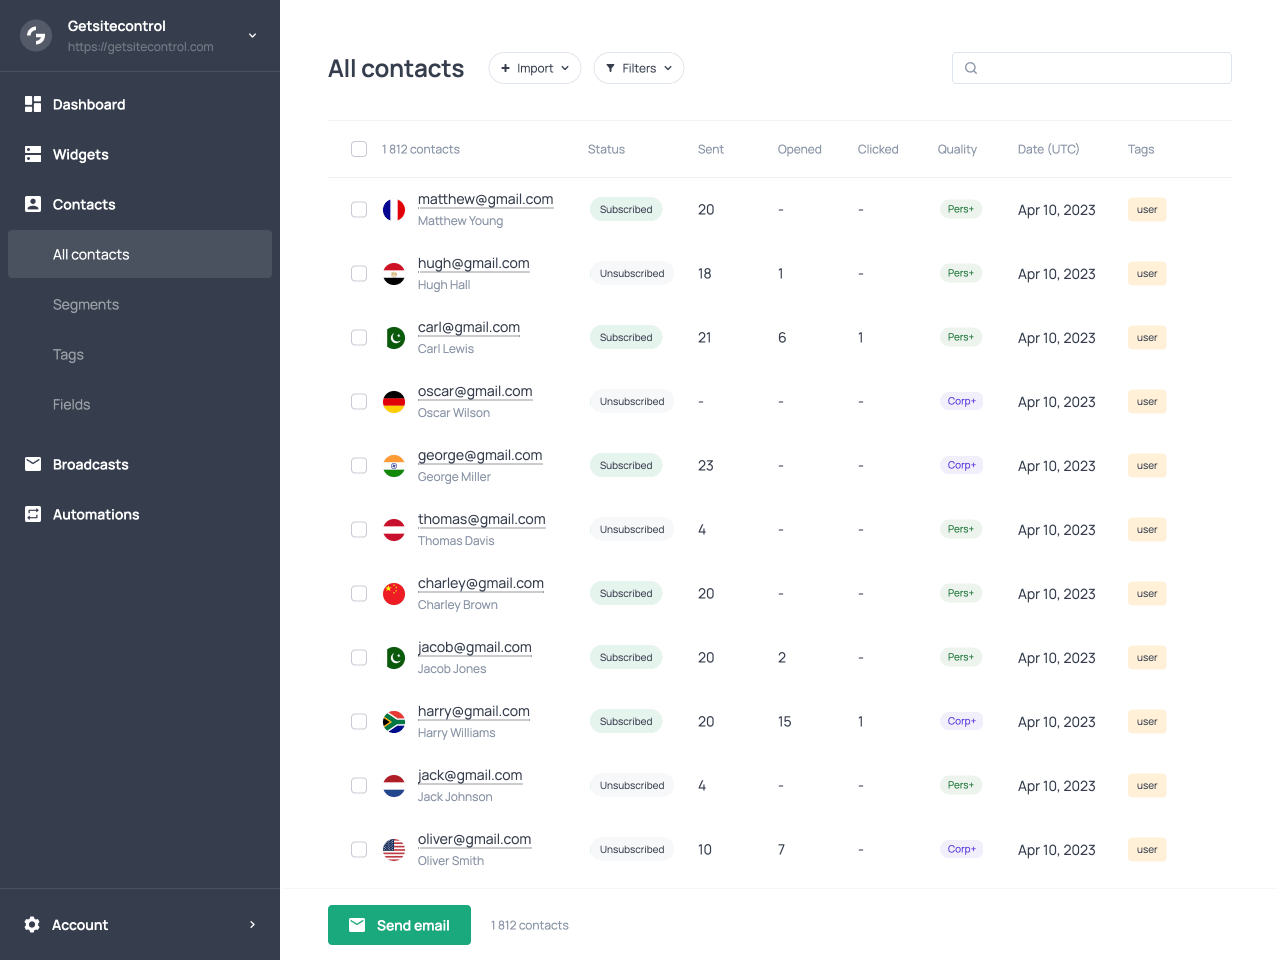
The contact list
When you open Contacts in the left navigation, you see your full database. Each row displays the contact’s email address, marketing status (Subscribed, Unsubscribed, or Bounced), first and last name if collected, the date they were added, and any tags assigned to them. Additionally, you can see how many emails the contact received, opened, and clicked, and an indicator of the contact’s quality.
Importing contacts
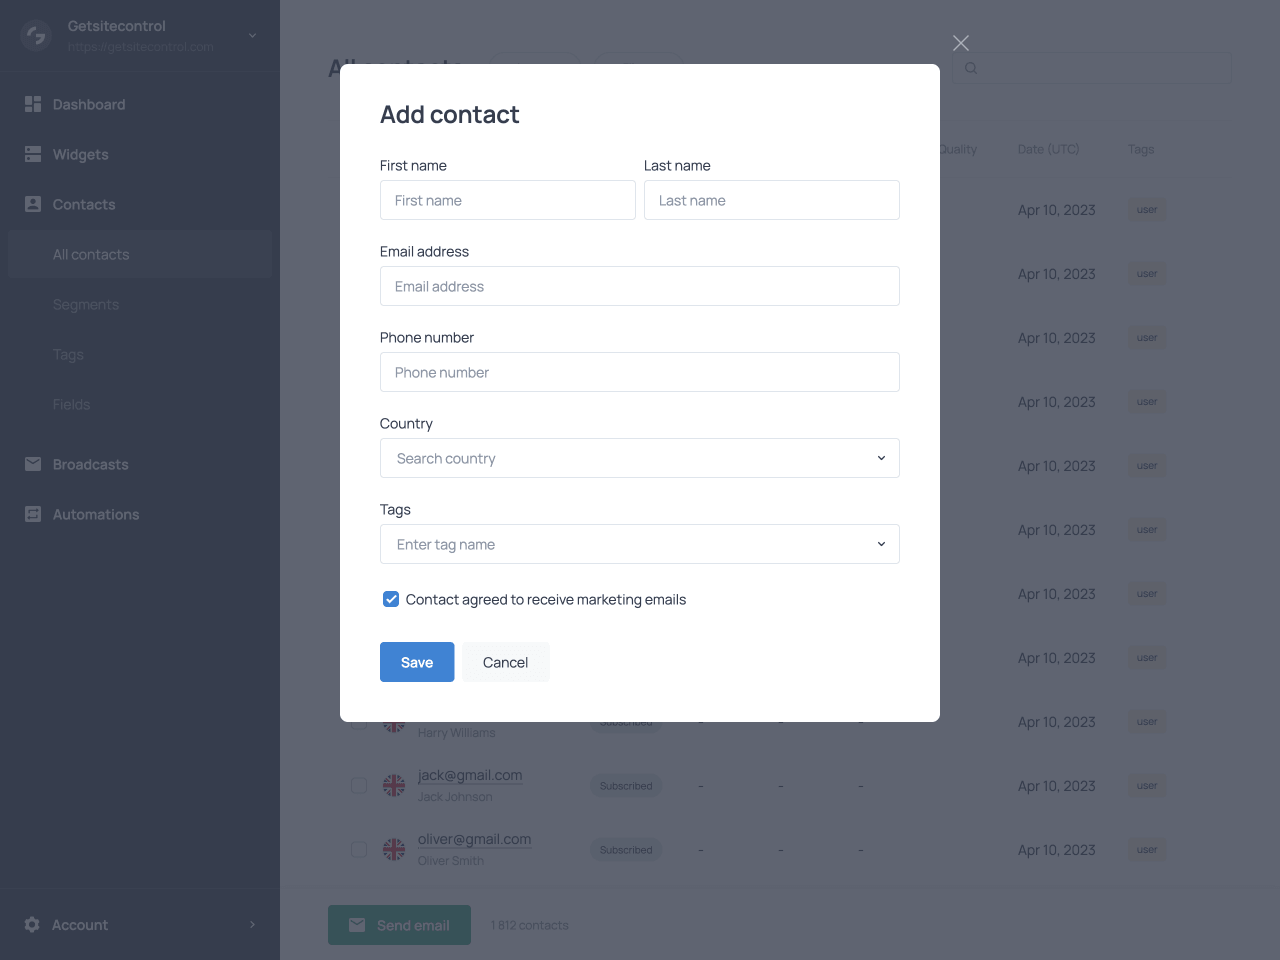
The Import button at the top of the main Contacts screen opens the import flow. You can import contacts from a CSV file, from Mailchimp, from Klaviyo, or, if you use Shopify, from your Shopify customer database. You can also add a single contact manually.
When importing contacts, map the fields in your source to the corresponding contact fields in Getsitecontrol, assign tags to the entire batch if needed, and optionally trigger a workflow for all imported contacts.
Filtering contacts
The Filters button opens a panel where you can define conditions to narrow down your audience. Filtering is based on flexible conditions that can be added and combined using +Add condition.
Conditions and categories
Conditions are organized into two categories: Contact and Emails. The Contact category includes fields such as segment, tag, country, marketing status, quality score, and other contact details. It also includes any custom fields you have created in your Getsitecontrol account to store business-specific data. If you use Shopify, additional conditions are available based on purchase data, including order count, total amount spent, and the date of the last order.
The Emails category focuses on engagement, allowing you to filter contacts based on whether they have received, opened, or clicked emails, as well as the number of interactions and the most recent activity. As conditions are applied, the contact list updates automatically to reflect the matching contacts.
Combining conditions
You can combine multiple conditions to refine your results. For example, you can filter contacts who have a specific tag and are located in a particular country, or contacts who have opened emails recently but have not clicked any links.
Conditions can be connected using AND or OR logic. When conditions are connected with AND, a contact must meet all of them to be included. When connected with OR, a contact only needs to meet one of them.
You can also combine conditions into groups to define more complex logic. Groups can be connected using AND or OR, allowing you to include contacts who match one set of conditions or another.
Using filter templates
In addition to building filters manually, you can use predefined filter templates from the Choose template menu. These templates cover common use cases, such as recently joined subscribers, engaged contacts, or subscribers who have not interacted with emails for a while. If you use Shopify, additional templates are available based on purchase behavior, such as customers who have recently purchased, high-spend customers, or customers who have not purchased for some time. Selecting a template applies a set of conditions, which you can further adjust if needed.
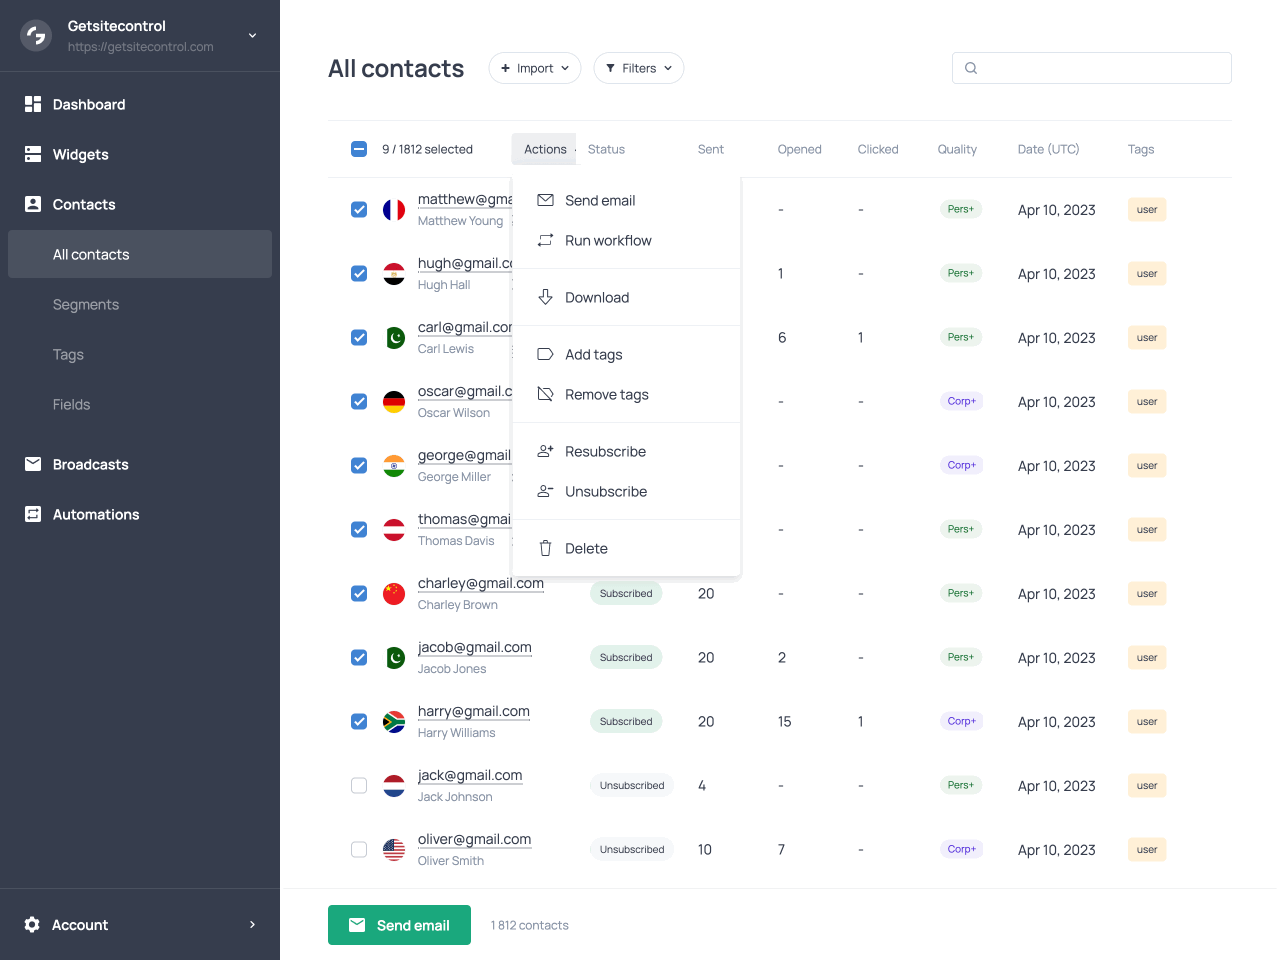
Selecting contacts and the Actions menu
Select all the filtered contacts or a subset using the checkboxes on the left. This will reveal the Actions dropdown in the toolbar. From there, you can send an email broadcast, run a workflow, download the selected contacts as a CSV file, add or remove tags, resubscribe to your list, unsubscribe from your list, or delete the selected contacts.
Sending an email
The Send email action allows you to send an email broadcast (a one-time email campaign) to the selected contacts. This is useful when you want to reach a specific group based on filters or manual selection, without affecting the rest of your audience.
When you choose this option, your selection of contacts is saved as the recipient group for the broadcast. You can then create your email and configure the sending options. The broadcast will be sent only to the contacts you selected at the start, and the total number of recipients is shown before sending.
Running a workflow
The Run workflow action launches an automated workflow for the selected contacts. Workflows are sequences of steps that can include adding or removing tags, sending emails, and waiting for a specified period between actions.
When you run a workflow from the Actions menu, the selected contacts enter the workflow and proceed through its steps according to the defined logic and conditions. This is useful, for example, to send an onboarding sequence to contacts who weren’t included in your main welcome automation, or deliver a special promotion or announcement to a selected group of contacts.
Fields
Each contact has a set of fields that store their data. You can view these fields on individual contact cards and in the Fields tab of the dashboard. You can use them as conditions when building segments or filtering your audience for broadcasts or automations.
Default fields
Getsitecontrol provides a set of default fields for every contact. These fields store key information such as contact details, subscription status, quality score, and other basic attributes. You cannot delete default fields or edit their labels.
| Field | Description |
|---|---|
| The contact’s email address. This field must include an @ symbol. | |
| Phone | The contact’s phone number. This field accepts only numbers and symbols. |
| First name | The contact’s first name. |
| Last name | The contact’s last name. |
| Full name | The contact’s full name as a single value. Available only on import, where the system splits the first word as the first name and the rest as the last name. |
| Marketing status | The contact’s subscription status: Subscribed, Unsubscribed, or Bounced. |
| Quality | An indicator of the contact’s quality and reliability. |
| Country | The contact’s country, typically detected automatically when the contact submits a response to a form. |
| Date | The date when the contact was added to the database. |
| Tags | The tags currently assigned to the contact. |
Quality score (Pro)
The Quality field is one of the default fields available for every contact, though it is only included in paid plans. It classifies the contact's email address into one of eight categories based on its type, reliability, and expected engagement potential. The classification is determined automatically by the system and cannot be edited manually. The categories range from high-value corporate addresses to disposable or untrusted ones.
| Score | Description |
|---|---|
| Corporate prime (Corp+) | A high-quality business email, likely belonging to a decision-maker or valuable contact. |
| Corporate basic (Corp) | A business email from a company domain, but associated with a lower-level role or a generic inbox such as info@ or support@. |
| Personal prime (Pers+) | A valid personal email with signals of a real, engaged individual. |
| Personal basic (Pers) | A personal email with low intent signals, generic naming conventions, or weak engagement history. |
| Academic (Edu) | An email from an educational institution, such as a university, school, or research organization. |
| Government (Gov) | An email associated with a government or public sector organization. |
| Disposable (Temp) | A temporary or throwaway email address, typically short-lived and unreliable for long-term engagement. |
| Untrusted (Risk) | A masked, relay, invalid, or unclear email source with low reliability. |
Like other default fields, Quality can be used as a condition when filtering contacts or building segments. This allows you to exclude low-reliability addresses before sending a broadcast, or to create a reusable segment of corporate prime and personal prime contacts for targeted campaigns. On paid plans, the Dashboard tab also features a quality breakdown chart showing the distribution of all eight categories across your contact database.
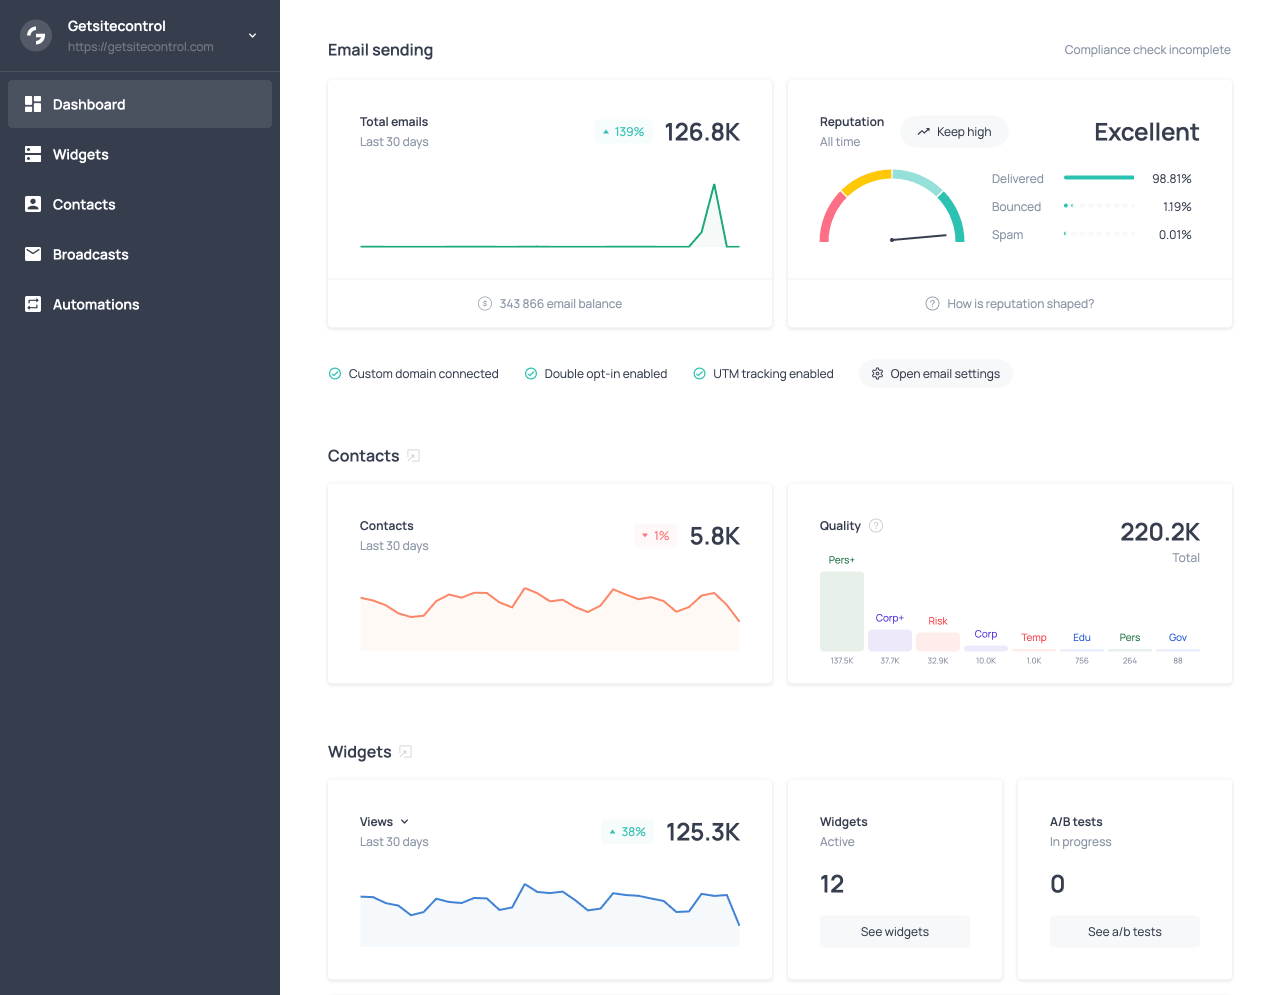
The contact Quality chart in the Dashboard tab
As an alternative to the built-in contact Quality score, you can use our free external Email quality checker to validate contacts online without registration. It detects disposable or untrusted email addresses in your list and scores contacts to help you choose who to send to.
Custom fields
You can create additional fields to capture any data your business needs. Custom fields are managed in the Fields tab under Contacts in the left navigation. This is where all your fields are stored, both default and custom.
New fields are created from this page using the Create field option. When creating a field, you define its name and select a type, such as Text, Number, or Date. The selected field type determines what kind of data the field can store and in what format.
| Field type | Accepted format |
|---|---|
| Text | Letters, numbers, and symbols. |
| Number | Numbers and symbols. |
| Date | Dates composed of numbers and symbols in the following formats: YYYY-MM-DD DD-MM-YYYY MM/DD/YYYY MM/DD/YY DD.MM.YYYY |
Any custom field you create becomes immediately available across the platform. It can be used in the field mapping interface in the widget editor, allowing you to populate it when a contact submits a form; it can also be used as a condition when filtering contacts or building segments.
Field mapping
Field mapping defines how the data you collect or import is stored in your contacts database. It ensures that each piece of information, such as an email address, name, or any custom input, is saved in the correct contact field. Proper field mapping keeps your contact data structured and ensures that it can be used effectively in segments and filters.
Field mapping at import
When importing contacts, you assign each source field to the appropriate contact field, ensuring that the data is stored consistently across your database.
Field mapping in forms
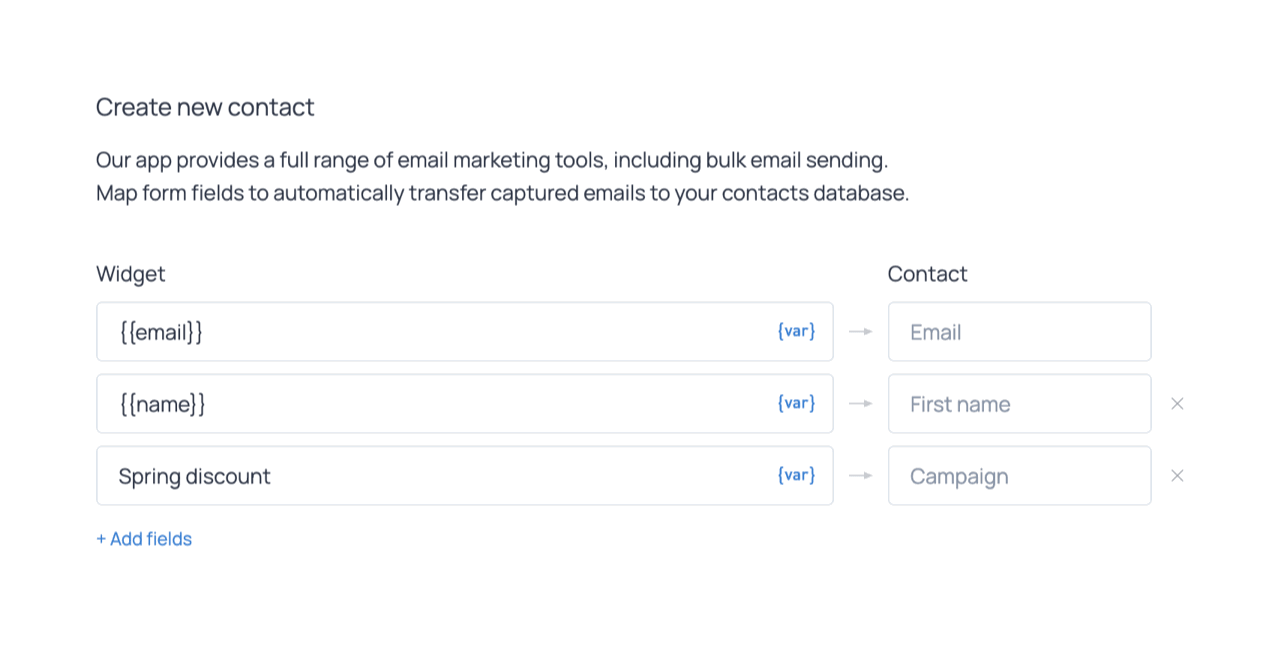
When working with forms, field mapping is configured in the widget editor under the Contacts tab. There, each form field is linked to a corresponding contact field. The section is initially empty, and you can add existing fields (default or custom) by clicking +Add fields. If you need to store new types of data, you can create a custom field directly from this interface. The new field becomes available immediately and can be used for future mappings, segmentation, and filtering.
The data from the widget is passed to contact fields using variables, which represent the values collected by the form or generated automatically by Getsitecontrol. Variables are used on the source side and are inserted using the {var} menu. The most common variables come from form fields, such as email or name. Other variables can capture additional data automatically, such as the visitor’s location, device, or the current date. These variables are then mapped to contact fields on the right, determining where each value is stored in the contact profile.
In addition to variables, you can use fixed text values in the source fields. These are static values that are applied to every submission from a specific form, for example to indicate the source of the contact or to assign a consistent label.
Tags
Tags are labels you assign to contacts to indicate specific attributes, such as their preferences, source, or stage in a campaign. A contact can have any number of tags. You can view tags assigned to specific contacts in the contact list and on individual contact cards.
The Tags tab, available under Contacts in the left navigation, provides an overview of all tags in your account. The list includes the tag name, the number of contacts it is assigned to, and the date the tag was created. From here, you can create new tags, search for existing ones, or delete tags you no longer need. Tags can be assigned to contacts in four ways: manually, through automations, at the moment of form submission, or when importing contacts.
Assigning tags manually
You can assign tags manually from the contact list by selecting one or more contacts and using the Actions menu. You can select an existing tag from the dropdown or create a new one on the spot. Use the same menu to remove tags from selected contacts.
Assigning tags via automations
Tags can be assigned automatically within any email automation by adding an Add tag action at the desired step in the flow. When a contact reaches that step, the system applies the tag to their profile. You can also use the Remove tag action to remove a tag, and you can add conditions to these actions if you want them to apply only to specific contacts.
A common example is an Email link click automation. When a subscriber clicks a link in one of your emails, the automation is triggered, applies a tag, waits for a defined period, and then sends a follow-up email. The builder displays the link-trigger at the top, followed by conditions and actions, each as a separate step.
Assigning tags at submission
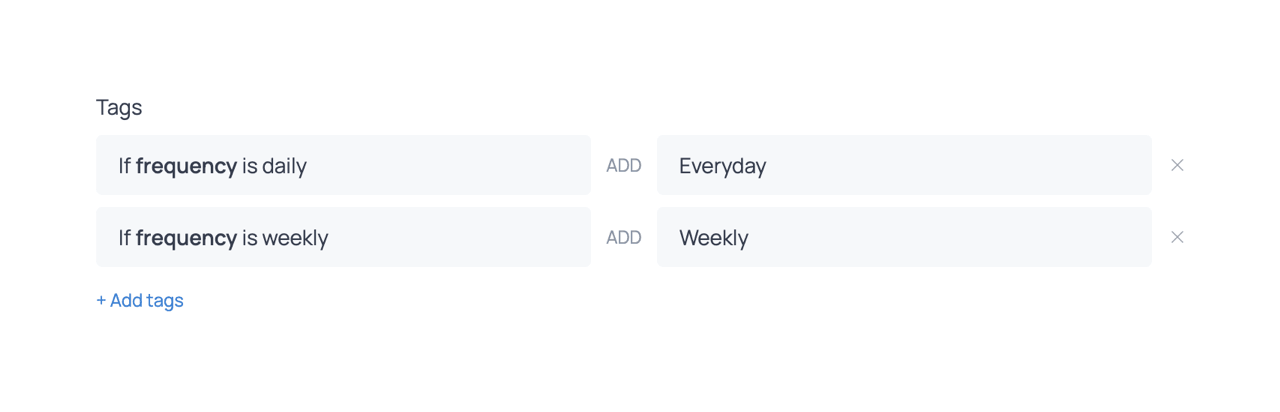
You can also assign tags when a contact submits a form. This is configured in the widget editor under the Contacts tab. The Tags section allows you to define tagging rules that are applied at the moment of form submission.
Each rule consists of a condition and a tag. Tags can be applied to all contacts who submit the form (Always) or conditionally based on the submitted values (If + field ID). Conditional tagging works with fields that have predefined options, such as dropdowns, radio buttons, checkboxes, or ratings, allowing different tags to be assigned based on the selected option.
For example, if a form includes a field for preferences, different tags can be assigned depending on the option selected by the contact. This approach allows you to categorize contacts immediately as they enter your database, without requiring additional automations.
Assigning tags at import
Lastly, you can assign tags when importing contacts to label the entire batch or categorize contacts as they enter your database. This is configured in the import flow, where you can add one or more tags that will be applied to all imported contacts. This approach is useful for identifying the source of the import (for example, a specific platform or campaign) or for grouping contacts for immediate segmentation and follow-up actions.
| Method | Description |
|---|---|
| Manual | Assign tags directly from the Contacts tab by selecting one or more contacts and using the Actions menu. This is useful for one-time updates or quick adjustments. |
| Automation | Add an Add tag action inside a workflow to assign tags automatically based on contact behavior or conditions. This is useful for ongoing segmentation based on engagement. |
| Form submission | Configure tags in the Contacts tab of the widget editor to assign them when a contact submits the form. You can assign tags to all submissions or only when specific form options are selected. |
| At import | Assign tags during import to label all imported contacts. Useful for identifying the source or grouping contacts for segmentation. |
Segments
A segment is a saved group of contacts defined by a set of conditions. Unlike a static list, a segment updates automatically as contacts gain tags, change their status, or meet other criteria. You can use segments to target broadcasts, trigger automations, and download a precise subset of your contacts.
The Segments tab, available under Contacts in the left navigation, displays all segments in your account. Each segment card features the segment’s name, creation date, ID, and current contact count; it provides options to edit, download, clone, or delete the segment.
Creating a segment
Segments are created via the Create segment button at the top of the page. The segment editor is structured around a conditions block at the top, where segment rules are defined, and a contact list below that updates in real time as those rules are adjusted.
Each condition is defined by three elements: a field, an operator, and a value. The field specifies what type of data is being evaluated, such as a tag, marketing status, country, or a custom field. The operator defines how the field is compared to the value, for example is, is not, or any of. The value is the specific criterion a contact must (or must not) match, such as a particular tag or country.
Conditions can be combined to refine the segment. Within a group, conditions can be connected using either AND or OR logic. When conditions are connected with AND, a contact must meet all of them to be included. For example, a segment with ‘Tag is Newsletter’ AND ‘Country is United States' will include only contacts who match both conditions.
When conditions are connected with OR, a contact only needs to meet one of them. For example, a segment with ‘Tag is Product A’ OR ‘Tag is Product B' will include contacts interested in either product, allowing you to target both groups with a single campaign.
The editor also supports multiple groups of conditions. These groups can also be combined using AND or OR logic, allowing you to define more complex rules.
Using segments in automations and broadcasts
Segments are used to target specific groups of contacts when sending emails or running automations. In email Broadcasts, segments define the audience for a campaign. Instead of sending an email to your entire contact list, you can select a segment to ensure the message is delivered only to contacts who match certain criteria, such as a specific tag, location, or level of engagement.
In Automations, segments can be used both to control who enters a workflow and to filter contacts at different steps. For example, the Segment trigger allows you to start an automation when a contact enters a specific segment. Segments can also be used within a workflow to tailor the actions based on contact attributes or behavior, ensuring that each contact receives relevant messages.
Because segments update automatically, they always reflect the current state of your audience. This means contacts can enter or leave a segment over time, and your broadcasts and automations will always target the most relevant group without requiring manual updates.
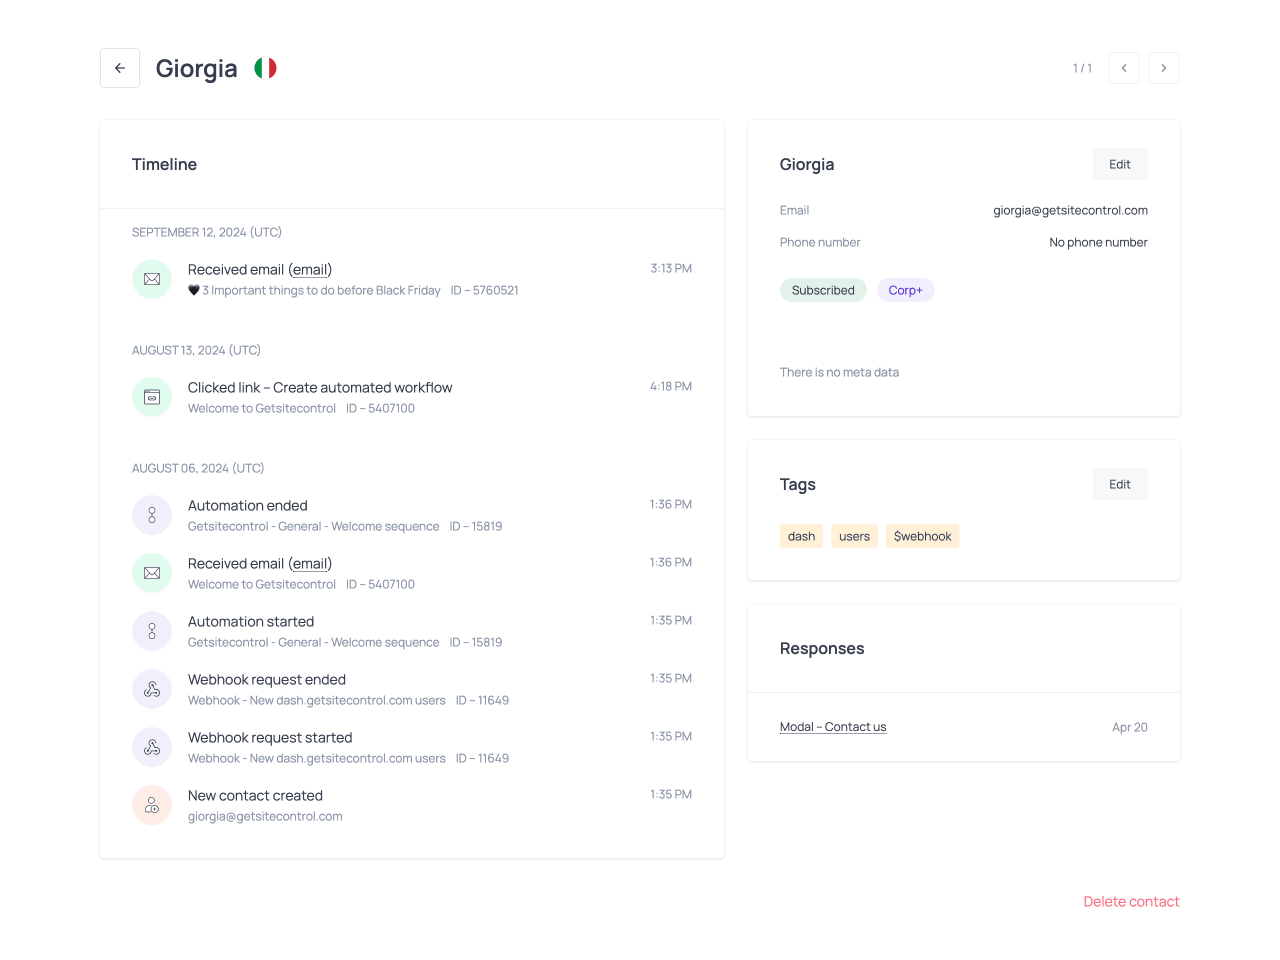
The contact card
The contact card provides a detailed view of an individual contact and is accessible from the Contacts section by clicking a contact’s email address on the list. It brings together all contact-related data in one place, making it easier to understand how a contact entered your database, how they have interacted with your emails and widgets over time, and how their profile has evolved.
The contact card is particularly useful for troubleshooting specific cases, such as verifying whether a contact received a particular email, whether they engaged with it, or whether a tag or status update was applied as expected.
Contact data
On the right, the contact card displays the contact’s details, including their name, email address, phone number, marketing status, quality score, and the values of any other fields, default or custom, if present.
Below this, you can see the tags currently assigned to the contact, followed by the responses collected through widgets. The responses are displayed by widget name and available as clickable entries. Clicking a widget name opens the corresponding submission for a more detailed view.
This section reflects the current state of the contact’s profile and provides a structured overview of their details, assigned tags, and collected responses.
Timeline
On the left, the Timeline presents the history of all events associated with the contact, starting with the most recent. It includes events such as emails received, emails opened, links clicked, form submissions, other widget actions, and status changes.
Widget actions include opening a URL, launching another widget, or copying a coupon code. For Shopify users, additional events are also recorded, including widget actions such as adding a product to the cart or applying a discount, and email actions such as opening a product page, adding a product to the cart, or applying a discount.
Each event is displayed with contextual details, such as the name and ID of the related email, widget, or automation, allowing you to trace interactions back to their source within the platform. When applicable, additional details are shown, such as the destination URL or the copied coupon code.
How it all works together
Contacts, fields, tags, and segments work together to give you a complete view of your audience and help you act on it. When someone submits a form or you import a contact, they are added to your contact list. Their information is stored in fields, such as their email address, name, and any custom data you collect. You can assign tags to describe who they are, where they came from, or how they have interacted with your business.
As contacts gain tags, update their details, or engage with your emails and forms, they automatically move in and out of segments based on the conditions you have defined. This allows you to group contacts dynamically without maintaining lists manually.
The contact card brings all of this information together in one place. It shows the contact’s field values, assigned tags, and full interaction history, so you can understand how they joined your list and how they have engaged over time.
You can then use tags and segments to send targeted broadcasts or trigger automations. This structure helps you keep your data organized and ensures that your campaigns reach the right audience at the right time.
Segments and email performance
Proper tagging and segmentation are essential for effective email marketing. They allow you to send relevant content to the right audience instead of relying on broad, generic campaigns.
When contacts are grouped based on their attributes and behavior, you can tailor messages to their interests and stage in the customer journey. This typically leads to higher engagement, such as improved open and click-through rates.
Segmentation also plays a key role in email deliverability and sender reputation. Email providers evaluate how recipients interact with your messages to decide whether future emails should reach the inbox or be filtered out. Low engagement, high unsubscribe rates, or spam complaints negatively impact your reputation and reduce deliverability.
By sending targeted emails to well-defined segments, you are more likely to reach contacts who are interested in your content, which promotes engagement and reduces unsubscribes and complaints. In practice, this improves both inbox placement and conversion rates.
FAQ
How are contacts added to the database?
Contacts are added when someone submits a form, when you import contacts from an external source (such as a CSV file or another platform), or when you create them manually.
Default vs custom fields: what’s the difference?
Default fields are built-in and store standard contact information, such as email, name, and marketing status. Custom fields are created by you to store additional data specific to your business, such as preferences, sources, or internal classifications.
What is field mapping and why is it important?
Field mapping defines how incoming data is stored in your contacts database. It ensures that each value collected through forms or imports is saved in the correct contact field. Proper mapping keeps your data structured and makes it usable for filtering, segmentation, and emailing purposes.
Can I assign multiple tags to the same contact?
Yes. A contact can have any number of tags. This allows you to describe different aspects of a contact, such as their preferences, behavior, or stage in a campaign.
What is the difference between tags and segments?
Tags are labels applied to contacts to indicate specific attributes or actions, such as interests or source. Segments are dynamic groups of contacts defined by conditions based on fields, tags, and activity. While tags are assigned manually or automatically, segments update as contacts meet or no longer meet the defined criteria.
When should I use filters vs segments?
Filters temporarily narrow down the contact list for immediate actions, such as sending a broadcast, reviewing or downloading a subset of contacts. Segments are saved sets of conditions that can be reused for ongoing campaigns and automations. The contacts included in a segment change automatically as they meet or no longer meet those conditions.
Can I use purchase data for segmentation?
Yes. If you use Shopify, additional conditions are available for filtering and segmentation, such as order count, total amount spent, and the date of the last order.
Can I send emails to filtered contacts?
Yes. After applying filters in the Contacts tab, you can send a broadcast or run a workflow for the matching contacts. Filters are temporary, but you can save them as a segment for future use.
How are segments used in email marketing?
Segments are used to target specific groups of contacts when sending email broadcasts or running automations. In broadcasts, you select a segment to define the audience for a campaign. In automations, segments can be used to trigger workflows when contacts enter them or to tailor the steps based on contact attributes or behavior. Because segments update automatically, they always reflect the most relevant audience.
What is the contact card used for?
The contact card provides a complete view of an individual contact. It shows their stored data, assigned tags, and a timeline of all interactions, allowing you to understand their behavior and troubleshoot specific cases.