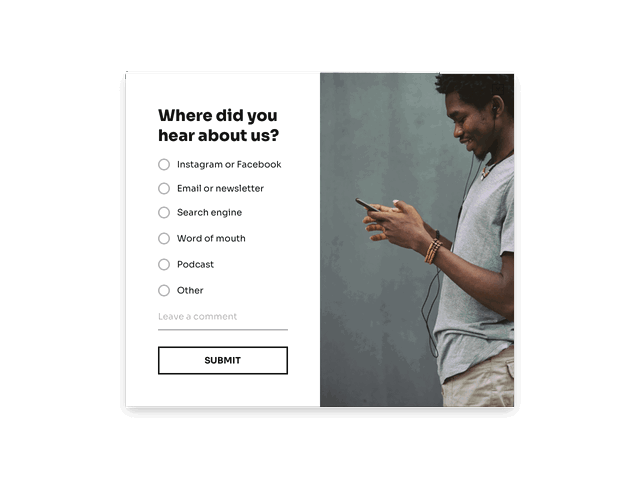
Create website surveys for free
Launch your first website survey in minutes.

Collecting feedback from your website visitors is one of the simplest ways to improve UX, conversions, and content performance — but only if you ask the right questions at the right time.
This guide includes 16 proven website survey questions, backed by real examples from brands like IKEA, Banana Republic, and Public Goods. You’ll also learn when to show each question for maximum response rates and actionable insights.
Whether you’re designing your first website feedback form or refining an existing survey, these examples will help you collect helpful data, regardless of your industry.
Analytics tools can give you a lot of quantitative information about where your website visitors come from — but they’ll never be able to give you the qualitative data that asking this question provides.
Figuring out how first-time visitors, returning visitors, or buyers discovered your business lets you double down on the marketing strategies with the best ROI.
Here’s how KiwiCo, a kids' educational brand, asks this question on the order confirmation page.
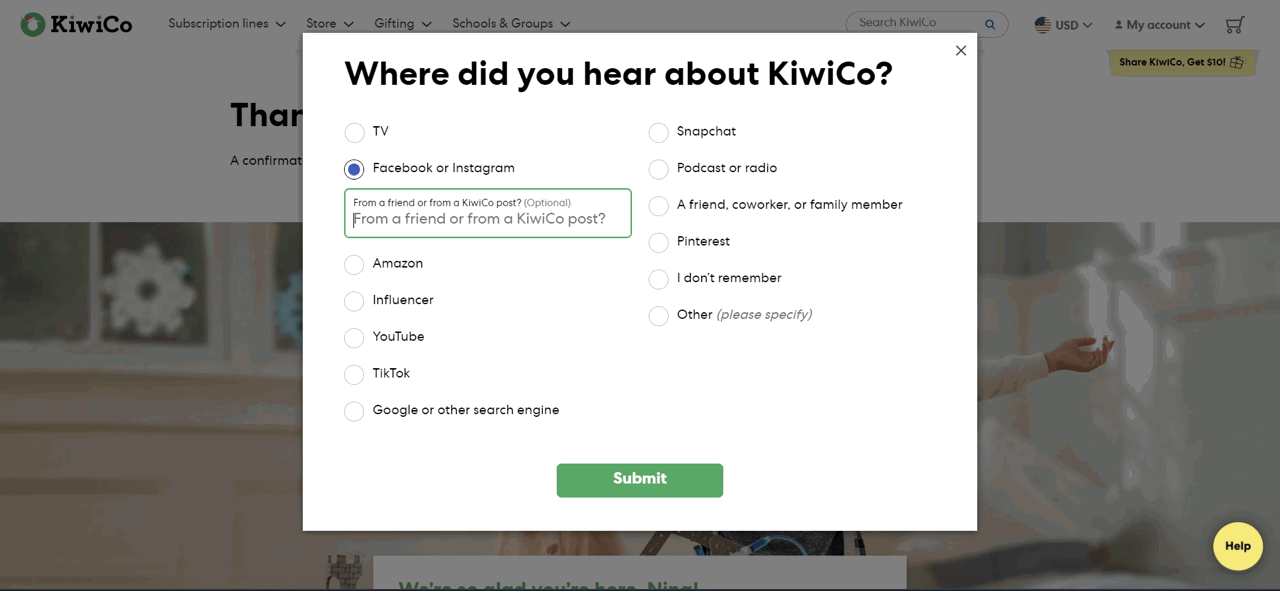
The most common practice is to show this survey on a Thank You page, after a visitor has completed a signup or purchase. That way, you can track which channels are converting, not just driving traffic.
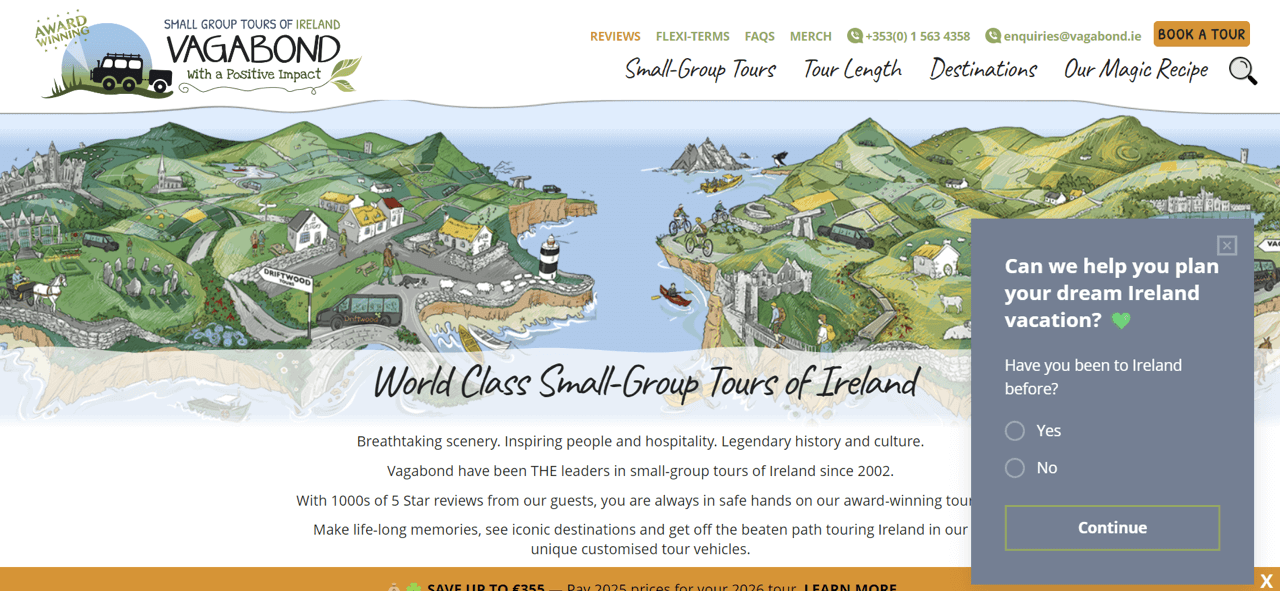
This question helps you understand who your visitors are and what level of context they have. First-time visitors often have different needs, expectations, and browsing patterns compared to returning visitors.
Asking this question early lets you segment people into different journeys based on their familiarity with your brand.
Here’s how Vagabond Tours, an Ireland tour agency, uses this type of question to understand visitor background and personalize assistance.
This website survey form is made in Getsitecontrol
Ask this question at the beginning of a visitor’s journey. It makes the most sense on a welcome screen or your landing page. And if you want to target engaged visitors, display the survey a few seconds after they arrive, or after they scroll down a certain percentage of the page.
This question helps you understand how familiar visitors are with your brand before they decide to take action. Some people convert on the same day they discover you, while others may spend weeks or months researching before making a purchase.
These insights might help you interpret other survey responses in context and refine your marketing strategy. For example, if long-term followers convert at much higher rates, you may want to invest more in retention and nurturing.
Here’s how Public Goods, a household essentials brand, collects this information after a purchase.
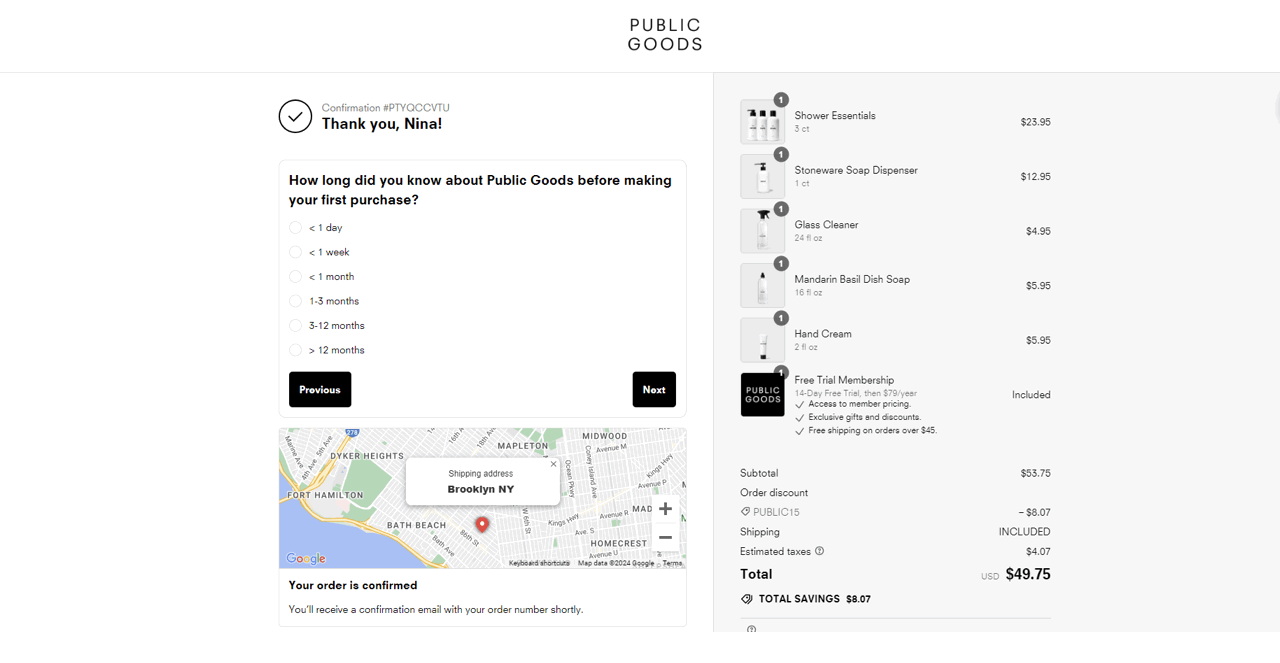
This question works best on post-purchase pages or signup confirmation screens, when the visitor has already completed the action you’re evaluating.
To improve your website’s usability, you need to know exactly what your visitors are trying to achieve.
As the website’s creator, you probably already have a general idea — but asking this question directly gives you real visitor intent data. That can help you refine your site’s navigation, messaging, and layout around actual user goals.
Here’s how Victoria’s Secret frames this question in their multi-step website feedback survey.
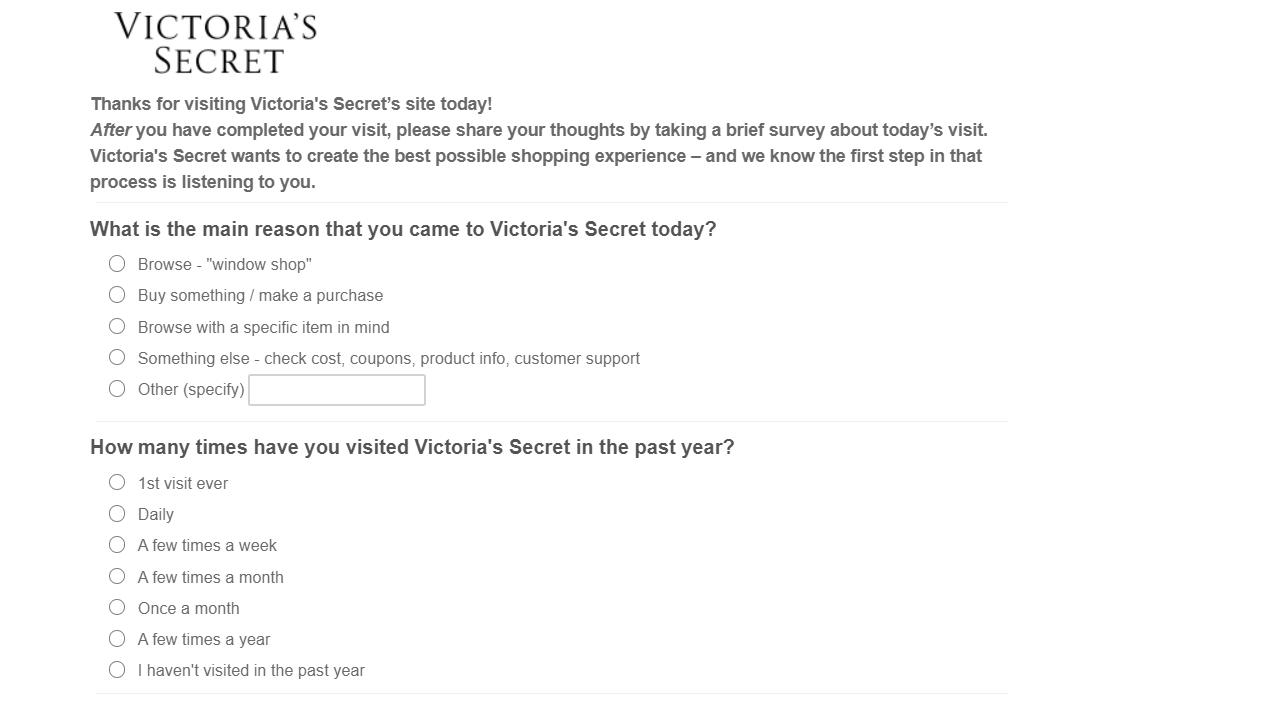
Soon after a visitor arrives at your website. If you want to survey engaged visitors only, you can show this question after they spend a few seconds on your website or view more than one page.
If you have multiple product categories, this question helps you segment your audience and personalize their experience — both on your website and via email campaigns.
For example, you can ask this question when inviting visitors to join your list. This data will help you send targeted email campaigns and relevant suggestions instead of generic broadcasts.
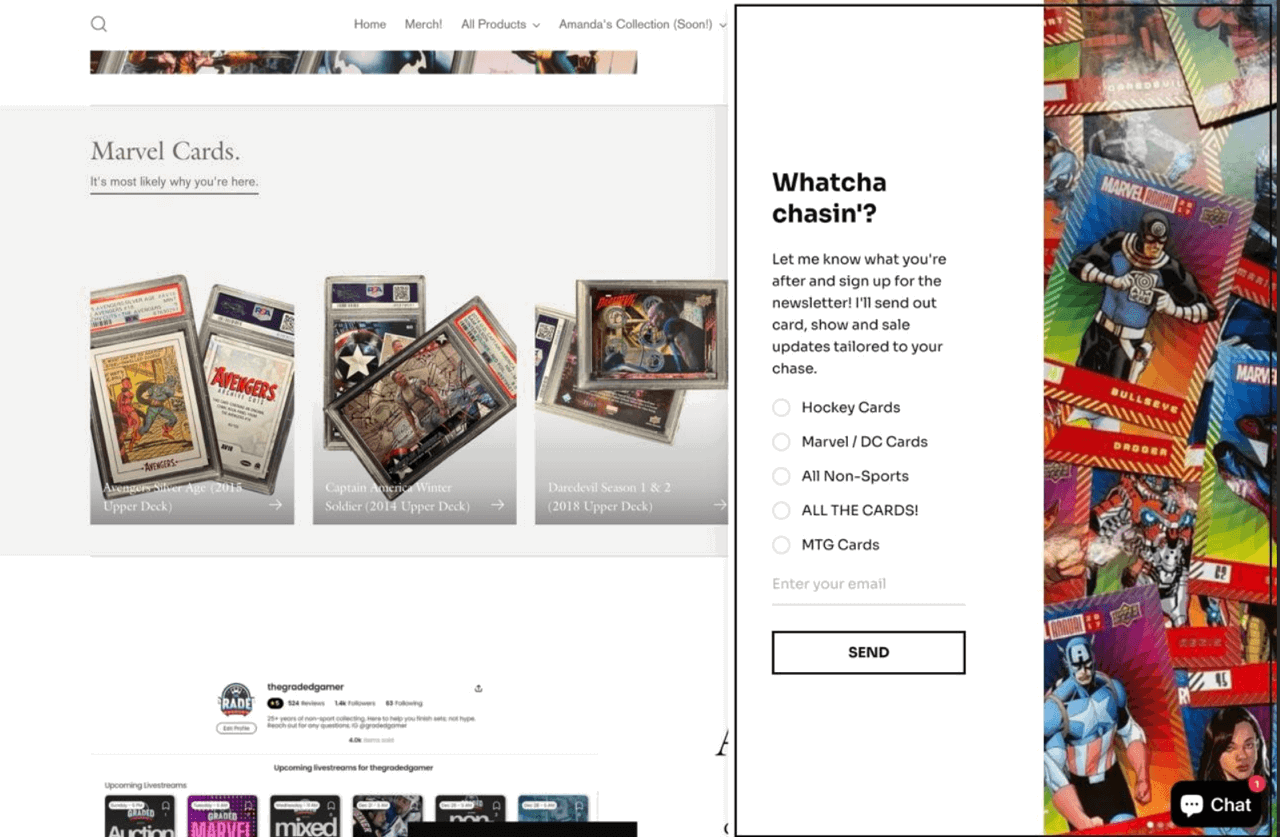
Here’s how Graded Gamer does exactly that, asking visitors about their interests before they subscribe.
This website survey form is made in Getsitecontrol
Show this survey during email newsletter signup, on welcome pages, or as an onboarding survey for new subscribers. You can also trigger it after a visitor browses multiple product categories.
You’ve probably seen this before: it’s a popular website survey question called the Net Promoter Score (NPS). You can ask it as a standalone question or as part of a broader user experience survey.
Here’s how Banana Republic Factory uses an NPS survey — triggered on exit intent. They pair the NPS question with a follow-up about why the visitors didn’t complete their purchase.

The Net Promoter Score is designed to be a single, trackable benchmark for customer satisfaction. Ideally, you measure it over time to see how your efforts affect customer experience.
The way it works is simple. Visitors are asked: “On a scale from 0 to 10, how likely are you to recommend us to a friend?”
From there, you’ll need to calculate the score based on responses:
To calculate your Net Promoter Score, subtract the percentage of detractors from the percentage of promoters. The result ranges from -100 to 100.
If you only plan to ask one question, this is one of the most powerful you can use.
The traditional timing is right after a customer interacts with your business: on a Thank You or Order Confirmation page. However, as seen in the example above, you can also trigger it on exit intent to gather broader visitor feedback before they leave.
This question helps you understand how closely your website matches what visitors expect when they arrive.
It also surfaces gaps: moments where visitors expected something different or felt the experience fell short. Those patterns help you prioritize improvements.
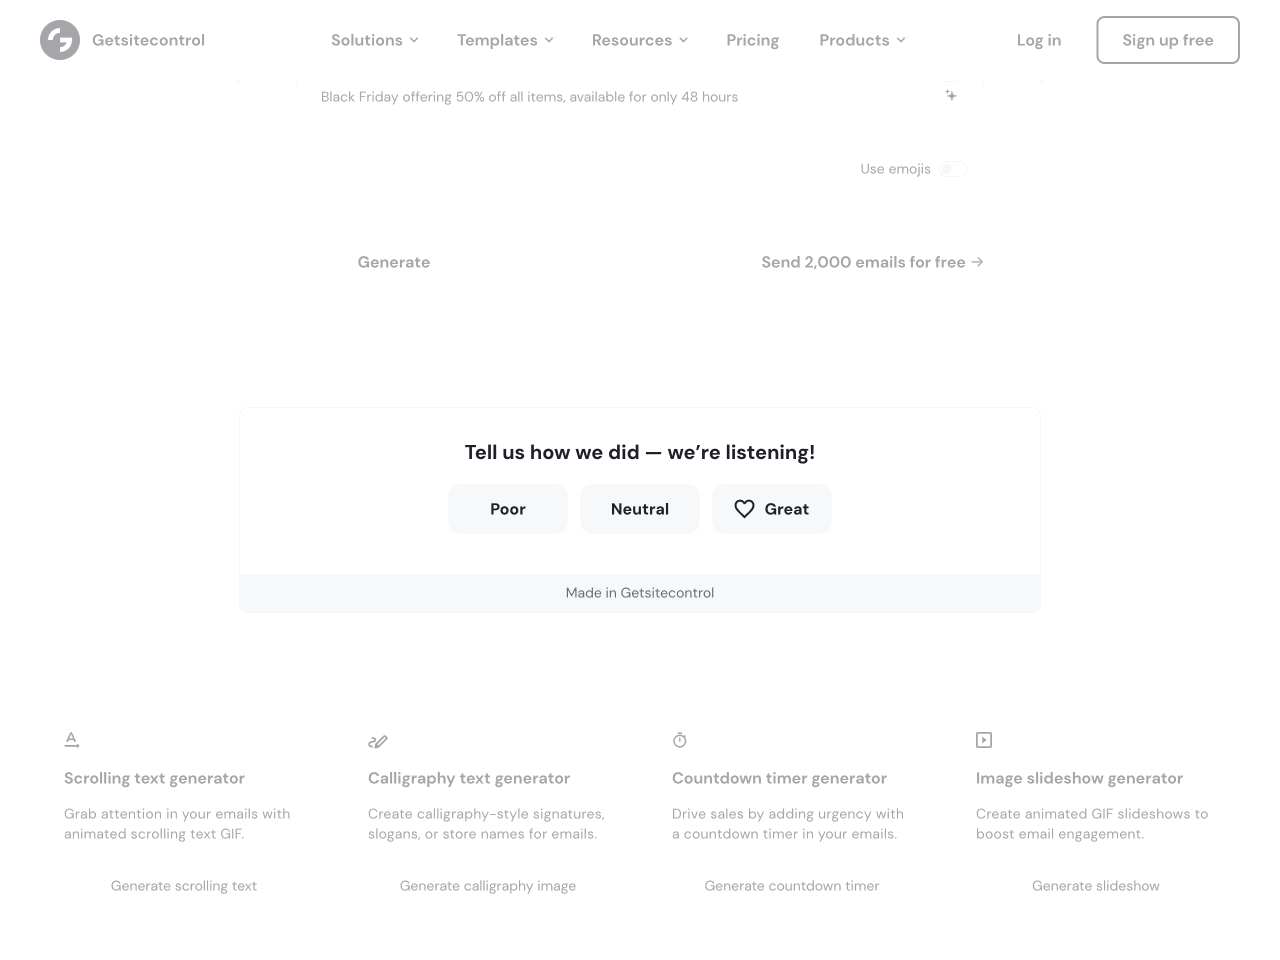
Here’s how Getsitecontrol (that’s us!) uses a simple on-page rating survey to measure visitor satisfaction after using an email scrolling text generator.
This website survey form is made in Getsitecontrol
The best timing for this question depends on your customer journey and what you consider to be an “experience” for your visitors.
You can display it when a visitor starts heading to exit, or after they complete a key action.
This usability question helps you understand how easily visitors can complete key actions on your site. It highlights friction you may not notice yourself, from confusing navigation to unclear steps in the journey.
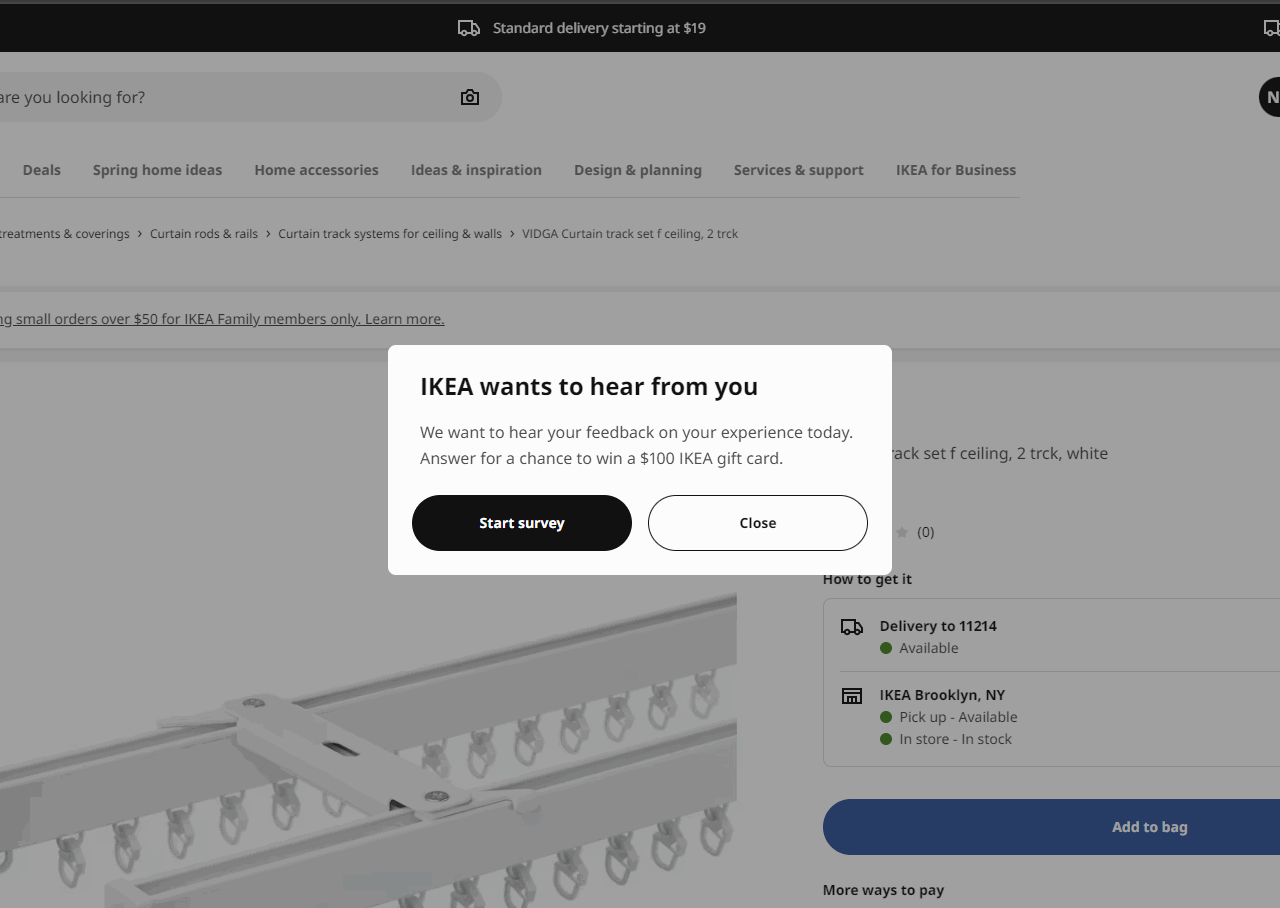
Here’s an example from IKEA, where they invite visitors to share feedback on their browsing experience.
Show it when the experience is complete: after a browsing session, a registration, or a similar action.
If you want to ask multiple questions and collect more in-depth data, consider following IKEA’s example and displaying a pop-up invitation as well as offering a survey incentive.
This is one of the best website survey questions about usability. It helps you understand how easily visitors can locate information and perform important actions.
If you find that visitors consistently struggle to find certain information, you might want to rethink how you structure your website.
Here’s how Moebe, a home decor brand, asks a similar question in their website feedback survey.
For the best results, trigger this question only after a visitor has spent a meaningful amount of time on your site, looked through multiple pages, or scrolled all the way to the end of a page.
This question is designed to focus on a single page and collect more specifics. Its goal is to highlight mismatches between what visitors expect to find on that particular page, and what’s actually presented.
For example, the structure or placement of information might make sense to you, but not to your visitors. If people consistently point out missing details, unclear explanations, or misplaced sections, that’s a strong sign your content hierarchy needs adjustment.
Show this question to visitors who have spent meaningful time on the page or reached the bottom. That way, their feedback reflects real engagement.
Beyond acting as a good website survey question about usability, this question also provides valuable information to your sales team and contributes to the feedback on your pricing strategy.
This is a great question to trigger if you notice that a visitor has been browsing your pricing page for some time.
Asking visitors for a single improvement suggestion helps you identify the issues that matter most. Limiting the question to “one thing” forces people to prioritize, which often surfaces stronger insights than an open suggestion box.
If you see the same request appear repeatedly, that’s usually a sign you should consider making the change.
Here’s how Air France asks for improvement feedback when a visitor spends a significant amount of time on the website.
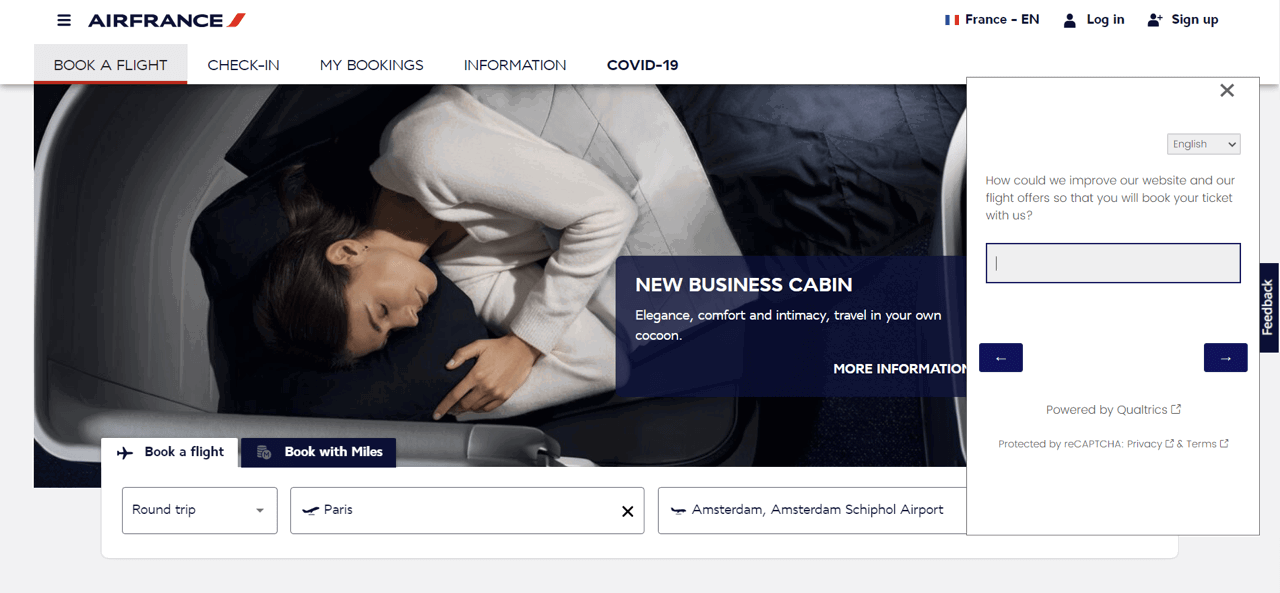
Show this question to visitors who have already explored your site. You can trigger it with a delay, after a certain number of page views, or after a key action completion. You can also embed this survey question into your blog or help content.
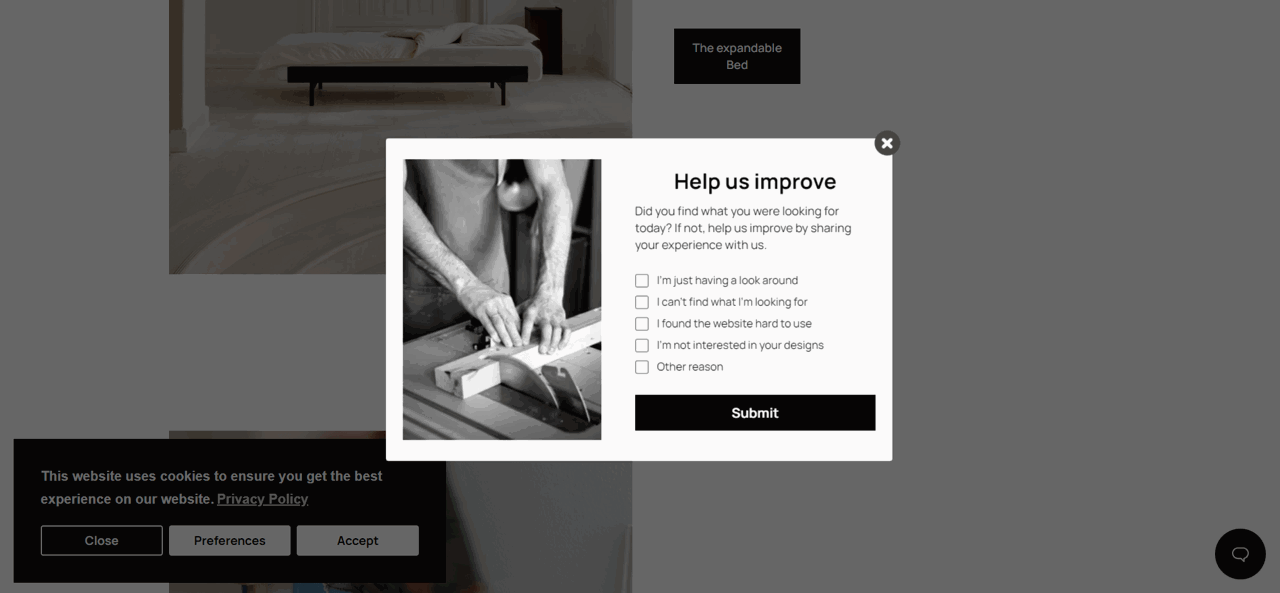
This question helps you understand what visitors value most about your site or your product: not what needs to change, but what you’re already doing well.
If you notice a pattern, you can highlight that feature more prominently in your messaging. When a specific benefit resonates with many visitors, it often works well as a value prop for new ones.
Here’s how Public Goods asks customers to rank what they value most, in a post-purchase survey.
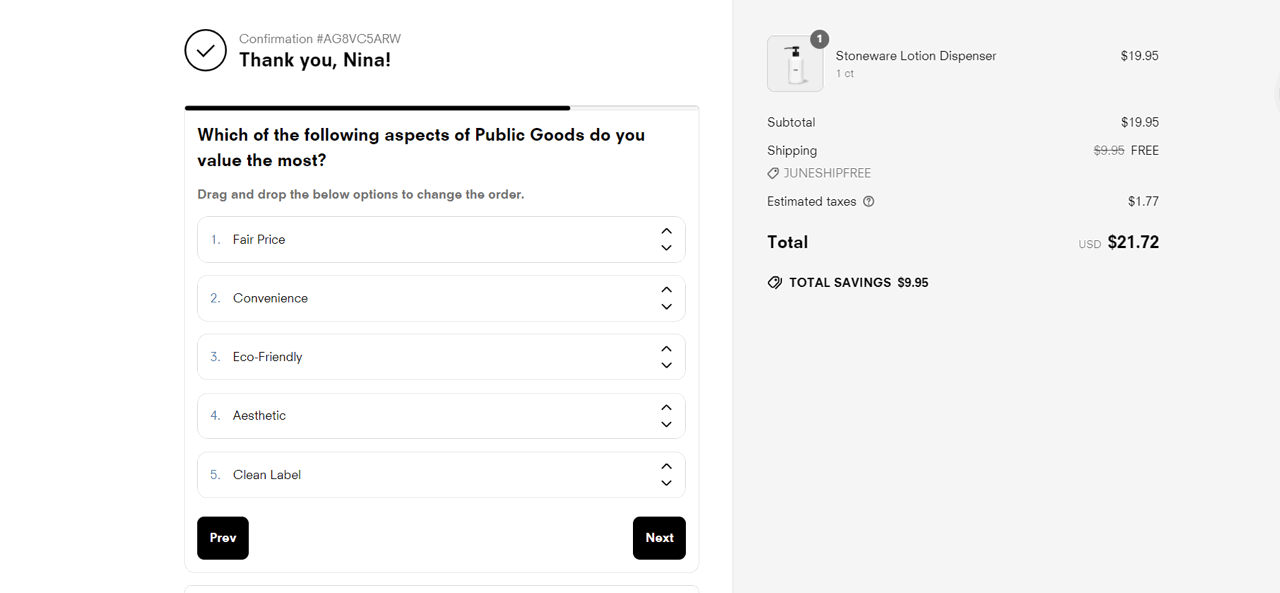
Show it to returning visitors or customers, who will be able to provide meaningful insights. The best moment to ask this question is after a key interaction, such as purchase.
Your internal view of your “competitors” doesn’t always match the alternatives your audience is actually evaluating. This question helps you understand who your visitors compare you to as they make decisions.
Knowing who else is in their consideration set helps you refine your messaging, your positioning, and the offer you should emphasize.
Show it on a Thank You page after a signup or purchase, or include it in a post-purchase email sent to confirmed customers.
This question is best presented on an exit-intent popup, and it’s one of the most effective ways to understand why visitors leave without converting.
Understanding exit reasons helps you identify patterns: whether visitors are just browsing, need more time to decide, or have specific concerns you can address.
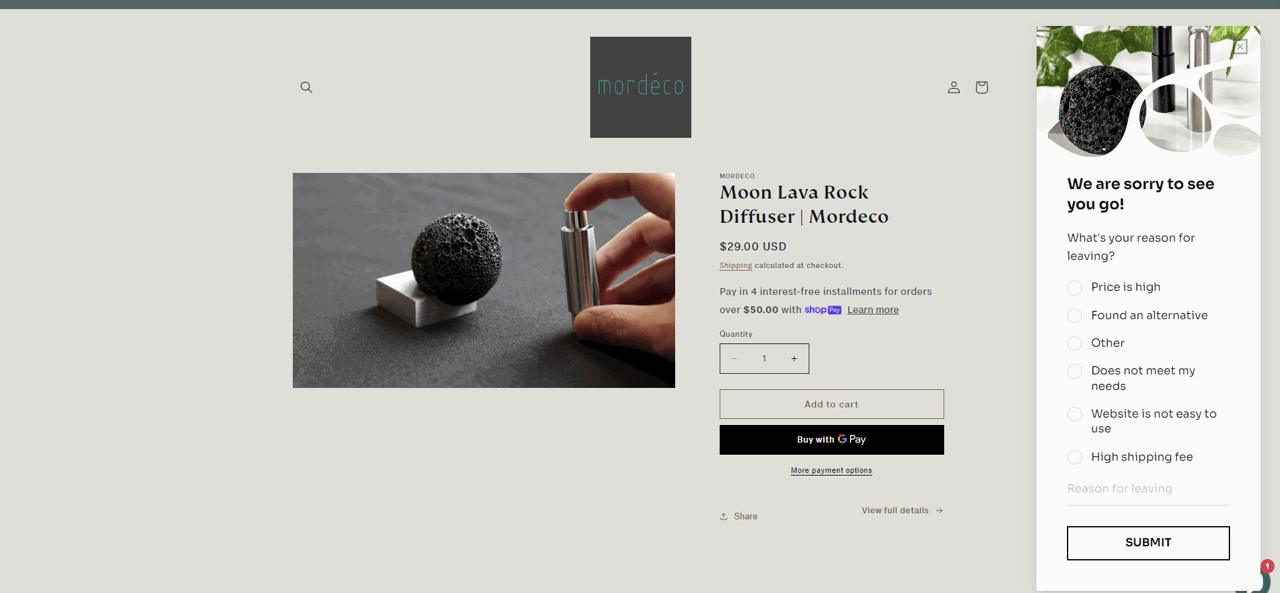
Here’s how Mordeco, a home accessory brand, asks this question when a visitor is about to leave a product page without adding the item to the cart.
This website survey form is made in Getsitecontrol
Only show this question when a visitor is about to exit the page. However, you can trigger it strategically based on context.
This will help you understand why visitors don’t add the product to the cart (missing details, sizing chart, unclear info).
This will help you understand why customers changed their minds after getting so close to purchasing (shipping costs, payment concerns).
Different targeting surfaces different objections, and this survey helps you identify them.
This question focuses specifically on purchase barriers rather than general browsing behavior. It helps you identify concrete obstacles preventing conversions: pricing concerns, shipping costs, missing features, or checkout friction.
Here’s how Moebe asks visitors about purchase barriers after they spend some time on the website and start heading to exit.
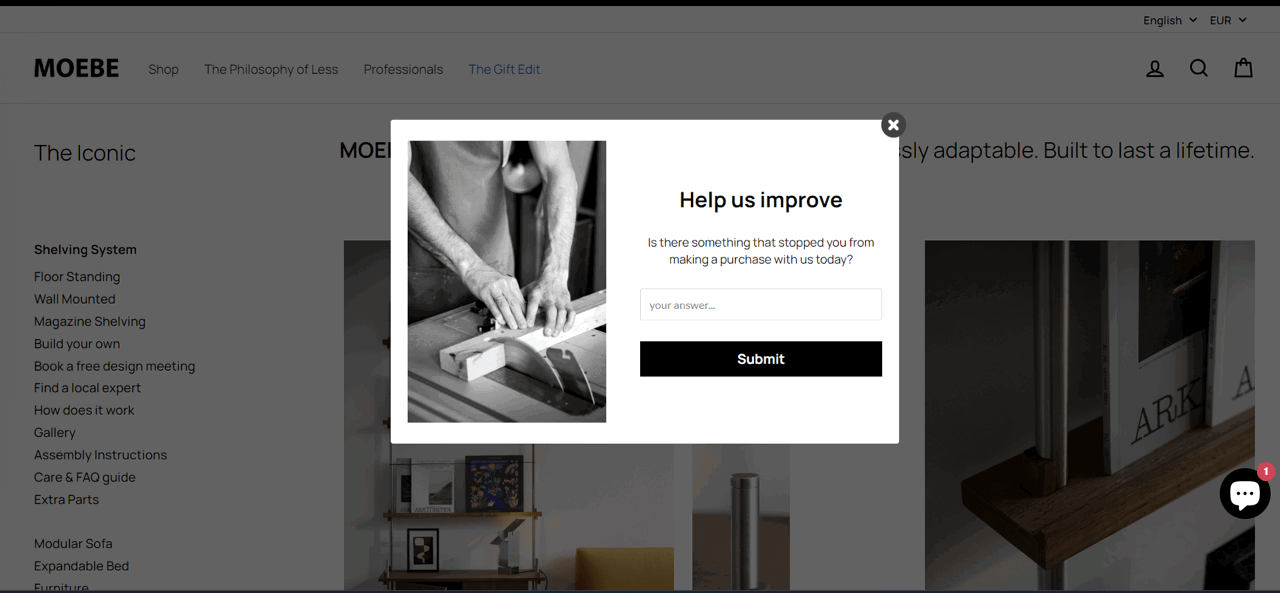
Show this survey when an engaged visitor is about to leave your site. Target visitors who have spent meaningful time browsing (indicating purchase consideration) but are now heading toward exit.
This works on product pages, category pages, or even after someone has viewed multiple items; you don’t need to wait for cart abandonment to ask this question.
Now that you’ve seen real-world examples, let’s summarize the guidelines for creating surveys that visitors actually complete.
Limit surveys to 3-5 questions. Completion rates drop approximately 20% for each question beyond five — unless a survey incentive is offered.
Showing your survey to the wrong audience at the wrong time will get you unmeaningful insights, skew your data, and lead to the wrong conclusions. Most surveys are meant to be displayed to engaged visitors or those who have completed a certain action.
Over 50% of your website traffic is likely coming from mobile devices, and so will your survey responses. Use large tap targets and minimize text input requirements to provide the best user experience for your mobile respondents.
This principle comes from Rob Fitzpatrick’s book, The Mom Test, a guide to asking questions that get honest answers. The most actionable survey questions focus on what visitors actually did rather than what they think they might do.
For example, ask more questions like “What almost stopped you from buying?” (specific past behavior) instead of questions like “What features would you like?” (hypothetical preferences). That’s how you get honest feedback instead of polite guesses.
If you’re running a comprehensive multi-step survey that takes 5+ minutes to complete, incentives can significantly boost participation. Research shows even a small $1 reward can more than double response rates (from 11.8% to 26.3%). However, for quick 1-3 question surveys, incentives aren’t necessary and may attract respondents who aren’t genuinely interested in providing thoughtful feedback.
Already have your questions in mind? The next step is getting them in front of the right visitors, and that’s where Getsitecontrol comes in.
Getsitecontrol allows you to create embedded and pop-up website survey forms within minutes, using a versatile form editor. You can easily adjust the fields, colors, and other visual components of the survey to make it look like an integral part of your website — and collect data in the format that works for you. From there, you can target surveys based on visitor behavior, such as exit intent, time on page, or pages viewed.
This app is fantastic. It helps us get feedback from our customers (those that buy and also those that choose not to) without being too intrusive.
Online art store shopifyIt only takes a few minutes to launch a survey and start collecting feedback, whether you’re trying to reduce cart abandonment, improve your content, or test your pricing page.
Create an account today, get started with the free plan, and try it for yourself.
Keep website surveys to 3-5 questions for optimal completion rates. Each question beyond five reduces participation by approximately 20%. Micro-surveys with just 1-3 questions achieve completion rates as high as 83%, making them ideal for quick feedback on single pages or features. Reserve longer surveys for comprehensive post-purchase feedback from engaged customers.
You should display your survey at a moment when the visitor can give meaningful feedback. This may be immediately after a purchase or signup, after a visitor has spent some time on a page, when someone is about to exit, or at the end of a piece of content. The right timing depends entirely on the question you’re asking and the context in which it makes sense.
A good website feedback survey is timely, specific, and actionable. Show it when visitors have context to respond: for example, right after checkout, not days later. Ask one clear question with simple answer options: multiple choice beats open-ended questions. Most importantly, ask questions that drive decisions: “What stopped you from buying?” tells you what to fix, while “Would you purchase product X?” is vanity data.
According to the research conducted by SurveySparrow, response rates vary depending on survey type and placement. Web popups typically achieve 20-30% completion rates, with central modal placements reaching nearly 40%. Passive feedback buttons collect responses from only 3-5% of visitors, at best. Generally, response rates fall between 5% and 30%, with retail and ecommerce sites seeing 5-15% and SaaS companies averaging 8-20%.
The questions you choose should reflect your goal. For usability insights, you might ask whether visitors found what they needed. For content evaluation, you can ask whether the page was helpful. For conversion optimization, ask what almost stopped them from completing a purchase. For segmentation, ask which products or categories they are interested in. For satisfaction, ask them to rate their experience. And for clarity, ask whether your pricing makes sense.
Colin Newcomer is a freelance writer with a background in SEO and affiliate marketing. He helps clients grow their web visibility by writing primarily about WordPress and digital marketing.
You’re reading Getsitecontrol blog where marketing experts share proven tactics to grow your online business. This article is a part of Customer engagement section.
Create popups for free
Email forms, promos, coupons, surveys, bounce-stoppers.
Get started, it’s free →The humble contact form – in one way or another, is the workhorse of nearly every website on the Internet. But while nearly every website has one, not all contact form designs are equal.
To help you create a form that will achieve your business goals, we’ve collected eight contact form examples from real websites. For each example, we’ll describe its strong points in detail, so that you’ll know what to include in your form.
Then, to make this post practical, we’ll suggest templates and steps for creating your own contact form without any technical skills.
A high bounce rate is often an indication that your website isn’t engaging visitors effectively, leading them to leave without exploring further.
Reducing your website’s bounce rate can improve user engagement, boost SEO, and most importantly – increase conversions.
In this article, we’ll walk you through the most up-to-date definition of the bounce rate, share 12 tips for lowering your bounce rate, and then answer five common questions about bounce rate.
Ready? Let’s go.
Exit-intent popups are one of the most effective ways to stop first-time visitors from disappearing for good.
Here’s why that matters: nearly 3 out of 4 customers never return even after making their first purchase — which means you often only get one shot at converting them.
That’s where exit popups shine: by showing the right message at the right moment, you can turn abandoning visitors into subscribers, buyers, or valuable leads.
Subscribe to get updates
Get beginner-friendly tips for growing your online business.