Email marketing automations: core elements, use cases, deliverability and conversion tips
Email marketing automations allow you to send timely, relevant emails based on how people interact with your brand. Instead of manually launching campaigns, you define what should happen when a specific event occurs, such as someone subscribing, placing an order, or clicking a link. From that moment on, the sequence runs automatically, sending emails, assigning tags, and performing other predefined actions based on user behavior.
Automations help you build stronger relationships with your audience, increase conversions, recover lost revenue, and save time. Because they respond to specific events rather than fixed schedules, they deliver messages when interest and intent are at their highest, making them especially effective.
Core elements of an automation
Trigger
The event that starts the automation. Triggers can be activated by a contact’s behavior, such as submitting a form or placing an order; by a lifecycle milestone, such as becoming a subscriber or reaching inactivity; or by a system-initiated action, such as a webhook request.
Actions
What happens after the trigger is fired. For example, sending an email, assigning or removing a tag, or running a pre-created email sequence.
Filters (conditions)
The rules that determine which contacts enter the automation or receive specific actions. They define who qualifies for the automation based on contact data, engagement, or purchase activity. Together, these three components allow you to create highly targeted email journeys.
Automation builder showing Trigger, Actions, and Filters
Triggers
Automations can be launched by three main types of triggers: behavioral triggers, lifecycle triggers, and system triggers.
Behavioral triggers are activated when a contact performs a specific action, such as submitting a form, clicking a link, or placing an order.
Lifecycle triggers are activated when a contact reaches a certain stage or status in their relationship with your brand. For example, becoming a subscriber, joining a segment, or remaining inactive for a defined period.
System triggers, by contrast, are initiated manually or by external systems, for example when Getsitecontrol receives a webhook request.
Behavioral triggers
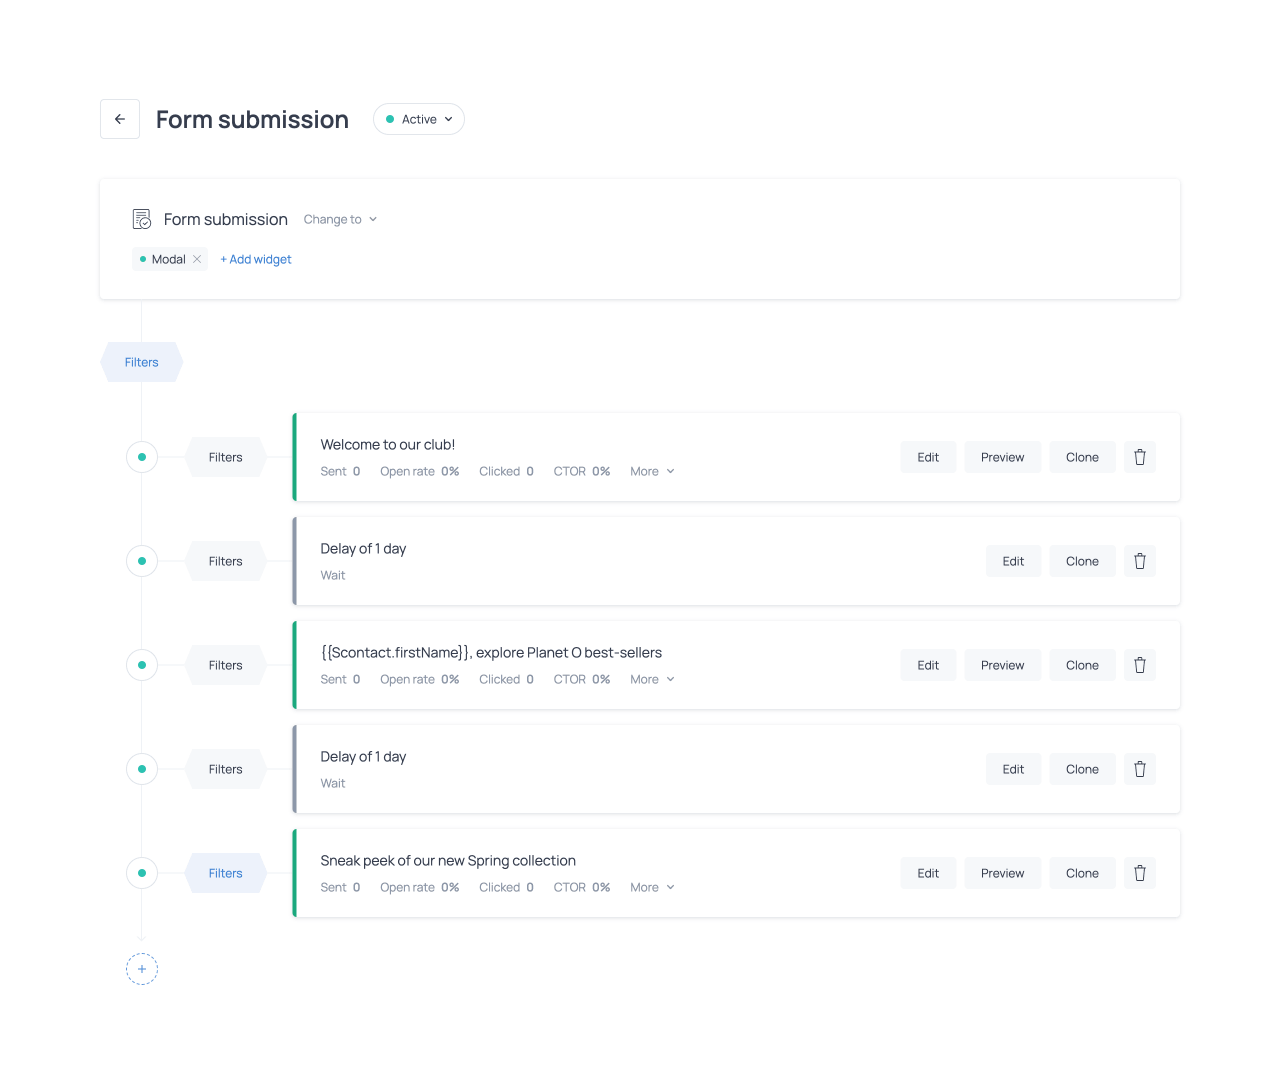
Form submission
The Form submission trigger activates when someone submits an email address through one of your forms. This includes newsletter signup forms, pop-up forms, embedded forms, or contact forms that collect email addresses. The automation can be connected to a single form or multiple forms.
Email link click
The Email link click trigger activates when a contact clicks through an email you’ve sent them. You can configure the automation to be triggered by a specific link or any of several links. This type of automation also allows you to set link-click conditions for the actions within the sequence. For example, within the same automation, you can have different emails, each one triggered by a specific link click.
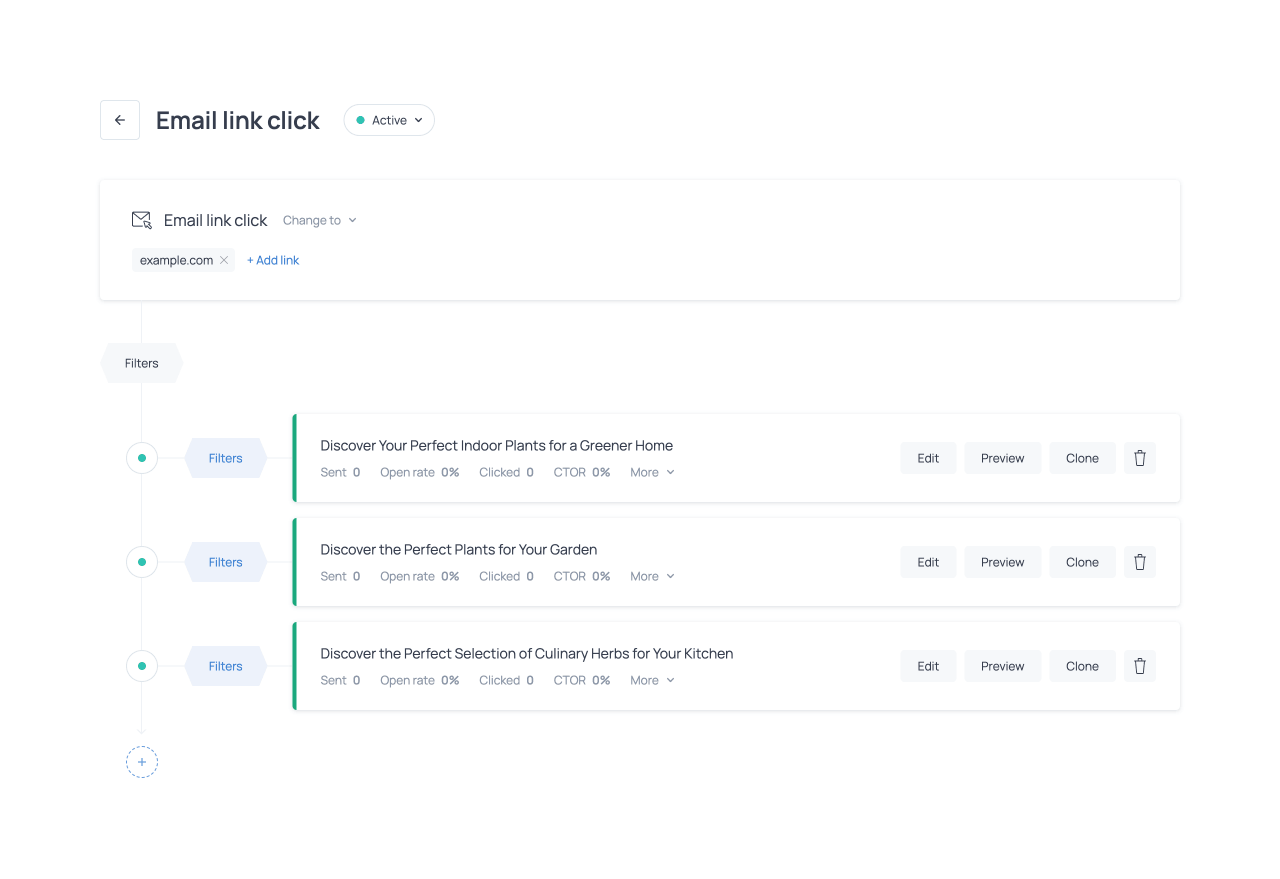
Email link click automation with different emails triggered by specific link clicks
Checkout abandonment (Shopify only)
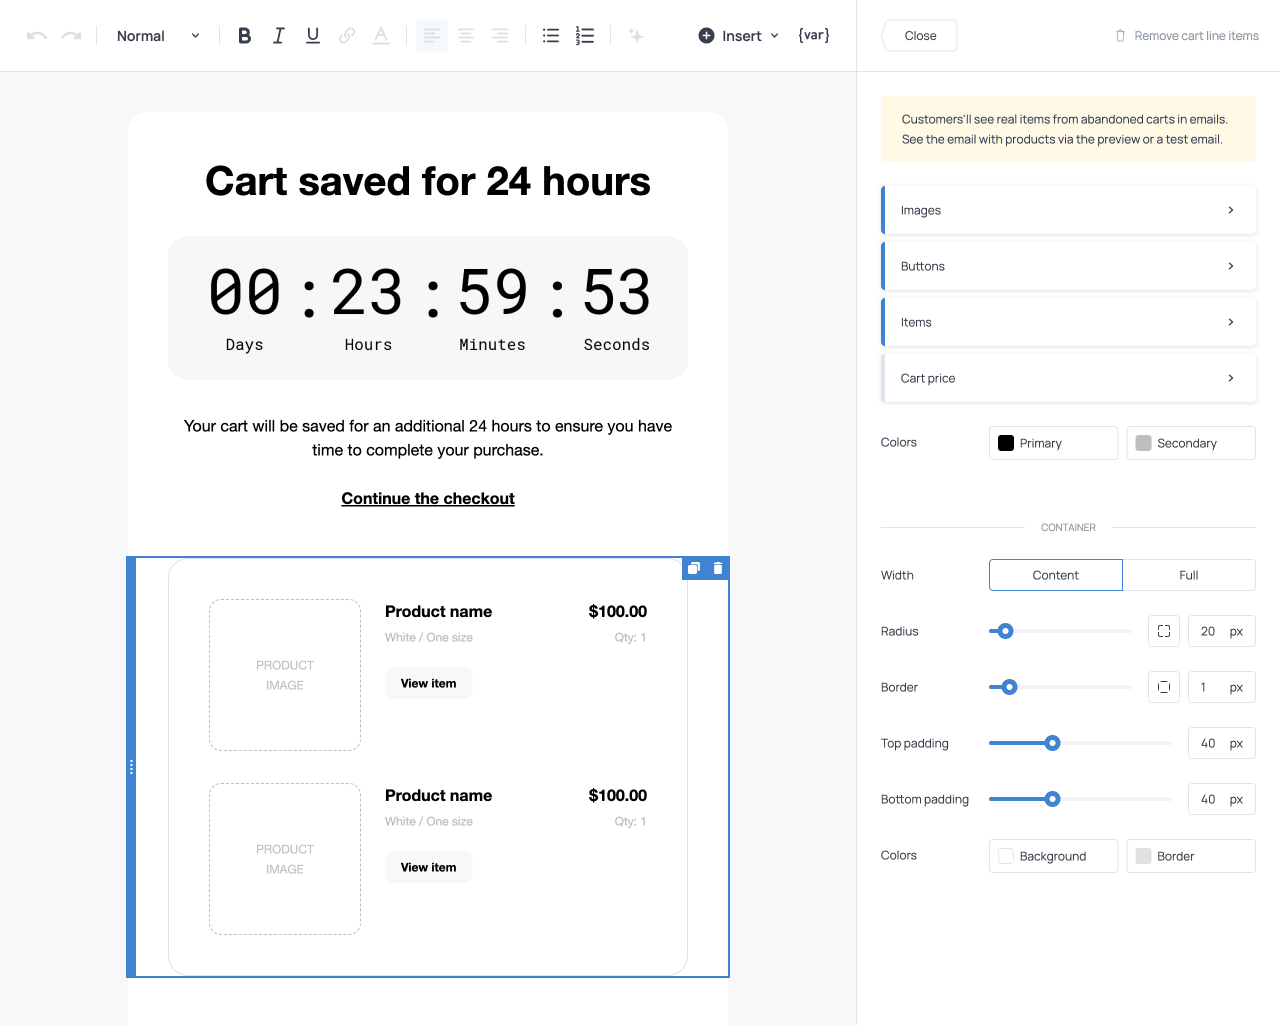
The Checkout abandonment trigger activates when a customer initiates checkout but does not complete the purchase. More specifically, the automation is triggered 20 minutes after checkout is started, provided the order remains incomplete. Within this automation, you can apply filters to target customers based on the products or variants they intended to purchase, the total cart value, or the number of items in the cart. This allows you to tailor recovery messages to purchase intent or order value.
A сheckout abandonment automation must include a button configured with the Continue checkout action. This button leads customers back to their saved checkout session, allowing them to resume and complete the purchase without starting over. You can also add the Abandoned items element to dynamically display the products left in the cart. This serves as a reminder of the pending purchase and encourages customers to return and complete their order.
New order (Shopify only)
The New order trigger activates after a customer completes a purchase in your store. By default, the automation runs after any order. You can set filters so that it triggers only when the customer purchases a specific product or variant, spends a certain amount, or buys a defined number of items.
Within the email, you can use the Purchased items element to dynamically display the products included in the order, making post-purchase communication more relevant and contextual. You can also use variables to insert the order ID and order URL directly into the message, providing customers with quick access to their order information. This flexibility allows you to tailor follow-up messages based on precise order details.
Fulfilled order (Shopify only)
The Fulfilled order trigger activates when an order is marked as fulfilled in your store. By default, the automation runs after any fulfilled order. However, you can apply filters to trigger it only when the order includes a specific product or variant, reaches a certain total value, or contains a defined number of items.
Within the same automation, you can create multiple emails with content tailored to different products or categories and use filters to ensure each email is sent only to customers who purchased the relevant items. In the email editor, you can add the Fulfilled items element to dynamically display the products included in the fulfilled order, and use variables to display order details in the message.
Lifecycle triggers
Segment
The Segment trigger activates when a contact joins a specific segment. Segments can be defined based on contact data, tags, purchase behavior, email engagement, or a combination of conditions. When a contact meets the criteria and enters the selected segment, the automation starts.
This trigger applies only to contacts who join the segment after the automation has been activated. Contacts who were already part of the segment before the automation was configured will not enter it retroactively. If you need to target contacts who already belong to a segment, you can launch a workflow for that segment instead (read about the Workflow trigger below).
New subscriber (Shopify only)
The New subscriber trigger activates when a new subscriber is added to your Shopify Customer list. Subscribers may join your list through store forms, at checkout, or they can be imported into Shopify from an external source. You can apply filters to target only specific subscribers based on available contact data. If no filters are set, the automation will run for every new subscriber added to your Shopify Customer List.
Customer winback (Shopify only)
The Customer winback trigger activates when a previously active customer has not made a purchase for a defined period of time. The inactivity period can be customized in the automation settings to match your product lifecycle and average repurchase frequency.
The automation is triggered only for customers who reach the defined inactivity threshold after the automation has been activated; customers who were already inactive for a longer period at the time of setup will not be included.
| Industry | Recommended interval before winback email |
|---|---|
| Clothing | 60–90 days |
| Health and beauty | 45–60 days |
| Jewelry and accessories | 90–120 days |
| Electronics | 90–180 days |
| Home and decor | 60–90 days |
| Food and drink | 30–45 days |
| Outdoor and garden | 90–120 days |
| Books, music, games | 30–60 days |
| Arts and crafts | 60–90 days |
| Pet supplies | 30–60 days |
System triggers
Workflow
A Workflow is a reusable automation sequence that is not tied to a specific trigger, such as a form submission or link click. Instead, it can be launched manually from the Contacts tab, triggered during bulk contact import, or initiated from another automation using the Run workflow action.
A workflow contains its own sequence of actions, such as sending emails and assigning tags, and it can include waiting times between steps. These actions run once the workflow is launched. This allows you to create one predefined sequence and use it whenever needed, without rebuilding the same steps in multiple automations.
| Launching method | Use cases |
|---|---|
| Launch the workflow manually for selected contacts | Send an onboarding sequence to contacts added before a welcome automation was created. Deliver a special promotion or announcement to a selected group of contacts. |
| Launch the workflow upon importing contacts | Automatically send a welcome sequence to contacts imported from another platform. Start a re-engagement sequence for inactive contacts imported from a CRM system. Send event confirmation and preparation emails to contacts imported from an event registration platform. |
| Launch the workflow via an action within another automation | Trigger a shared onboarding sequence when new subscribers join through different sources. Launch a product education sequence when a contact shows interest in a specific category or completes a previous sequence. Start a post-purchase education sequence after a customer places an order containing a specific product (Shopify). |
Webhook request
The Webhook request trigger activates an automation when Getsitecontrol receives a request sent to a unique webhook URL generated for that automation. This request must be configured and sent from an external system, such as your website, backend, or another application. In the automation settings, you’ll find the dedicated webhook URL along with the required request format.
The request must include at least the contact’s email address and may contain additional data, such as name, tags, or custom fields, which will be saved to the contact profile. If the contact does not yet exist, a new profile is created automatically. If the contact already exists, their information is updated. Once the webhook request is received and validated, the automation is triggered.
Actions
After defining what event triggers an automation, the next step is specifying what should happen next. Actions define the steps the automation performs after the trigger occurs. By combining multiple actions in sequence, you can create structured email journeys that evolve over time and respond to customer behavior. The following actions are available in all automations.
Send email
The Send email action allows you to compose and deliver a message to contacts who enter the automation. You can send a single email or build a sequence by adding multiple email actions separated by delays. When creating an email, you can start from scratch, use a premade template, reuse a previously created email, or import an HTML email template from an external source.
You can enrich the email with urgency elements such as countdown timers, product cards displaying product feeds, and attention-grabbing visual blocks like the Slideshow and Animated text banners. Depending on the automation type, you can also include elements such as Abandoned items or Purchased items, as well as buttons like Continue checkout that guide recipients back to the relevant action. Personalization and dynamic content allow each message to adapt to the recipient and the context that triggered the automation.
Each email action can apply to all contacts in the automation or only to those who meet specific conditions. This makes it possible to send different emails within the same automation based on behavior, tags, or purchase data.
Add delay
The Add delay action inserts a waiting period between steps in your automation. Delays can be configured in minutes, hours, or days. They are essential for pacing messages appropriately, preventing multiple emails from being sent at once, and creating structured onboarding, recovery, or educational sequences.
Assign tag
The Assign tag action adds a tag to a contact’s profile when they reach that step in the automation. Tags are useful for segmentation, behavioral tracking, and triggering other automations. For example, you might tag contacts who clicked on a specific link, purchased a certain product, or completed a sequence. Tags help you organize your audience and refine future targeting. This action can apply to all contacts or only to those who meet specific conditions defined by filters.
Remove tag
The Remove tag action removes an existing tag from a contact’s profile. This keeps segmentation accurate and ensures that tags reflect current behavior rather than outdated status. For instance, you might remove a temporary campaign tag after a promotion ends or remove an interest tag once a purchase is completed. Like other actions, it can be limited to contacts who match defined conditions.
Run workflow
The Run workflow action launches a predefined workflow when a contact reaches this step in the automation. The contact is then enrolled in the selected workflow and proceeds through the sequence of actions defined there. This allows you to reuse the same sequence, such as an onboarding or educational series, across multiple automations without recreating the same emails and steps each time.
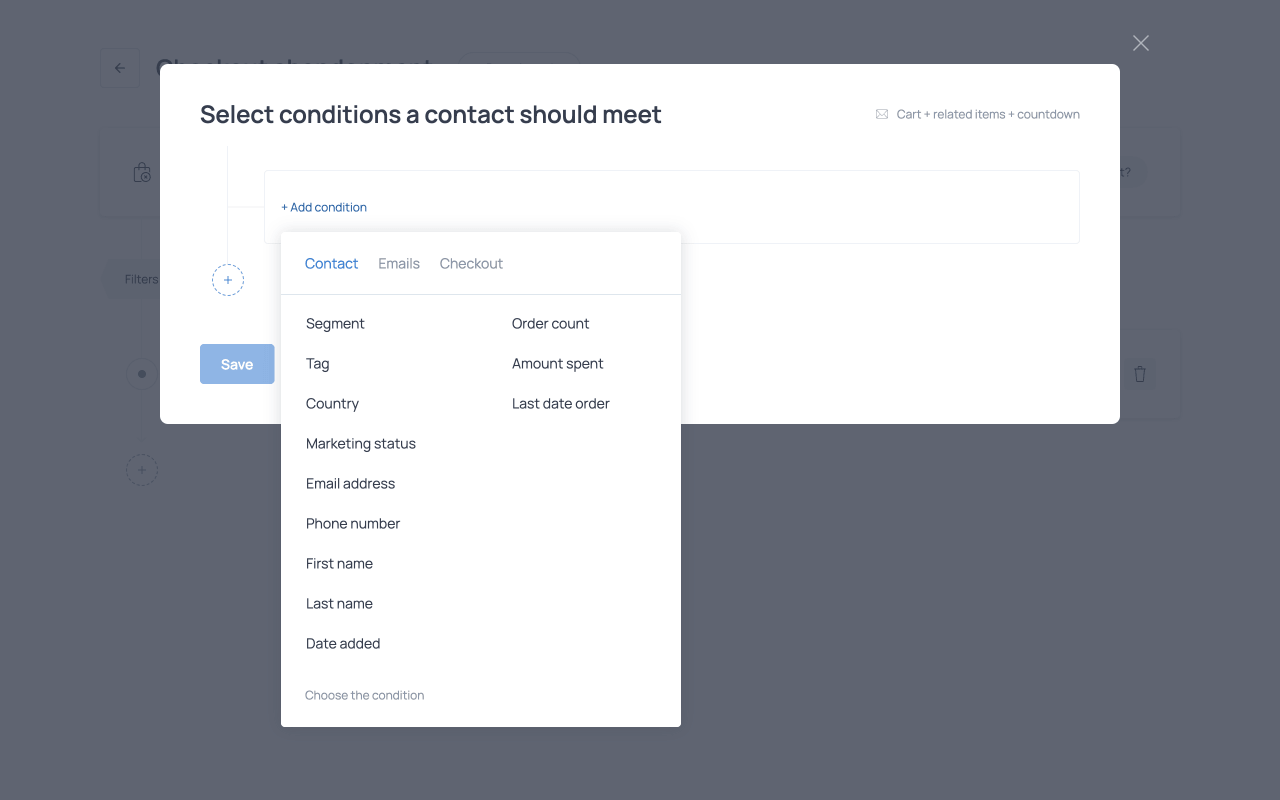
Filters (conditions)
Filters determine who enters an automation and who receives specific actions within it. In the automation builder, these rules are configured using Filters buttons. Each filter consists of one or more conditions that define the criteria a contact must meet.
Filters can be applied at two levels: at the automation level, controlling which contacts enter the automation; at the action level, controlling which contacts receive a specific email, tag, or delay within the automation. This distinction allows you to build complex logic inside a single workflow.
Filters are one of the most powerful components of automations because they allow you to move from broad messaging to precise, behavior-driven communication. Depending on the automation trigger, different condition categories are available, each based on the type of data they evaluate.
Contact-based conditions
Contact-based conditions rely on information stored in the contact profile to determine whether a contact enters an automation or receives a specific action. In the automation builder, these conditions appear under the Contact tab of the conditions menu and are available for all automation triggers. They evaluate attributes such as email address, phone number, name, country, assigned tags, segment, marketing status, and the date the contact was added. For Shopify stores, they can also evaluate the order count, the total amount spent, and the date of the last order.
You can also create your own custom fields and use them in conditions. Once created, these fields also appear under the Contact tab and can be used like any other contact attribute. Their values can be collected through forms, provided during contact import, or passed through webhook requests. When collecting or importing this data, field mapping allows you to match source fields with the corresponding custom fields in Getsitecontrol, so that the values are stored correctly. Contact-based conditions are commonly used to target contacts based on audience segments, purchase history, or geographic location.
Email interaction conditions
Email interaction conditions evaluate how contacts have interacted with previous emails. In the conditions menu, they appear under the Emails tab. These conditions evaluate whether a contact has received, opened, or clicked an email; how many emails they interacted with; and the most recent date of those interactions. Email interaction conditions are available across all automation triggers.
In automations using the Email link click trigger, additional conditions are available to evaluate interactions with specific links, including the link URL, link text, and the subject line of the email containing the link. These can be found in the Click tab of the conditions menu. Email interaction conditions are commonly used to send follow-up emails to contacts who opened or clicked a previous campaign, or to exclude contacts who have already received a specific message.
Form submission conditions
Form submission conditions evaluate contextual data captured when a visitor submits a form. For this reason, they are available only in automations that use the Form submission trigger. These conditions evaluate information such as the visitor’s location, device type, browsing session details, API parameters, and UTM tags. They are commonly used to trigger different follow-ups depending on how the visitor arrived on the site, where the form was submitted, or which marketing campaign generated the subscription.
Order and checkout-based conditions (Shopify)
Order and checkout-based conditions rely on data associated with an abandoned checkout or a completed order. These conditions are available in automations that use the Checkout abandonment, New order, or Fulfilled order triggers. They evaluate attributes such as the total price, the number of items, and the specific product or variant involved. Depending on the trigger, the conditions refer either to the items included in a completed order or to the items present in an abandoned checkout session. These conditions allow you to tailor follow-up messages based on purchase value, specific products, or the size of the order.
Logical operators: AND vs OR
Filters can include multiple conditions, which can be combined using one of two logical operators. AND means that all conditions must be met for the filter to apply. OR means that at least one of the conditions must be met for the filter to apply. Using the wrong operator can lead to unexpected automation behavior, including more or fewer contacts in the automation than intended. For this reason, it is important to choose the operator that matches the intended logic.
Use cases
The following examples demonstrate how the triggers, actions, and filters described above can be combined to build practical email automation flows. Each use case highlights a common scenario, showing how automations can respond to subscriber behavior, purchase activity, or lifecycle events.
Subscription confirmation with incentive
The Form submission automation can be used to confirm a subscription from a Getsitecontrol form and deliver an incentive. For example, a visitor signs up to receive a discount on their first purchase. Immediately after submitting the form, they receive a confirmation email containing the discount code. After a short delay, they may receive a second email introducing your brand and highlighting bestsellers. This ensures that every new subscriber receives what was promised while also entering a structured onboarding journey automatically. It removes manual follow-up and creates a consistent first impression. Other applications include survey confirmations, webinar registrations, lead magnet delivery, or automated replies to contact form submissions.
Personalized product recommendations
The Email link click trigger can be used to send personalized product recommendations based on demonstrated interest. For example, if a newsletter features multiple product categories and a subscriber clicks on one of them, that click indicates what they are interested in. The Email link click automation can tag the contact accordingly and send an email or email sequence featuring recommendations related to that specific category. Over time, assigning tags based on clicks helps build more refined audience segments and improves the relevance of future campaigns. Other applications include re-engagement campaigns, upsell sequences, and product-specific promotional flows.
Abandoned checkout sequence
You can use the Checkout abandonment trigger to send reminder emails to customers who start checkout but leave before completing their purchase. In this scenario, a customer adds several products to their cart and proceeds to checkout, but exits before finishing the payment. A few minutes later, the automation sends a reminder email that dynamically displays the Abandoned items and includes a Continue checkout button, allowing the customer to return to their saved checkout session. The email may also feature product cards displaying one of the following dynamic product feed options.
| Dynamic product feed | Description |
|---|---|
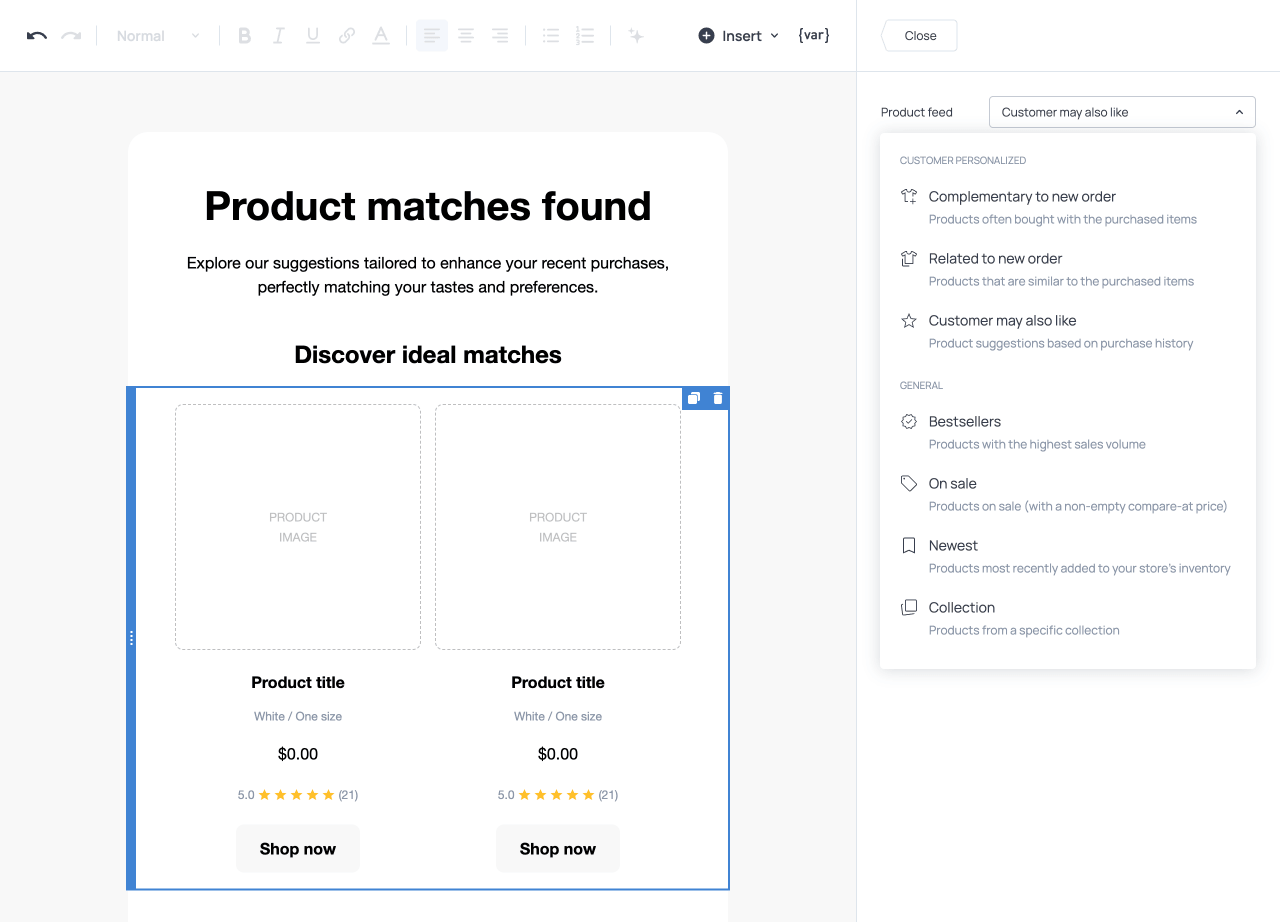
| Related to abandoned checkout | Shows products that are similar to the abandoned items. For example, if a customer abandons a pair of running shoes, the email can recommend other running shoes in different colors or models. |
| Customer may also like | Generates personalized suggestions based on the customer’s purchase history. For example, if a customer has previously purchased kitchen appliances, the product cards will feature products bought by customers with similar interests. |
You can also include a limited-time incentive to encourage completion, such as a discount or free shipping. The Coupon email item can generate unique single-use coupon codes for each recipient, helping track individual sales and prevent code reuse (Shopify only). The sequence can be refined by applying filters based on cart value, specific products, or the number of items in the checkout, allowing you to send different follow-up emails for different scenarios.
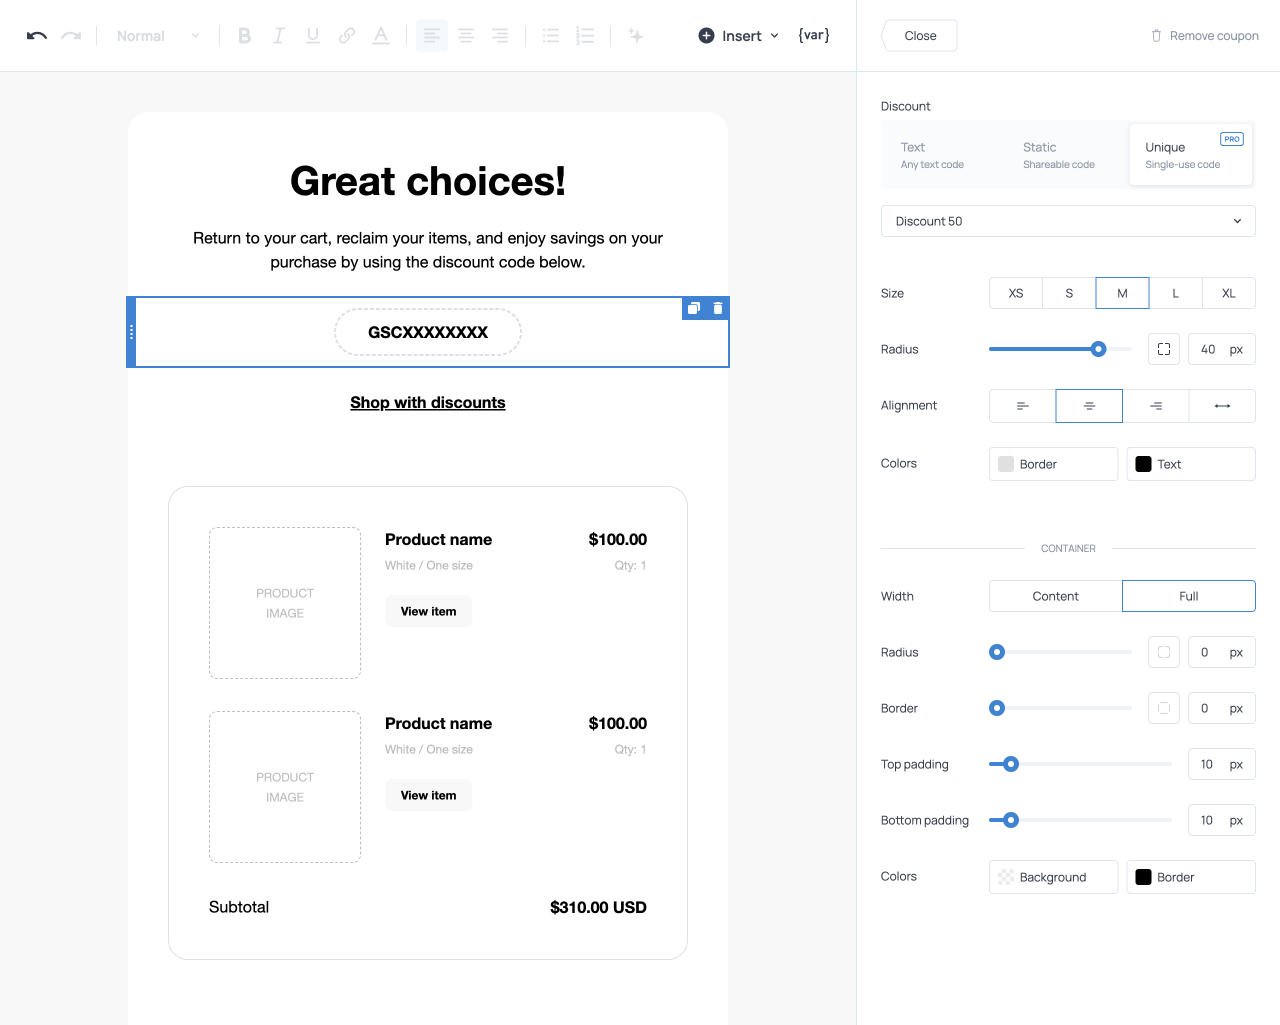
Coupon element configured to display a unique single-use coupon code
Post-purchase complementary recommendations
The New order trigger can be used to send complementary product recommendations based on what the customer has just purchased. For example, if a customer buys a specific product, the automation can send a follow-up email featuring relevant items that complement their purchase. For this purpose, you can add Product cards to the email and choose one of the following dynamic product feed options.
| Dynamic product feed | Description |
|---|---|
| Complementary to new order | Displays products that naturally complement the purchased item. For example, a phone case for a smartphone, a lens for a camera, or matching accessories from the same product line. |
| Related to new order | Shows products that are similar to the purchased item. For example, if a customer buys a video game, the email can recommend other games for the same console or with a similar theme. |
| Customer may also like | Generates personalized suggestions based on the customer’s purchase history and interests. For example, if a customer often buys outdoor gear or products in specific colors or styles, the recommendations will reflect those preferences. |
Other applications for this trigger include product care instructions, loyalty invitations, referral program invitations, or discount codes for a future purchase.
Product review request
The Fulfilled order trigger can be used to request a product review after a customer receives their order. The automation can send a follow-up email thanking the customer for their purchase and inviting them to share feedback about the product. You can use the Fulfilled items element to dynamically display the products included in the order. Beneath each product, you can add a ‘Review product’ button that links directly to the product page, where customers can submit a review through the store's review system. This type of automation helps collect product feedback while the purchase is still fresh in the customer’s mind, increasing the chance of receiving reviews and strengthening social proof.
Post-purchase care instructions
The Fulfilled order trigger can also be used to send a post-shipment email confirming fulfillment and providing guidance on how to use, assemble, or care for the purchased product. This type of follow-up sets expectations, improves the customer experience, and reduces support requests. The email may also include a discount for a future purchase or a dynamic product feed featuring complementary items. Other applications include sharing educational content related to the purchase or sending replenishment reminders for consumable products.
VIP customer sequence
The Segment trigger can be used to launch a dedicated sequence for high-value or highly engaged contacts. For example, you can create a segment that includes contacts who have a specific tag, belong to a particular audience group, or frequently engage with your emails. When a contact qualifies and joins that segment, the automation can send a welcome-to-VIP email offering exclusive benefits, early access to new collections, or a special discount. Other applications include re-engaging inactive subscribers who enter a predefined inactivity segment or rewarding highly engaged contacts with milestone-based incentives.
Welcome sequence for Shopify subscribers
The New subscriber trigger can be used to launch a structured welcome sequence for new Shopify subscribers. As soon as someone agrees to receive marketing emails, the automation sends a welcome message that may include a first-purchase incentive or set expectations about future communication. Subsequent emails can introduce bestselling products, highlight key categories, or explain your brand’s values and mission. This approach ensures immediate engagement while guiding new subscribers toward their first purchase in a consistent and automated way.
Winback sequence for Shopify customers
The Customer winback trigger can be used to launch a structured re-engagement sequence for customers who have stopped purchasing. For example, once a customer reaches the defined inactivity period, the automation can send a personalized email that highlights products they are likely to be interested in. By adding product cards and selecting the Customer may also like dynamic product feed, the email can display tailored recommendations generated from the customer’s purchase history. A follow-up email may offer a limited-time incentive, such as a discount or free shipping, to encourage customers to return and complete another purchase. Other applications include sending replenishment reminders for consumable products or inviting inactive customers to share feedback about their experience.
Reusable onboarding sequence
A Workflow can be used to create a single, structured onboarding sequence for all new subscribers. For instance, every new contact receives a three-email sequence: the first email welcomes them and introduces the brand, the second highlights best-selling products, and the third explains key benefits such as shipping policies or loyalty rewards. Regardless of how the subscriber joined the list, they go through the same predefined sequence. This ensures that every new contact receives a consistent introduction to your brand while keeping the onboarding process organized and easy to maintain. Other applications include creating a product or category-specific email sequence and launching it from different automations whenever a contact shows interest in that topic.
Account registration confirmation
A Webhook trigger can be used to send onboarding emails when a user creates an account on your website or application. Once the registration is completed, your system sends a webhook request containing the user’s email and other relevant details to Getsitecontrol. This triggers an automation that sends a confirmation email welcoming the new user and introducing key features of the service. The automation can then continue with a short onboarding sequence that helps the user get started, highlights important functionality, or encourages the user to complete their profile. Other applications include sending confirmation and reminder emails after a customer books an appointment through an external scheduling tool. Another option is triggering a follow-up sequence when a user registers for an event hosted on a third-party platform.
| Automation trigger | Example use case |
|---|---|
| Form submission | Subscription confirmation and delivery of a signup incentive. Webinar registration confirmation. Automated reply to a contact form submission. |
| Email link click | Personalized product recommendations based on clicked content. Upsell email sequence triggered by product category clicks. |
| Checkout abandonment | Abandoned checkout recovery sequence. |
| New order | Post-purchase complementary product recommendations. Loyalty program invitation after purchase. |
| Fulfilled order | Product review request. Post-shipment care instructions and usage guidance. Replenishment reminders for consumable products. |
| Segment | VIP customer sequence for high-value contacts. Re-engagement sequence for inactive contacts. |
| New subscriber | Welcome sequence for new Shopify subscribers. First-purchase incentive campaign. |
| Customer winback | Re-engagement sequence for inactive Shopify customers. Feedback request from inactive customers. |
| Workflow | Reusable onboarding sequence for new contacts. Product or category education sequence triggered from multiple automations. Special promotion for a selected group of contacts. |
| Webhook | Account registration confirmation and onboarding. Event registration follow-up sequence. |
Improving email deliverability
Once your automations are configured, their effectiveness depends on whether the emails they send actually reach your subscribers. Email deliverability refers to how successfully your messages land in your subscribers’ inboxes rather than being filtered into spam or promotional folders. Inbox placement is ultimately determined by receiving mailbox providers, which evaluate factors such as sender authentication, engagement, and list quality.
Getsitecontrol includes built-in tools that support strong deliverability, while proper authentication and good sending practices help maintain a positive sender reputation over time. The recommendations below explain how to use these tools and practices to ensure your automated emails consistently reach subscribers’ inboxes.
Send emails from your domain
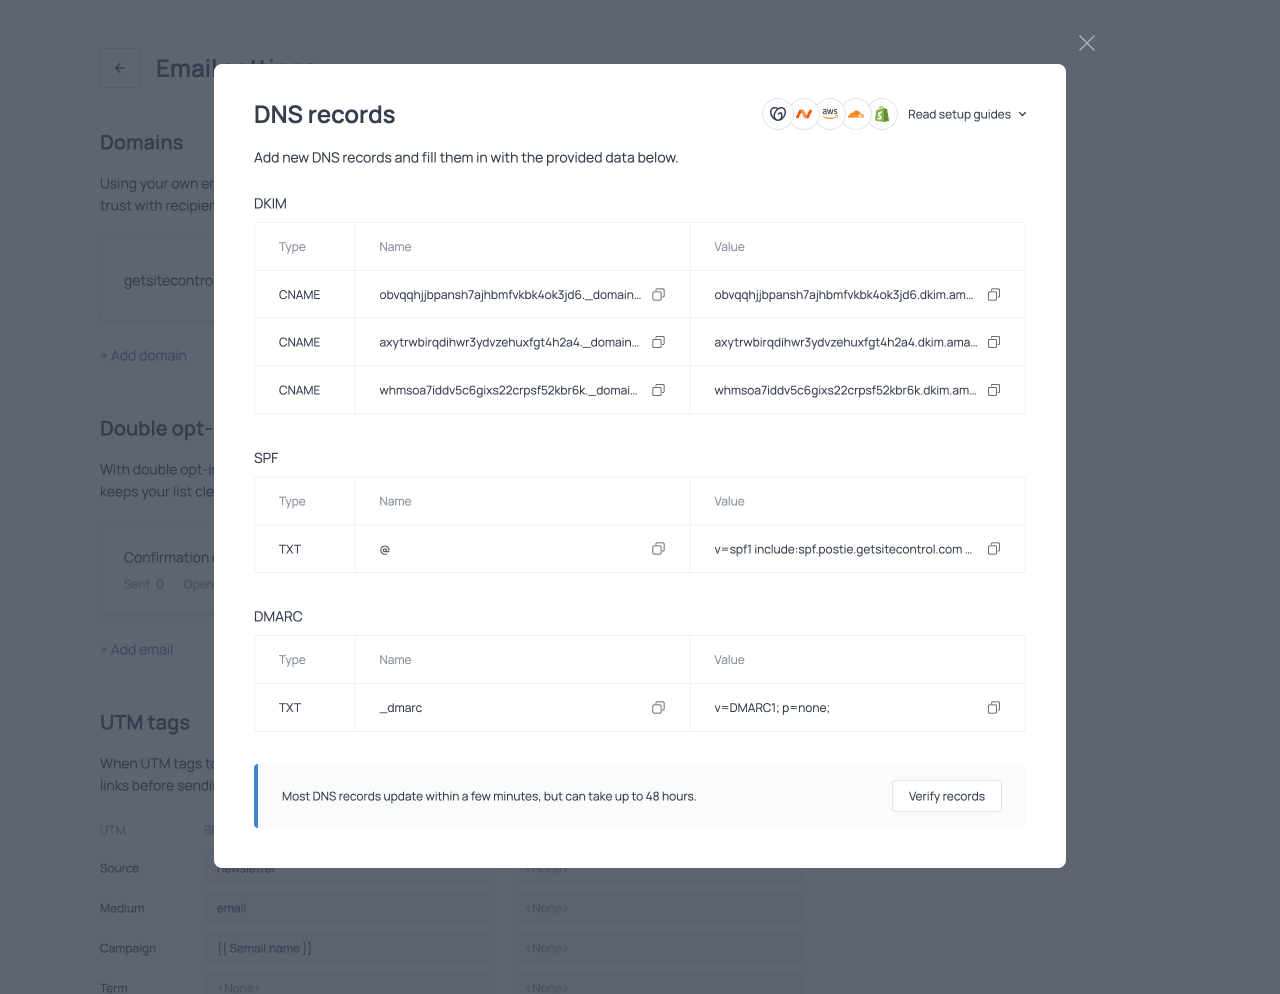
Using a verified custom domain is one of the most important steps for maintaining strong deliverability. When emails are sent from your own domain rather than a shared sender address, mailbox providers can better authenticate your messages and associate them with your brand.
In Getsitecontrol, you can connect your domain in the Email settings and verify it by adding the required DNS records. The verification process involves configuring authentication records such as DKIM, SPF, and DMARC in your domain provider’s DNS settings. Once these records are verified, you can select your domain as the sender of your automated emails. These authentication mechanisms help receiving servers confirm that the email was legitimately sent on behalf of your domain, strengthening trust and improving inbox placement. In addition to supporting deliverability, sending emails from your own domain also strengthens brand recognition, as recipients repeatedly see your domain in the ‘From’ field.
Reduce bounce rates with Anti-Bounce
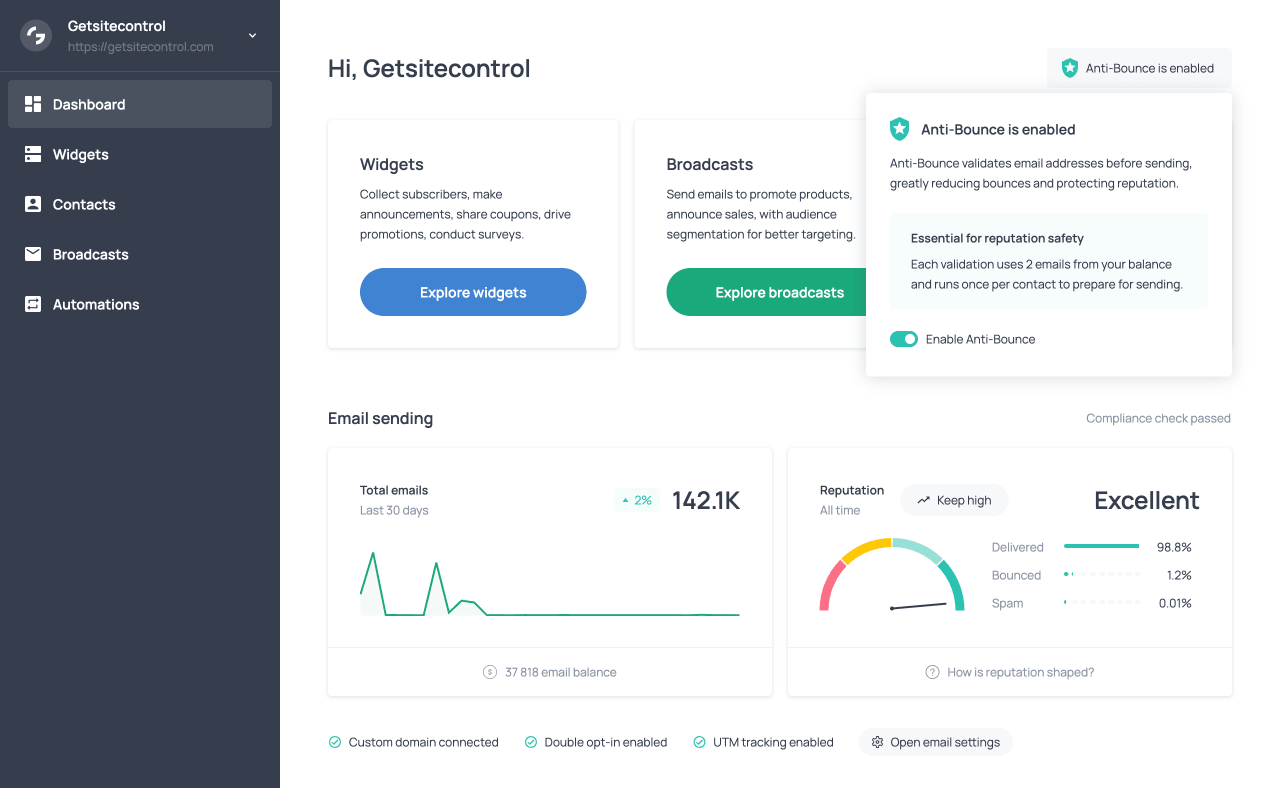
High bounce rates can negatively affect sender reputation over time. To prevent this, Getsitecontrol includes a built-in Anti-Bounce feature that validates email addresses before sending.
When anti-bounce is enabled, email addresses are checked before the message is sent, allowing the system to identify invalid addresses in advance. By preventing emails from being sent to problematic addresses, this validation process significantly reduces bounce rates and protects your sender reputation. Anti-bounce can be enabled from the Dashboard tab or directly from the Automations tab. Each validation runs once per contact and uses two emails from your sending balance.
Ensure high-quality subscriber signups
While Anti-Bounce validates existing contacts before sending emails, it is equally important to ensure that only legitimate subscribers are collected in the first place. Getsitecontrol provides two built-in tools that protect the quality of your contact list from the moment someone subscribes.
Using Double opt-in emails ensures that subscribers confirm their email address before being added to your contact list. After submitting a form, users receive a confirmation email containing a verification link, and only those who confirm are added to the list. This process prevents mistyped, fake, or bot-generated addresses from entering your database.
Another useful safeguard is Google reCAPTCHA, which blocks automated bot submissions. reCAPTCHA analyzes visitor behavior in the background and stops suspicious activity, preventing bots from submitting fake addresses in your email forms.
Together, these tools ensure that your contact list consists of real, intentional subscribers, which leads to stronger engagement and more reliable inbox placement over time. Read more about Double opt-in emails and reCAPTCHA.
Send relevant and well-timed messages
Automations typically perform well from a deliverability perspective because they respond to real user actions. However, relevance still matters. Emails that match subscriber expectations are more likely to be opened and engaged with, which mailbox providers will interpret as a positive signal.
Using triggers, filters, and segmentation allows you to send messages that reflect subscriber behavior, interests, or lifecycle stage. Personalizing your emails can further improve engagement. For example, you can use variables to insert the recipient’s name or other contact data into the subject line, preview text, or body of the email, making the message feel more relevant and personal.
Use clear and balanced email design
The structure of your emails can also influence how mailbox providers evaluate them. Emails that contain mostly large images and little supporting text may be treated with caution by some mailbox providers, or they may load slowly in recipients’ inboxes. Maintaining a balance between text and visual elements improves readability and ensures the message remains understandable even when images are blocked by the email client. Subject lines should also clearly reflect the content of the email. Excessive punctuation or overly promotional wording may be treated with caution by mailbox providers.
Designing emails that convert
While email deliverability determines whether your messages reach subscribers’ inboxes, conversions depend on what happens after the email is opened. After your messages successfully reach the inbox, the next step is ensuring recipients click, explore your content, and take action.
Getsitecontrol’s email editor includes features designed to make automation emails more engaging and more likely to lead to an action. The practices below help increase click-through rates and drive more conversions from your automation campaigns.
Display clear and prominent CTAs
An effective email makes the expected action immediately clear. Visual hierarchy, readable structure, and prominent call-to-action buttons help subscribers understand what the email is about and what they should do next.
Getsitecontrol provides premade email templates designed for effectiveness and readability. These templates feature modern layouts and well-structured content blocks. They also include strategically placed call-to-action buttons that guide recipients toward the primary action, such as visiting a product page, making a purchase, or returning to checkout. The templates are fully customizable.
You can reinforce CTAs by using visual elements that draw attention to key sections of the email. Animated text banners highlight important announcements or promotional messages that lead to the CTA. Display headings are larger than standard H1 headings and emphasize key messages while making important sections of the email easier to scan.
Use contextual and personalized product content
Product-focused emails convert better when the items displayed are relevant to the recipient. When customers see products that match their interests and taste, they are more likely to purchase.
Getsitecontrol allows you to include product content in automation emails using Product cards, where you can display product images, prices, and links to the product page. For Shopify stores, product cards can pull product details directly from the store catalog without needing to enter product information or images manually. Products can be selected manually or automatically using dynamic product feed options such as complementary products, related products, or recommendations based on purchase history (Shopify).
Product cards can also highlight discounted prices, helping customers evaluate whether a product is worth purchasing on the spot. For Shopify stores, they can additionally display product reviews (star ratings), providing social proof that encourages clicks and purchases.
To make products more visually prominent in the email, you can use a Slideshow element. It includes several presets, such as Slideshow, Carousel, Overlay (picture-in-picture), and more. This allows you to display multiple products in an attention-grabbing format. For Shopify stores, the slideshow can display products dynamically by pulling images from your store catalog. Available product feeds include bestsellers, on-sale products (items with a compare-at price in Shopify), new products, or items from a specific collection.
Encourage purchases with coupon codes
An incentive can be the deciding factor for a customer to make a purchase. Discount codes give recipients an immediate reason to click through and take advantage of a promotion. To display a text coupon code in the email, you can use a Coupon element, which formats the discount code to draw the customer’s attention.
For Shopify stores, the coupon element allows you to display a shareable coupon code from your existing discounts or create a new coupon code while designing the email. You can also generate Unique single-use coupon codes for each recipient. Because each code can only be used once, it prevents code sharing and improves conversion tracking. This makes unique codes particularly useful in abandoned checkout reminders, winback sequences, or limited-time promotional offers.
Tailor templates and text with AI
Creating effective email content takes time, especially when you want messages to reflect your brand voice and current promotions. AI tools can speed up this process by adapting templates and refining messaging for you.
When selecting a template, you can preview it in two modes: Original, which displays the generic template, and Adapted, which automatically tailors the template to your store. This adaptation affects the language, content, store logo, coupon codes, and social links, ensuring the template already reflects your store before you begin editing it. Once the template is opened in the email editor, the built-in AI text generator can generate or refine text based on your instructions. This allows you to rewrite sections, adjust tone, or generate new content while maintaining the overall structure of the email.
Use urgency to encourage action
Even when customers are interested in an offer, they may postpone acting on it. Adding urgency elements like Countdown timers encourages recipients to respond sooner rather than delaying their decision. Countdown timers highlight expiring promotions, limited-time discounts, or upcoming events directly within the email. When combined with clear call-to-action buttons, these visual cues communicate that the opportunity is temporary and increase the chance that recipients complete the intended action.
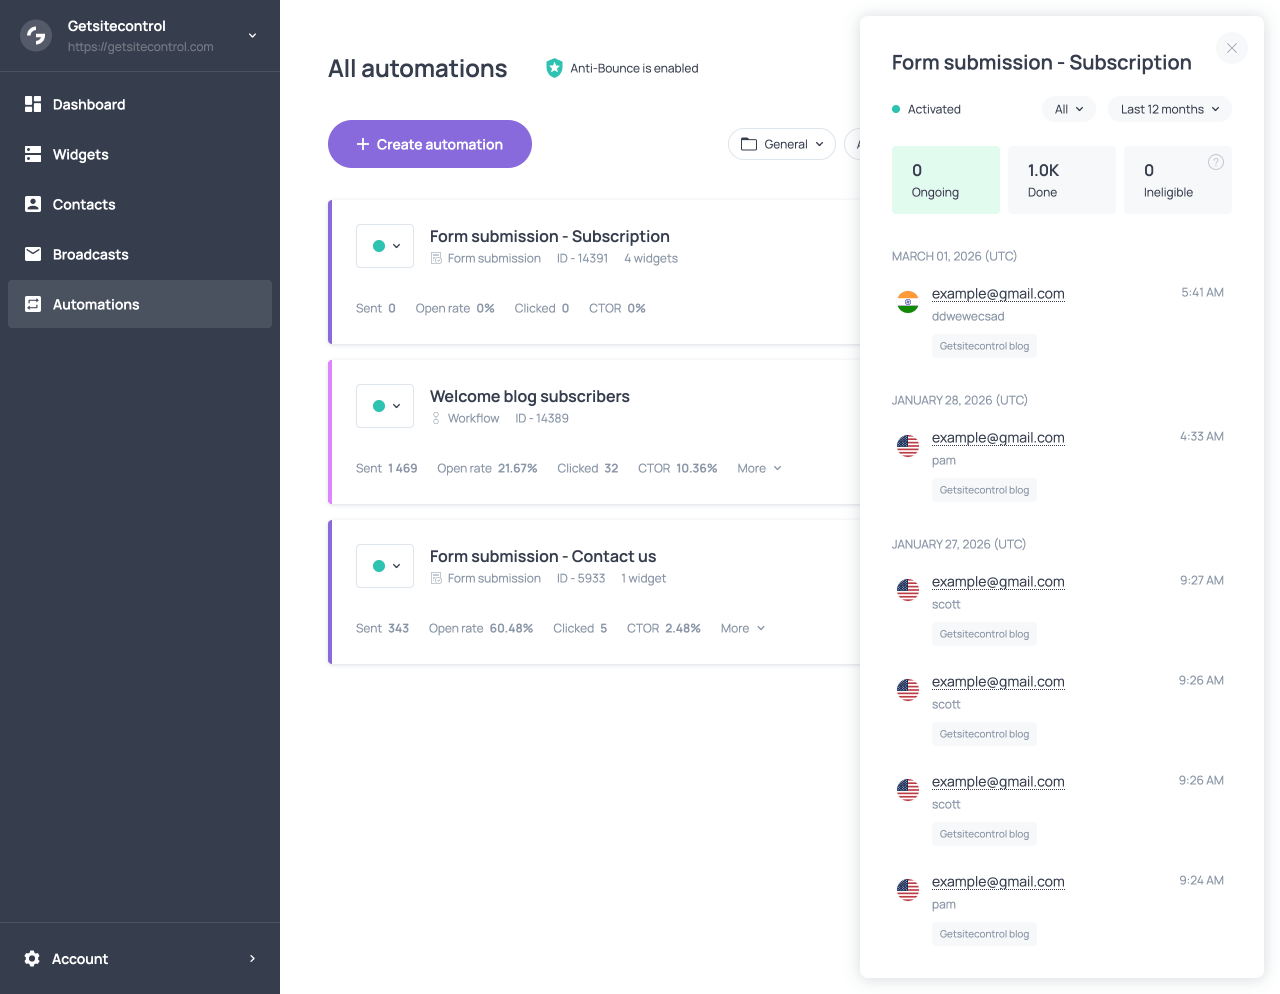
Tracking automation activity
Once an automation is activated, you can monitor how contacts move through it using the automation tracking panel, which can be opened by clicking View statistics next to the automation. This tool helps you verify that the automation is working as expected and identify potential configuration issues.
From the panel, you can see the contacts who entered the automation and track their progress through the sequence. For each contact, the panel displays the parameters with which the contact entered the automation (for example, the order value in an order-based automation) and any tags assigned to the contact. Each contact also has a status that reflects their position in the automation.
| Status | Contacts included |
|---|---|
| Ongoing | Contacts who are currently moving through the sequence. For example, a contact may have received the first email and be waiting in a Delay step before the next action. |
| Done | Contacts who have completed the automation successfully. |
| Ineligible | Contacts who triggered the automation but were filtered out because they did not meet the configured conditions. |
| Failed | Contacts for whom the automation could not be completed due to a delivery or processing issue. |
These statuses can be used as filters in the automation tracking panel, allowing you to view only contacts who are currently in the sequence, those who have completed it, or those who were excluded by filters. By monitoring these statuses, you can confirm that contacts are entering the automation correctly and notice when filters wrongfully include or exclude contacts. You can also filter the tracking view by time period, such as today, the last 7 days, or the last 6 months.
Viewing contact activity (Timeline)
At any stage, you can click on a contact in the automation tracking panel to open their Timeline. The timeline shows a detailed history of actions related to that contact, including form submissions, automation entry, emails received, and automation completion. This view helps you understand exactly how the contact interacted with the automation and which actions were executed for them.
Common mistakes to avoid
| Mistake | Consequence |
|---|---|
| Leaving filters empty unintentionally | This can cause automations to trigger for all contacts instead of a specific group. |
| Using incorrect AND/OR logic in filters | Improper operators may exclude all contacts or include too many. |
| Forgetting to activate the automation | Automations only run when activated. If the automation remains inactive, it will not trigger even when contacts meet the conditions. |
| Sending too many emails without delays | This may overwhelm subscribers and increase unsubscribe rates. |
| Not updating automations after product or pricing changes | Outdated incentives or links can damage credibility. |
| Overcomplicating logic | Complex logic increases the risk of unexpected behavior. Keep workflows clear and intentional. |
| Not testing an automation before launch | Errors in filters, links, or content may go unnoticed and affect all contacts who enter the automation. |
| Not monitoring automation tracking after launch | Configuration issues may go unnoticed. Contacts who should enter the automation may be filtered out, or the wrong contacts may be included. |
| Not using any verification safeguards (Double opt-in, reCAPTCHA, Anti-bounce) | Invalid or bot-generated addresses may enter your list, increasing bounce rates and harming sender reputation. |
Troubleshooting automations
| Issue | What to check |
|---|---|
| Automation is not running | Make sure the automation is activated. |
| Form submitted but no email received | Confirm the automation is connected to the correct form and that a Send email action is included in the automation. |
| Contacts are not entering the automation | Verify that the triggering event actually occurred (form submission, order placement, segment entry, etc.) and review any automation-level filters that may be excluding contacts. |
| Emails are not being sent | Check whether the Send email action has filters applied and review any delays placed before the email step, as contacts may still be waiting in the sequence. |
| Automation audience is larger or smaller than expected | Review the filters and logical operators (AND / OR) used in the automation. |
| Checkout recovery email does not lead back to checkout | Ensure the email includes a button with the Continue checkout action. |
| Dynamic product information is missing from the email | Confirm that the dynamic element is used, such as Abandoned items, Purchased items, or Fulfilled items, depending on the automation trigger. |
| Webhook automation is not triggering | Verify that the webhook URL is correct, the request is sent from your external system, and the request contains at least the contact’s email address in the expected format. |
| Contacts expected to enter a Segment automation do not enter | The Segment trigger only applies to contacts who join the segment after the automation is activated. Contacts already in the segment will not enter retroactively. |
| Emails are reaching spam or promotional folders | Consider sending emails from a verified custom domain, enabling Anti-bounce to validate addresses, and collecting contacts using safeguards such as Double opt-in or reCAPTCHA. |
FAQ
Can I test an automation before sending it to contacts?
Yes. You can test automations by triggering the relevant event yourself, such as submitting a form, placing a test order, or clicking a link in a test email. To prevent other contacts from entering the automation during testing, you can temporarily add a filter (condition) that includes only your email address. This ensures the automation runs only for you while you verify it behaves as expected.
If you only want to check how an email in the automation will appear in a subscriber’s inbox, you can use the Send test email feature in the email editor.
Can I send multiple emails within the same automation?
Yes. You can add several Send email actions within the same automation and separate them with Add delay actions to create a sequence of messages.
Why didn’t the email send immediately after the trigger?
Emails in an automation are sent according to the sequence of actions and delays configured in the workflow. If a delay action is placed before the email step, contacts will wait for the specified period before the email is sent. Some triggers also include built-in timing rules. For example, Checkout abandonment automations are triggered 20 minutes after a customer starts checkout, provided the purchase is not completed.
Can a contact enter the same automation more than once?
In most cases, automations are triggered each time the triggering event occurs. For example, if a contact submits the same form multiple times or places multiple orders, the automation can run again for that contact. You can use filters, tags, or segments to control whether contacts can enter the automation more than once.
Can a contact be part of multiple automations at once?
Yes. A contact can be part of multiple automations simultaneously if they trigger different events. For example, a contact may enter a welcome sequence while also triggering a post-purchase automation after placing an order on your store.
Can I see who enters the automation in real time?
Yes. In the automation tracking panel, you can see contacts as they enter the automation and monitor their progress through the sequence. The panel shows each contact’s current status, the parameters with which they entered the automation, and any tags associated with them. You can also open the contact’s Timeline to view the full history of actions related to that contact.
What happens if I change an automation after it starts?
Changes to an automation are not retroactive. Updates such as modifying filters, editing emails, or adding actions apply to contacts who enter the automation after the changes are saved. Contacts already in the automation will follow the updated sequence if they have not yet reached the step where the change was made. For example, if you add a third email after a contact has received the first, they will receive the remaining emails according to the updated sequence. Contacts who have already completed the automation are not affected by the changes.
What happens if a contact’s data changes mid-automation?
If a contact’s data changes, such as receiving a new tag or placing an order, those updates may affect filters applied to upcoming actions in the automation. However, they will not cause the contact to restart the automation or repeat previous steps.
Can I pause or deactivate an automation?
Yes. You can deactivate an automation at any time. While it is inactive, new contacts will not enter the automation even if they trigger the event. Once the automation is activated again, it will start accepting new contacts who meet the trigger conditions. Contacts who triggered the event while the automation was inactive will not be added when it is activated again.