Try Getsitecontrol for free
Create stunning email capture forms for your website.
There is no denying: website popups are the most popular and the most effective tools to capture email addresses.
But do you know what type of email capture form is considered second best? It’s sticky bars at the bottom of a webpage. Some of them look rather minimalistic, like the template below 👇
. . . others are more attention-grabbing and will stand out even on a very busy website 👇
It’s easy to see why this format receives so much love from bloggers and ecommerce store owners:
If you want to use a sticky bar to feature your email capture form, in the following sections, we’ll show you how to do that using Getsitecontrol.
Getsitecontrol makes it easy to get started with a large gallery of templates. Open the gallery, and once you select a template to your taste, just follow the prompts to add it to your Getsitecontrol dashboard.
Once in the dashboard, click on the piece of text you want to change – including the text on the button – and start typing. The process is very straightforward, and you’ll see the result in the preview window right away.
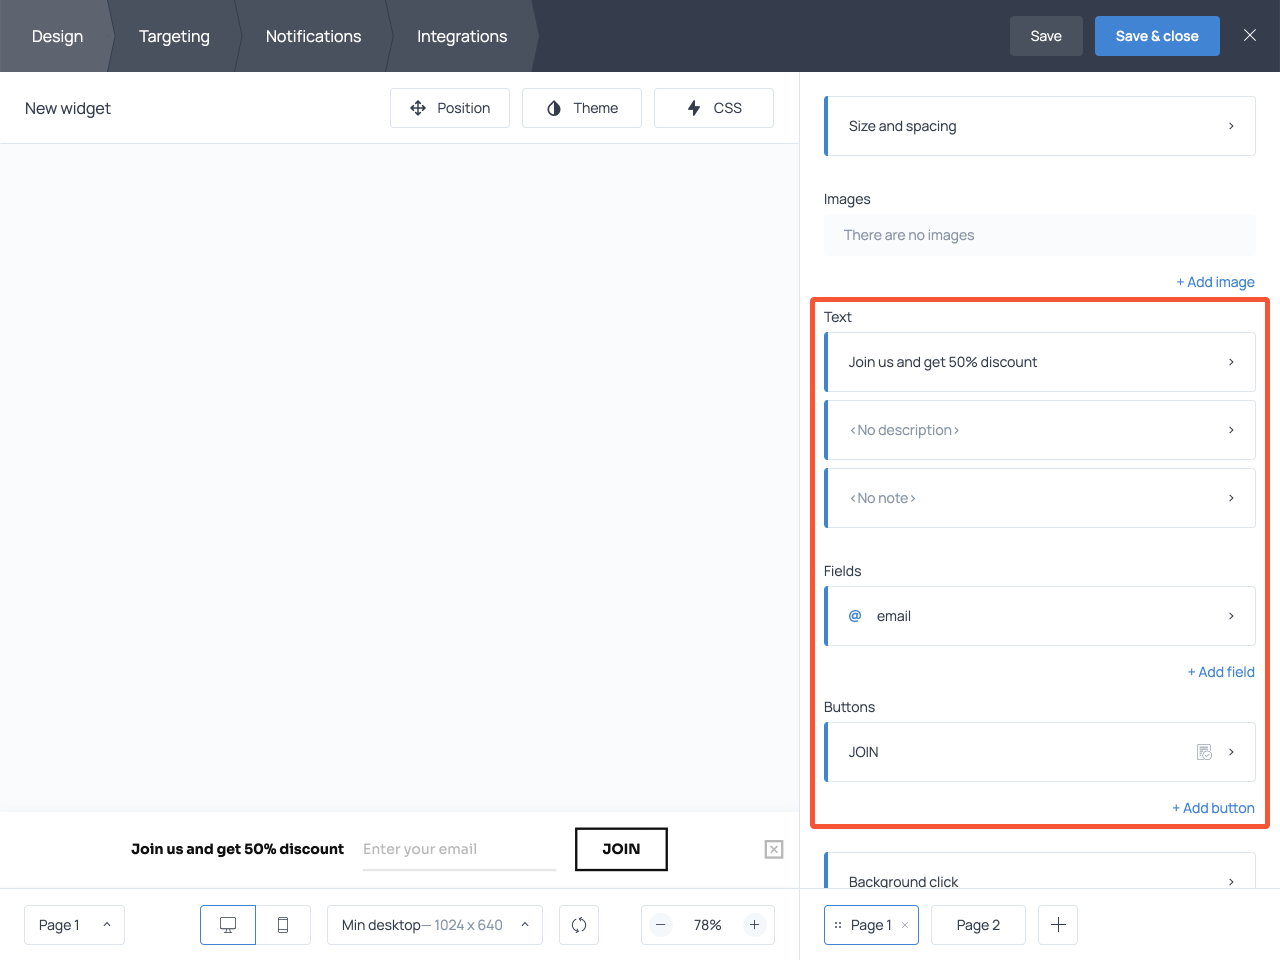
Once your website visitors fill out the form, they’ll see a brief “thank you for subscribing” note: it’s called a submission success message. Most templates already contain a default submission success message, but you can edit it as well. In your dashboard, it’s located on Page 2.

In addition to the text, you can add links and buttons to encourage new subscribers to explore other pages on your website.
On the same screen, you can change the design of your email capture form. Open the Theme menu to switch to the dark mode or select the color theme manually.
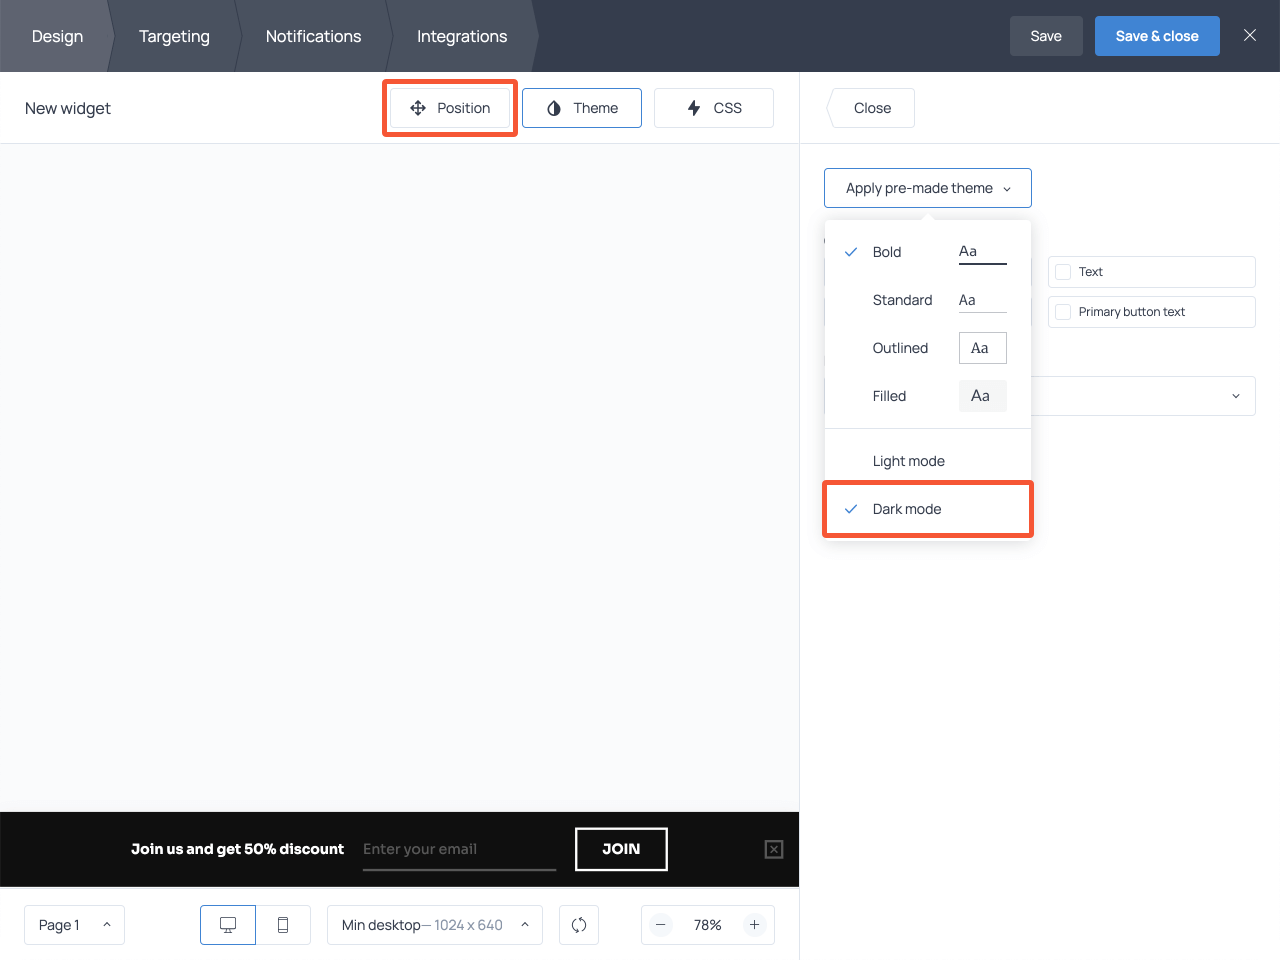
You can also change the position of the sticky bar and place it at the top of the page, for example. To do this, use the Position menu right next to the Theme button.
By default, all the emails collected through the form will be stored in your Getsitecontrol account. You can access them at any point through the Statistics report. However, if you already have an email marketing app, you can connect it using the Integrations tab, so that new subscribers go directly to your email list.

At this point, your form is ready. If you save and activate it, it will be displayed on every page of your website, unless you want to add it to selected pages only. In this case, open the Targeting tab and paste the URLs of these pages.
Let’s face it: consumers are getting more and more reluctant to subscribe to email newsletters.
If you want to attract more subscribers, the first thing you should do is avoid the bland “Subscribe to our newsletter” phrase.
Below are 5 easy recommendations to help you turn more visitors into subscribers and make the most of your email capture form.
Most people coming to your website probably hear about your business for the first time. It’s safe to assume they won’t feel urged to subscribe to your “news and updates.”
That said, capturing their emails during the first visit is crucial because the second one might never happen.
Be generous to your first-time visitors and offer a little extra something in exchange for an email address. For example:
Such incentives are called “lead magnets” because, well, they help you attract more leads. If you want to learn more, you can read our detailed guide to using lead magnets on a website.
Even if the value you’re offering to new subscribers doesn’t fall into any of the lead magnet categories, the more specific your copy is, the better.
Think of it this way. You’re asking website visitors to sign up for a newsletter. But how often will you be sending it? What exactly will it contain? Why should they subscribe?
Nobody wants to open their inbox to yet another daily newsletter where half of the content might be irrelevant to them. Clear copy helps overcome this fear and sets the right expectations.
A powerful CTA can contribute greatly to the number of subscriptions you receive, yet this short piece of copy is often overlooked.
How do you choose the right CTA for your email capture form? Think of the words that would fill you with excitement and the perception of accomplishment. In most cases, “Subscribe” or “Sign up” won’t make it to your list, will they? Here is a couple of ideas for you to start off:
If you need more inspiration, check out the roundup of the best-converting CTAs to use on your signup forms.
You may be wondering if a different color or call to action would convince more people to subscribe. But guesswork is rarely effective when it comes to conversion optimization. That’s why we encourage you to try split testing and rely on statistics instead.
Getsitecontrol allows you to build several versions of the same email capture form and run them simultaneously to see which one brings more subscribers.
All you need to do is duplicate the form you’ve created using the ‘Clone’ button, add the change you expect to make a difference in results, and start the experiment.
Running an A/B test is a no-brainer even if you’re a complete non-techie. Meanwhile, the potential benefit from finding the winning combination, even if it converts 1% better than others, can be tremendous in the long run.
What to test?
💡 To keep the experiment clean, make sure you only have one variable at a time and give the app enough time to collect sufficient data.
Autoresponder allows you to send an automated message to your new subscribers. It’s a good practice to thank them for joining your list, send them a lead magnet, or suggest following you on social media.
An automated message is an easy way to produce a good first impression on your new subscribers and stay on top of their heads.
The best part about the autoresponder tool in Getsitecontrol is that you can use it without connecting your email marketing software. The Autoresponder feature is located in the Notifications tab, and if you want to find out how it works, read our guide to using the Autoresponder.
Having an email capture form is essential for growing your email list. However, many website owners place it at the very bottom of a page where few visitors are likely to scroll to. Having a floating opt-in form that is always in sight is a far more efficient tactic.
Go ahead and try it for yourself. Register a Getsitecontrol account and start collecting emails today.
Nina De la Cruz is a content strategist at Getsitecontrol. She is passionate about helping small and medium ecommerce brands achieve sustainable growth through email marketing.
You’re reading Getsitecontrol usecase collection where we talk about the best practices for using website popups. This usecase is a part of Build email list section.


If you want to make your website GDPR-compliant, one of the crucial steps is to add an explicit consent checkbox to all of your email opt-in forms.
Consider the example below. The checkbox above the button is mandatory, which means your website visitors will only be able to submit their details after confirming they agree to your processing of their data.
Most visitors – especially new visitors – will leave your website without converting. That’s the reality.
Sometimes, it’s because your content doesn’t meet their expectations. Other times, it’s just how people surf the Internet.
Either way, having people leave in large numbers is pretty annoying, especially when you spend ad money to drive them to your website in the first place.
One tool you can try to reduce those numbers is website exit popups 👇
If you want to understand how your visitors would evaluate your products, services, or website experience, a star rating scale is the easiest way to do it.
Rating widgets quickly collect high-level feedback and barely require any effort from your visitors.
Unlike more complex customer feedback surveys, they allow visitors to quickly express their opinions with a single click.
Subscribe to get updates
Get beginner-friendly tips for growing your online business.
