Add exit popups to your website
Start converting abandoning visitors today.
Most visitors will leave your website without converting. That’s normal, especially for first-time visitors who are still comparing options, browsing products, or researching solutions.
Exit-intent popups give you one last opportunity to engage those visitors before they leave. These popups appear when a visitor shows signs of leaving the page — for example, moving their cursor toward the browser bar on desktop or quickly scrolling upward on mobile.
Exit-intent popups work across a range of marketing goals: recovering abandoned carts, growing an email list, delivering a last-chance discount, or running a survey. You can add exit-intent popups to your website easily, using Getsitecontrol, a platform for website engagement and email marketing. It works on Shopify, WordPress, Squarespace, and any other website platform, without coding.
An exit-intent popup is an overlay that appears when a visitor shows behavioral signals of leaving your website. Exit-intent technology tracks cursor movement speed and direction on desktop, triggering the popup when the cursor accelerates toward the upper browser boundary. The core purpose is to recover attention at the moment of departure, presenting an offer or message before the visitor navigates away without converting.
Exit popups with discount codes work best when purchase intent is already present: on product pages, category pages, or when a visitor has items in their cart. Showing a discount popup to someone who hasn’t engaged with a product yet is unlikely to convert; showing it to someone close to buying gives the offer a reason to land.
One of the most common approaches here is offering click-to-copy coupon codes. It reduces friction because the visitor doesn’t need to memorize or type anything: they just grab the code and continue to checkout.
Cart reminder exit popups are used to re-engage visitors who added products to their cart but didn’t complete checkout. Instead of offering a discount, this format simply reminds shoppers that they left items behind and gives them a direct way to return.
This approach works best when purchase intent is already high, but something interrupted checkout, such as distraction, comparison, or hesitation.
Another common website exit popup type is an email capture that opens with a yes/no question. If a visitor clicks “Yes,” they are asked to enter their email to receive it. If they click “No,” they can proceed to leave without interruption.
The two-step approach works because it lets visitors self-select before committing to anything. The act of clicking “Yes” creates a small moment of agreement that makes the follow-up question easier to accept. It works well for website traffic that doesn’t convert on the first visit but is still worth capturing. Even if a purchase doesn’t happen, it allows you to follow up later via email.
Getsitecontrol is an awesome app to get email subs. Was able to get 30% sign-up rates on some campaigns which is wild. Easy to use. Premade design templates were good. Simple UI. Really effective got some great conversion rates.
Apparel & Fashion store founder capterraNot every exit popup is designed to capture emails or drive a purchase. Some simply ask visitors why they are leaving the website or a particular page. Such pop-up surveys can help you identify friction points, whether it’s pricing concerns, missing information, or checkout issues.
Exit-intent surveys are especially useful when conversion rates are unexpectedly low, and analytics data alone doesn’t explain why. A single-question format keeps the response rate high: visitors who are already leaving are unlikely to complete anything longer, but a quick tap takes almost no effort.
Flash sale exit popups promote limited-time offers when a visitor is about to leave the website. A visible countdown timer shows how long the offer remains available, nudging visitors to take a second look.
This format works best for short campaigns where urgency matters more than consideration, such as seasonal sales or limited-time discounts. It performs best on product or category pages where purchase intent is already high.
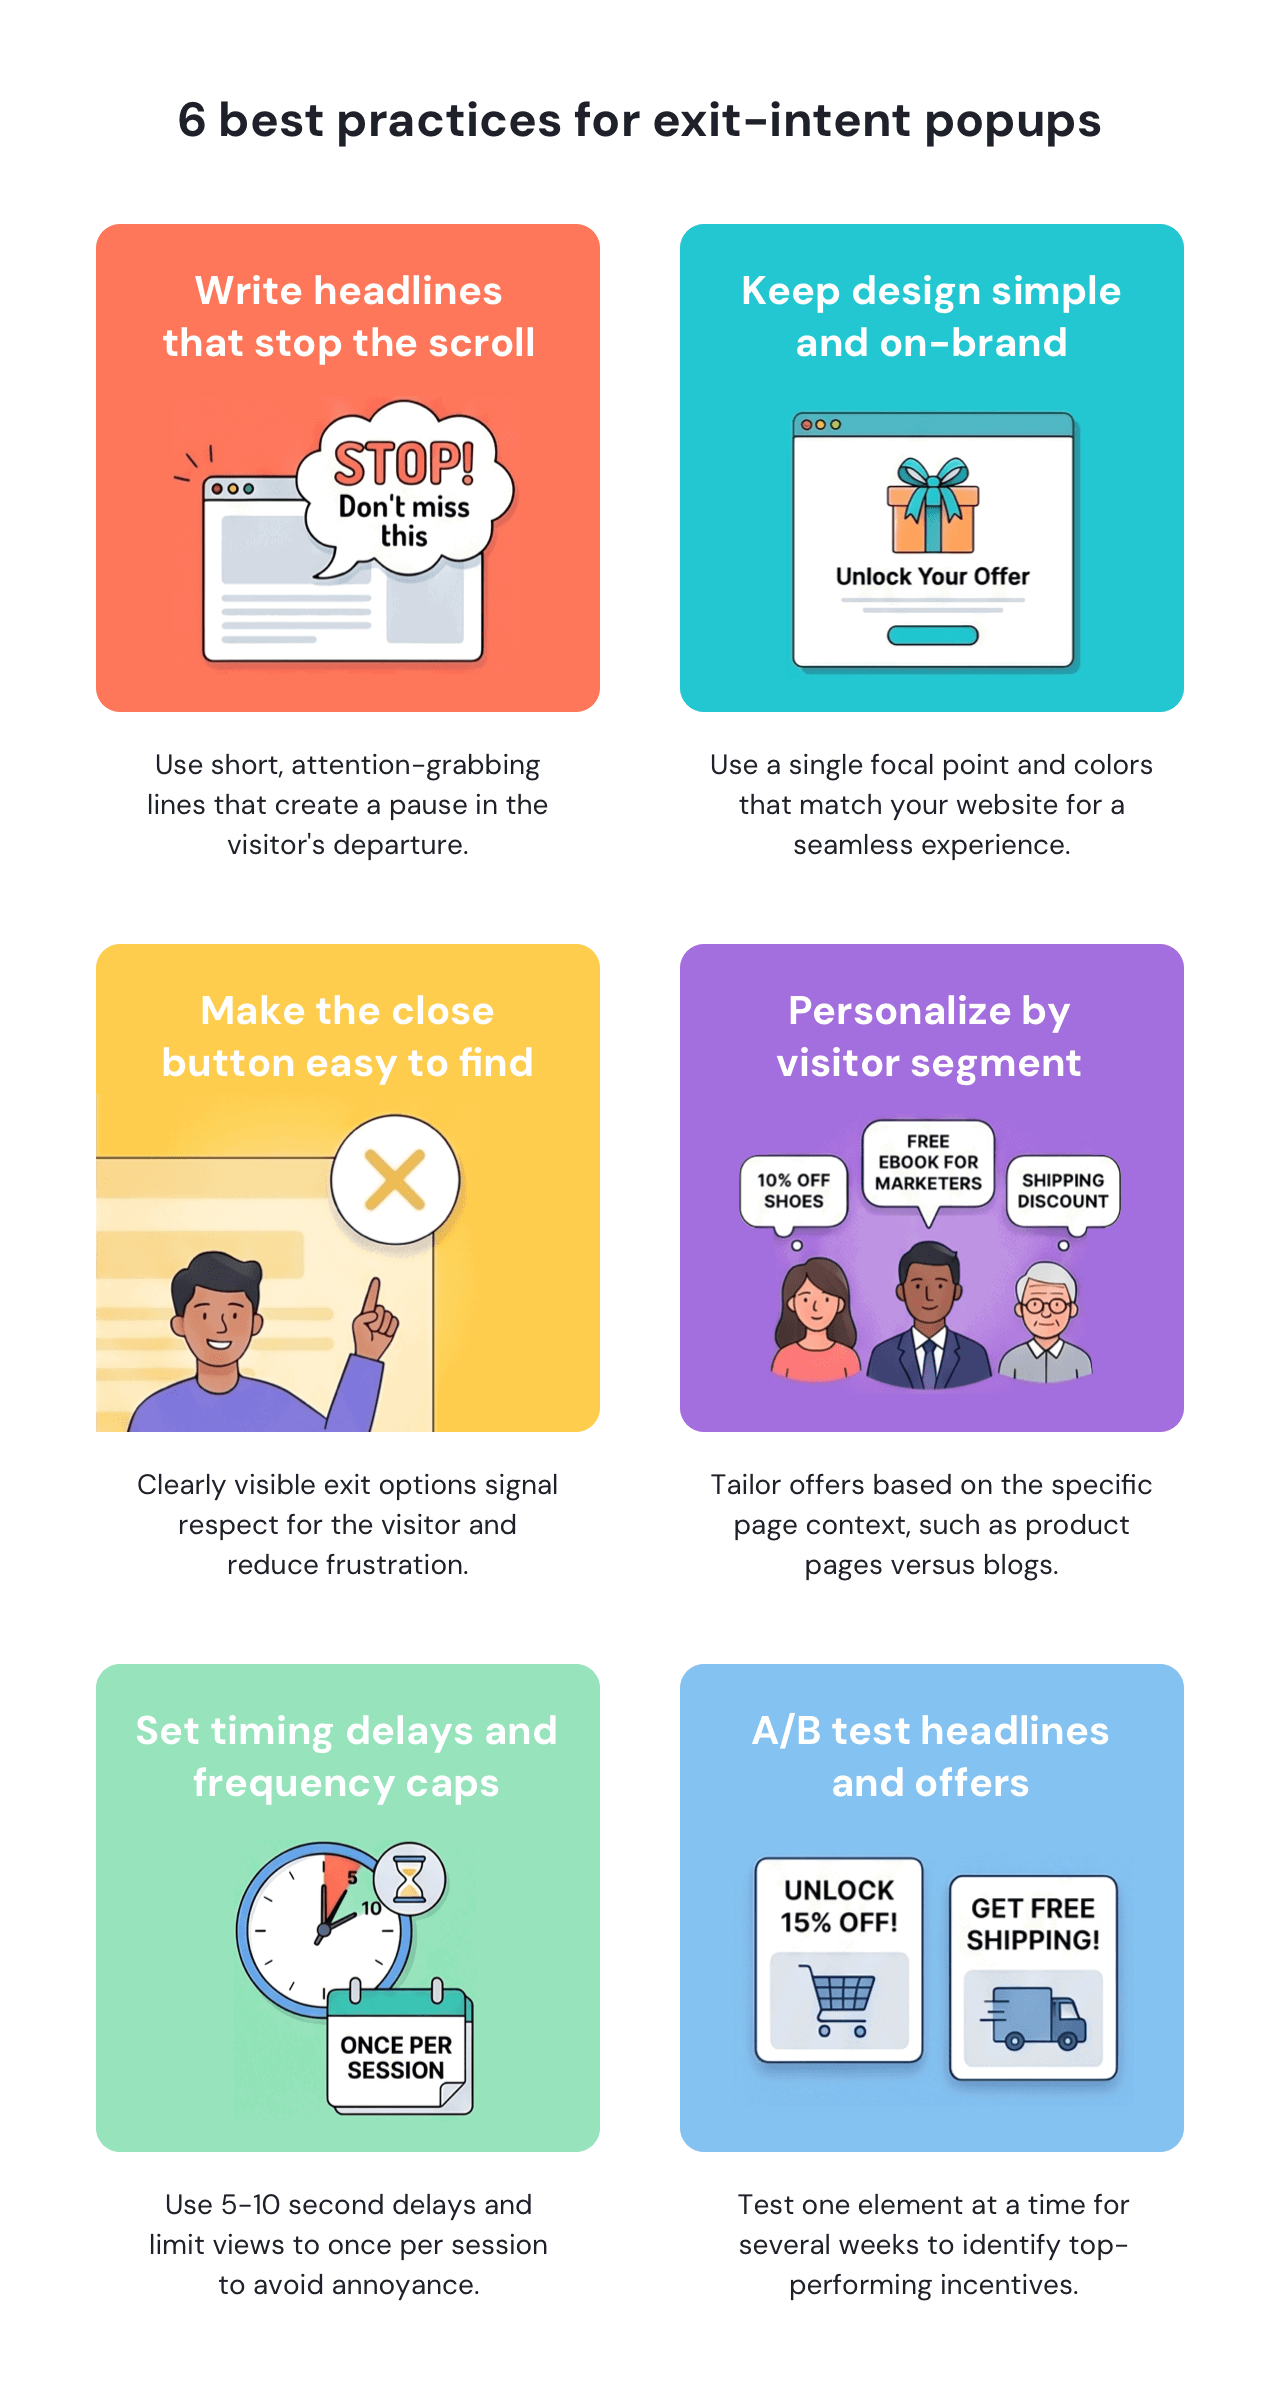
Exit popup headlines work best as short attention-grabbing lines that stop a leaving visitor rather than full benefit statements. The offer detail — what the visitor actually gets — belongs in the supporting copy or the call-to-action button, where there’s room to be specific. A visitor who is already heading to exit has very limited attention, so the headline’s job is to create enough pause for the offer to land.
| Exit popup headline | Works best for |
|---|---|
| Before you go… | General exit, low-pressure tone |
| Wait — your cart is still full | Cart abandonment sitewide |
| Still thinking it over? | Product page hesitation |
| One last thing… | Any page type |
| Don’t miss this offer | Flash sale or limited-time discount |
| Leaving already? Tell us why | High-bounce pages |
| Your discount expires soon | Urgency-driven email capture |
Exit-intent popups tend to perform better when they match the visual style of the surrounding website rather than looking like generic overlays added by a third-party tool. When the popup feels visually connected to the site branding, visitors are more likely to treat it as part of the browsing experience.
Simplicity also matters. A single focal point, one call-to-action button, and minimal form fields make the popup easier to process quickly. For most exit popup use cases, an email-only form is enough, since each additional field reduces completion rates.
People who cannot easily dismiss a popup — whether it’s an exit-intent or a welcome popup — are more likely to leave the site altogether. A visible, clearly placed close button signals confidence in the offer and respects the visitor’s decision if they are not interested.
Hiding, minimizing, or delaying the close button can make a popup feel manipulative rather than helpful. In practice, making the popup easy to dismiss rarely prevents interested visitors from subscribing; it mainly reduces frustration for everyone else.
A visitor leaving a product page has a different intent than someone leaving a blog post. A discount on a product page and a downloadable guide on a blog post usually produce stronger engagement than showing the same offer everywhere. Exit popups become more effective when the offer reflects that context.
Getsitecontrol allows you to target exit popups based on various factors, such as the page a visitor is viewing or whether they are visiting for the first time. This makes it easier to show offers tailored to different sections of the website instead of using the same popup everywhere.
| Website goal | Recommended exit popup type | Recommended message |
|---|---|---|
| Recover abandoning shoppers | Pop-up discount coupon offer | Apply immediately or get a coupon for next time |
| Promote a seasonal campaign | Pop-up sale promotion with a countdown | Explore sale page to avoid missing out on great deals |
| Increase repeat purchases | Exit popup with email form | Join the email list and become a VIP member |
Adding a minimum time-on-page delay — typically five to ten seconds — helps avoid showing the popup to visitors who land on a page and leave almost immediately. Instead, the popup appears to people who have spent at least some time engaging with the content.
Frequency capping prevents the same visitor from seeing the same popup on every visit. Once per session or once every few days is a common starting point. Repeated exposure without interaction can lead to higher dismissal rates and gradually make the popup feel more annoying than useful. In Getsitecontrol, time-on-page delays and frequency caps are both configured easily in the widget’s targeting settings, no code changes required.
The headline and the incentive itself usually have the biggest influence on exit popup performance. Testing one element at a time — first the headline, then the offer, then visual changes — makes it easier to understand which change actually affected results.
Tests typically need to run for at least a couple of weeks to collect enough data, though the exact timing depends on traffic volume. Getsitecontrol includes built-in A/B testing for widgets, tracking click-through rate across variants, and allowing you to compare different headlines, offers, or designs under identical conditions.
Exit-intent popups produce results when the offer matches the visitor’s context. The decisions made before a popup launches — which pages it appears on, which visitors see it, and what the offer contains — have the biggest impact on performance.
If you’re a website owner working on conversion optimization or visitor engagement, Getsitecontrol gives you the tools to act on both: exit popups, targeting rules, and automated email follow-ups in one platform. You can build exit popups using customizable templates and target them to specific pages or visitor segments. If your popup includes an email form, captured contacts can be enrolled in automated follow-up sequences directly within the same platform. A free plan is available, and no coding is required to get started.
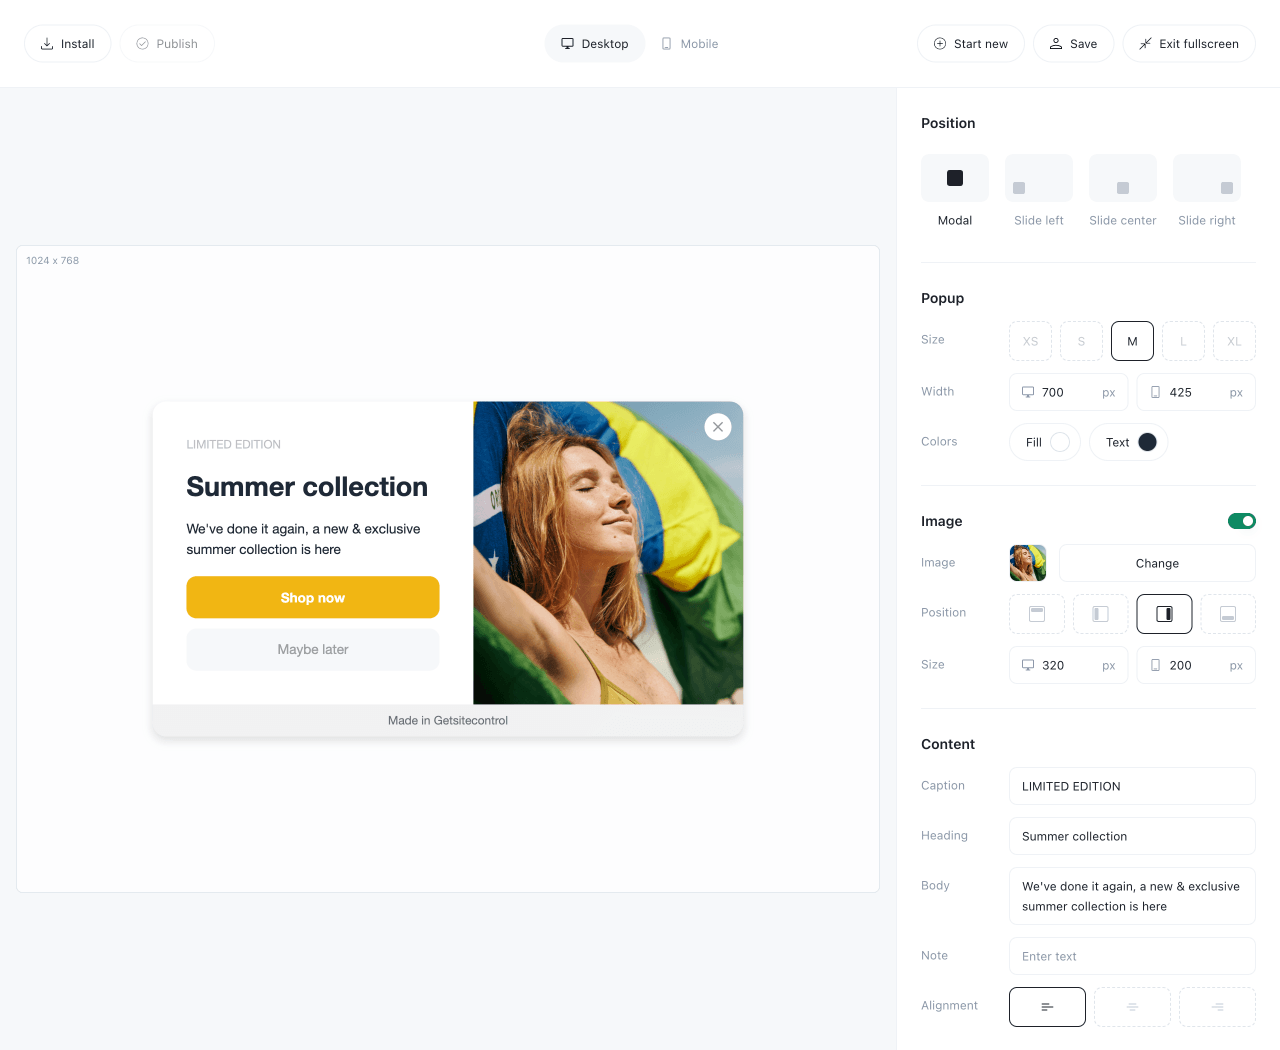
If you’d like to experiment with exit-intent popups without creating an account, Free Popup Builder by Getsitecontrol is a good starting point. It lets you create pop-up messages that appear on your website when visitors are about to leave. Popups can be used to display a message or to guide visitors to another page using buttons.
Choose the popup position on the screen, add your copy and image, adjust buttons with links to any URL, then publish the popup on your website using a simple code snippet — no sign-up required. It works well for last-minute discount offers, flash sale reminders, and quick announcements.
Showing exit-intent popups to every visitor, regardless of how much time they’ve spent on the website, is a common mistake. The best practice is to display them to those who’ve shown interest in the content. A time-on-page delay of five to ten seconds is a common starting point. This ensures the popup appears only to visitors who engaged with the page, rather than those who arrived and immediately began leaving.
The most common exit-intent popups include cart abandonment offers, newsletter signup forms, limited-time sale reminders, and quick feedback surveys. The best-performing popup type depends on the visitor’s intent and the page they are leaving.
No, as long as the popup triggers on exit rather than blocking content on page load. Google’s interstitial penalty applies to popups that obstruct content immediately after a visitor arrives from search, not to popups triggered when a visitor is about to leave.
Once per session or once every few days is a common frequency cap. Showing the same popup repeatedly after a visitor has already dismissed it increases annoyance and rarely improves conversion rates.
Well-optimized exit-intent popups typically convert between 2% and 10% of visitors who see them. Ecommerce discount offers and cart abandonment campaigns tend to perform toward the higher end of that range, while generic newsletter signup popups without a specific incentive usually convert lower. Testing different headlines and offers is the most reliable way to improve results over time.
Nina De la Cruz is a content strategist at Getsitecontrol. She is passionate about helping small and medium ecommerce brands achieve sustainable growth through email marketing.
Create popups for free
Collect emails, offer coupons,
run surveys, stop abandonment.
Discount popups are among the easiest conversion tools available to Shopify merchants. A well-timed offer gives hesitant visitors a reason to act — whether that’s completing a first purchase, returning to an abandoned cart, or joining an email list.
A survey popup is a short feedback form that appears over website content at the moment of your choice. It can be triggered by time on page, exit intent, or a completed action — capturing feedback while it’s most relevant, before the experience fades.
Collecting feedback in the moment is what separates pop-up surveys from email surveys and standalone feedback tools. A visitor who just abandoned a cart can explain why while the friction is still fresh. A customer on the order confirmation page can tell you how they found you and what made them choose you over alternatives.
As a website owner, you need a simple way to publish sitewide updates — and know visitors will actually see them. Announcement bars solve this problem by staying visible at the top or bottom of the page as people browse, without interrupting the experience.
Sticky bars help visitors immediately see discount codes, sale announcements, shipping thresholds, and service updates without searching or contacting support. This format works particularly well on mobile, where screen space is limited.
Subscribe to get updates
Get beginner-friendly tips for growing your online business.