Widget targeting: triggers, page rules, visitor conditions, scheduling, and use cases
Targeting determines where your widgets appear on your website, who sees them, and when they are displayed. Proper targeting helps ensure that widgets appear in the right context and at the right moment for the right audience. Instead of showing the same popup to every visitor immediately, you can tailor widgets based on factors such as page location, visitor behavior, device type, marketing campaign, customer status, and how much time a visitor has spent on the page or site.
Getsitecontrol offers flexible targeting settings that give you full control over this. You can control when the widget starts and stops showing, choose which pages it appears on, define visitor conditions, and schedule it for specific dates and times.
When used effectively, targeting reduces disruption, improves engagement, and increases conversion rates by displaying widgets only when they are relevant to the visitor.
Where to find targeting settings
Targeting settings are configured in the Targeting tab when creating or editing a widget. This tab contains the options that control where a widget appears, who sees it, and when it is displayed during a visitor’s session.
A widget appears only when all relevant targeting conditions are satisfied, meaning the visitor reaches the configured start trigger, is on an eligible page, and matches the visitor conditions (if any). Additional settings can hide the widget under certain circumstances or prevent it from appearing again for the same visitor. The sections below explain the different parts of the targeting settings and provide a detailed overview of the options available within them.
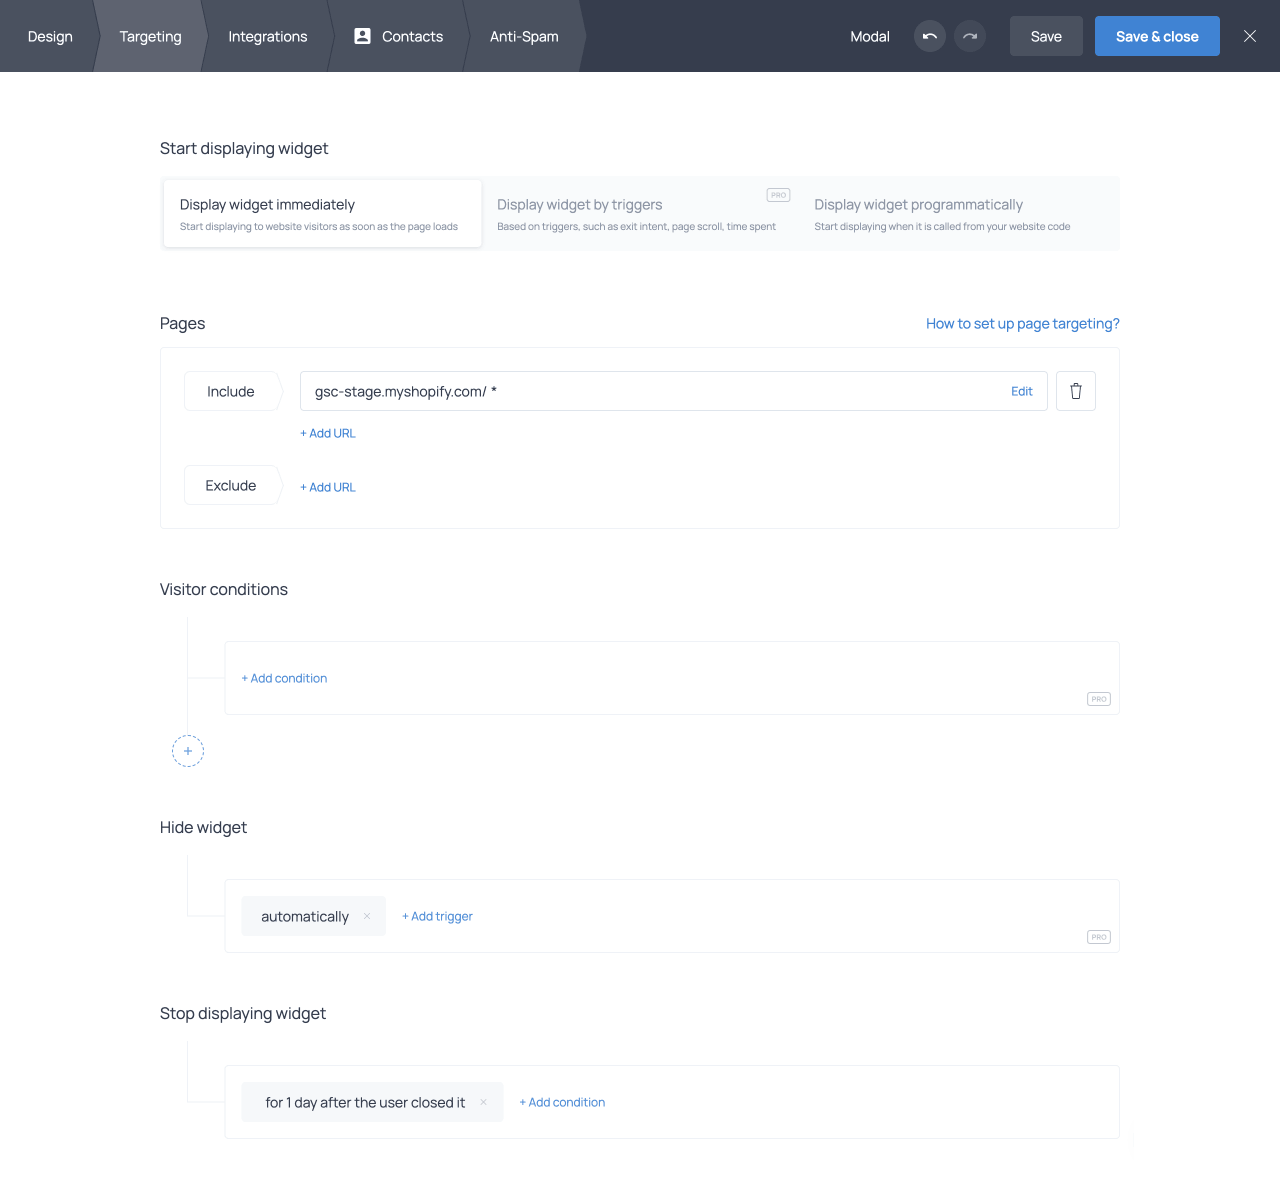
Start displaying widget
The Start displaying widget section determines when a widget appears after a visitor lands on a targeted page and meets any conditions you have configured. The three available display methods are described below.
Display widget immediately
This option shows the widget as soon as the page loads, provided all other targeting conditions are met. It is the default setting and requires no additional configuration.
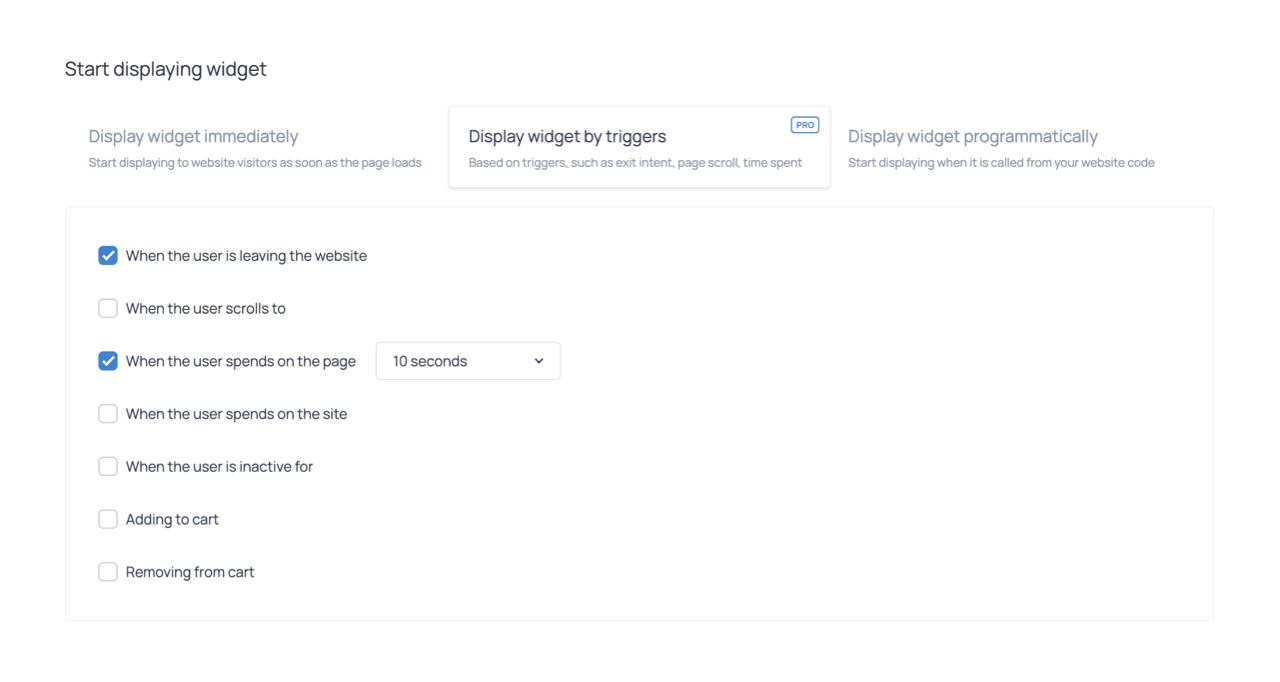
Display widget by triggers (Pro)
This option displays the widget when one or more visitor actions or behaviors occur. After selecting Display widget by triggers, choose the triggers you want to use and configure their settings. You can enable multiple triggers at the same time, and the widget will appear as soon as any one of the selected conditions is met. For example, if you enable both When the user scrolls to 25% of the page and When the user spends on the page 10 seconds, the widget will appear as soon as either condition is satisfied. The available triggers are described below.
When the user is leaving the website
The When the user is leaving the website trigger displays the widget when the visitor's mouse moves toward the top edge of the browser window, indicating an intention to leave the page (for example, to close the tab, switch tabs, or enter a new address). Because exit intent relies on mouse movement, it does not work on mobile or touch devices. For mobile visitors, consider using a scroll or time-based trigger instead.
When the user scrolls to
The When the user scrolls to trigger displays the widget after the visitor has scrolled to a specified percentage of the page. This is particularly useful for long-form content such as blog posts, because it ensures that the widget is shown only to visitors who are engaging with the content.
When the user spends on the page
The When the user spends on the page trigger displays the widget after a visitor has spent a specified amount of time on the current page. Showing a widget too early can interrupt the browsing experience, while waiting too long may result in visitors leaving before they see it. This trigger allows you to find the right balance.
When the user spends on the site
The When the user spends on the site trigger measures the visitor's total time spent across your website during the current session. This is useful when you want to delay a widget until a visitor has spent enough time exploring your site, even if they have navigated between pages.
When the user is inactive for
The When the user is inactive for trigger displays the widget after a visitor has stopped interacting with the page for a specified period of time. This can be used to re-engage visitors who have paused their activity, offer assistance, or present a special offer.
Shopify cart triggers
For Shopify stores, two additional triggers are available. Adding to cart displays the widget when a customer adds a product to their cart. Removing from cart displays the widget when a customer removes a product from their cart. These triggers can be used to show upsell offers, discount codes, or feedback requests at important moments in the shopping journey.
It is not possible to specify which product is added to or removed from the cart when configuring these triggers. However, you can combine them with page targeting rules to effectively target a specific product. For example, if the widget is configured to appear only on the product page of Product A and uses the Adding to cart trigger, it will only appear when a visitor adds Product A to the cart from that page.
Display widget programmatically
This option prevents the widget from appearing automatically and allows it to be displayed through your website code. Use this method when you want to show a widget in response to a specific action, such as clicking a button, link, or image on your website. Programmatic display requires implementation outside of the Targeting tab and some familiarity with JavaScript.
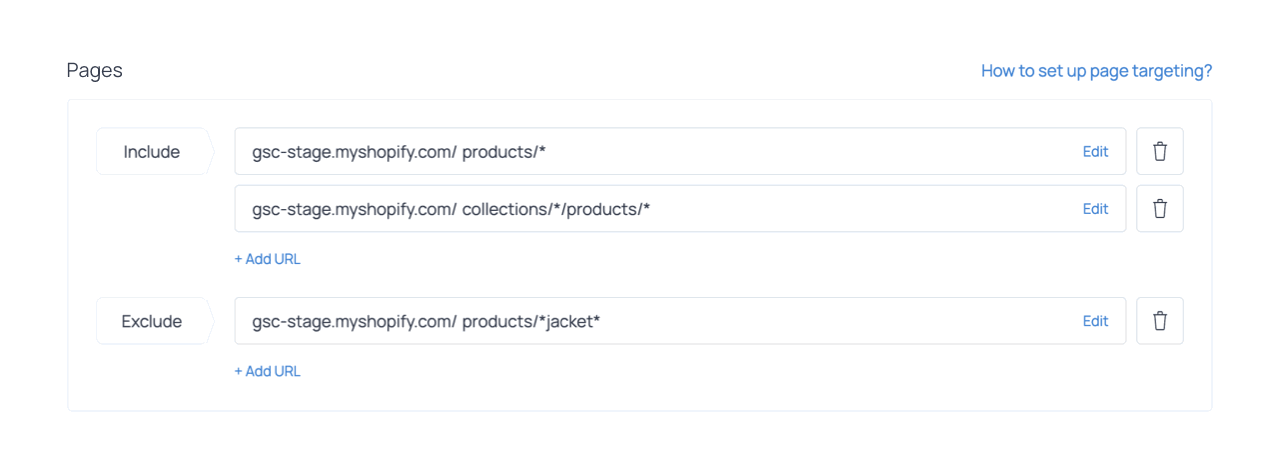
Pages
Pages lets you specify which pages of your website the widget will appear on. By default, a widget is set to appear on all pages. The asterisk (*) at the end of your homepage URL in the Include field is a wildcard, meaning any URL starting with your domain qualifies.
Including specific pages
To show the widget on one page only, add the exact URL of that page to the Include field. If you have correctly configured your website in Getsitecontrol, your domain name will be pre-filled, so you only need to add the part of the path that comes after it. You can add as many URLs as you need by clicking + Add URL.
Excluding specific pages
To hide the widget on certain pages while displaying it everywhere else, add those pages to the Exclude field. When you click + Add URL under Exclude, you can choose Home page to exclude the homepage automatically, or choose Blank to paste any other URL manually.
Targeting subdirectories
Because the asterisk means “anything goes here,” you can use it to target or exclude entire subdirectories. For example, entering your domain followed by /blog* in the Include field will show the widget on every page whose URL begins with /blog, regardless of what follows. The same logic applies when excluding a subdirectory: add it to the Exclude field using the same wildcard pattern.
If you want to match a specific word anywhere in the URL, place an asterisk on both sides of the word. For example, lead-magnet will match any URL that contains the string “lead-magnet,” regardless of its position.
Targeting via query parameters
Query parameters appear at the end of a URL, starting with a question mark (?). The parameter name comes right after the question mark, followed by an equals sign (=) and its value. Multiple parameters are separated by an ampersand (&).
To target a specific query parameter, click Edit next to an Include or Exclude rule, find the Query section in the pop-up window, and enter the parameter name and value. The full URL string is updated automatically to reflect what you’ve entered.
Shopify preset pages
If your site runs on Shopify, the + Add URL button offers preset options in addition to custom URLs. You can select Cart or Product pages and the corresponding URL patterns are added to your targeting settings automatically.
Visitor conditions (Pro)
The Visitor conditions section lets you narrow down which visitors see the widget based on their characteristics or behavior. By default, no filters are applied and the widget is shown to everyone. To add a filter, click + Add condition, choose a category from the tabs at the top of the panel, and select the condition you want to apply. Then choose an operator (is / is not, or match / does not match, in most cases) and select or enter the value. The visitor conditions are only available on paid (Pro) plans and feature six groups of filters.
Geo
Geo filters target visitors based on their physical location. You can include or exclude visitors by country, region, or city.
Device
Device filters allow you to target visitors based on the device and software they use to access your website. This is useful when you want to adapt widgets to different screen sizes, troubleshoot browser-specific issues, or display different messages for mobile and desktop visitors.
| Filter | What it targets |
|---|---|
| Browser | The browser the visitor is using (e.g. Chrome, Safari) |
| OS | The operating system (e.g. Windows, macOS, iOS, Android) |
| Device type | Desktop, Tablet, Mobile, or Other |
| Language | The language set in the visitor's browser |
| Screen width | The width of the visitor's screen in pixels |
Visit
Visit filters are based on the visitor’s behavior and browsing context during their current or previous visits to your site. These conditions help you trigger widgets based on engagement signals; for example, after a visitor has viewed several pages or spent a certain amount of time exploring your content.
| Filter | What it targets |
|---|---|
| New visitors | Whether this is the visitor's first session on the site |
| Previous page | The page the visitor came from within your site |
| Referer | The external URL the visitor arrived from |
| Page views | The number of pages viewed in the current session |
| Sessions | The total number of sessions the visitor has had |
| Scroll depth | How far down the current page the visitor has scrolled |
| Time on page | How long the visitor has spent on the current page (seconds) |
| Time on website | How long the visitor has spent on the site in the current session (seconds) |
Developer
The Developer category includes advanced targeting options for controlling widget behavior using custom logic or data passed from your website. These filters allow you to target visitors using API parameters, cookies, visitor IP addresses, or custom JavaScript conditions.
| Filter | What it targets |
|---|---|
| API parameter | A custom parameter passed via the Getsitecontrol API |
| IP address | A specific IP address or addresses |
| Cookie | The presence or value of a browser cookie |
| HTML condition | A custom JavaScript expression that evaluates to true or false |
The IP address filter is particularly useful for testing: by targeting your own IP, you can see the widget on your site without it being visible to other visitors.
The HTML condition filter allows you to target widgets based on elements present on the page. With this option, the system evaluates a custom JavaScript condition that checks for specific HTML elements. For example, you can use it to detect whether a page contains an element indicating that products are present in the cart and target visitors based on this information.
UTM
If you use UTM parameters to track marketing campaigns, you can use them to target or exclude visitors arriving from those campaigns. The five supported parameters are UTM Campaign, UTM Content, UTM Medium, UTM Source, and UTM Term. You will need to type or paste the values manually.
Shop (Shopify only)
Shopify users have access to an additional filter category called Shop, which covers cart content, customer attributes, and data about the product or variant currently viewed by the visitor.
| Filter group | What it targets |
|---|---|
| Cart total price | The combined price of all items in the cart |
| Cart discount | The total amount discounted from the cart in the shop’s currency |
| Cart items count | The number of items in the cart |
| Cart product | The product in the cart |
| Cart product type | The type of product in the cart |
| Cart variant | The variant in the cart |
| Customer logged in | Whether the customer is logged in to their account |
| Customer tag | A tag assigned to the customer in Shopify |
| Customer order count | The total number of orders the customer has placed |
| Customer total spent | The total amount the customer has spent |
| Customer subscription status | Whether the customer has opted in to receive marketing emails |
| Product | The product currently being viewed |
| Product type | The type of product currently viewed |
| Product vendor | The vendor of the currently viewed product |
| Product tag | The tag assigned to the currently viewed product |
| Variant | The selected variant of the viewed product |
| Variant availability | Whether the currently viewed variant is in stock |
| Variant price | The price of the selected variant of the viewed product |
Cart filters are useful for cross-selling and upselling: for example, you can show a popup promoting related items when a specific product is in the cart. Customer filters let you target segments based on purchase history, such as showing a discount popup only to customers who have placed at least two orders. Variant availability lets you show a widget specifically when the currently viewed variant is out of stock.
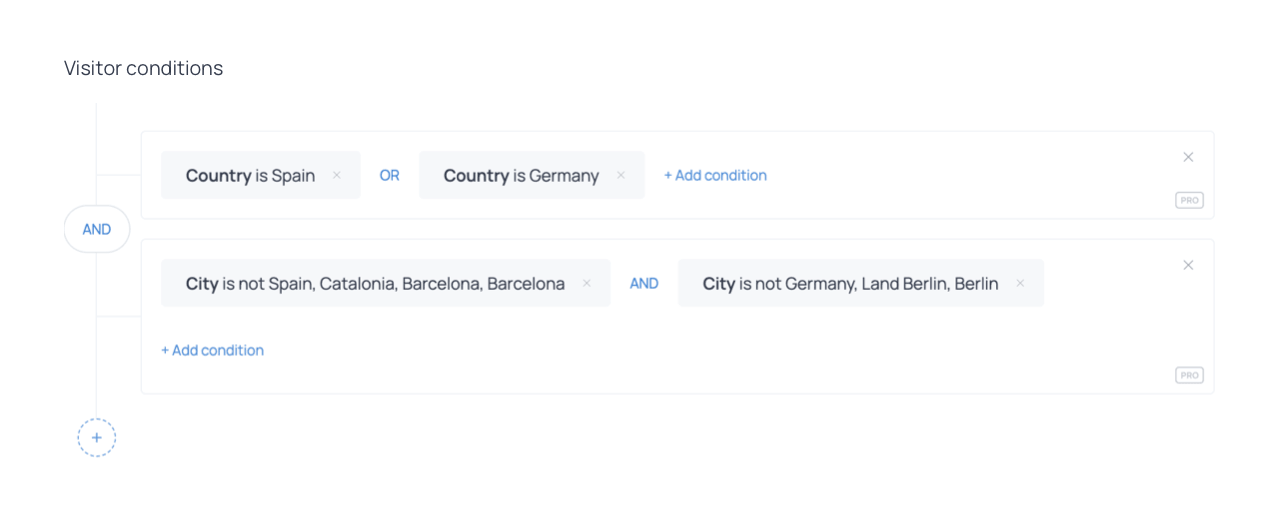
Combining multiple visitor conditions
You can set multiple conditions and connect them with AND or OR operators. When two conditions are connected with AND, the visitor must meet all conditions for the widget to appear. When connected with OR, the widget appears if the visitor meets at least one of them. Note that negative conditions, such as Device is not Desktop or Visitor is not new, can only be combined with an AND operator.
For more complex logic, you can group conditions into segments. Each segment acts as a unit, and segments themselves can be connected with AND or OR. For example, you could create one segment targeting visitors from Spain or Germany, then add a second segment excluding visitors from certain cities in those countries. The AND operator is applied automatically between segments when you add a new one, and you can change it by clicking on it.
Hide widget (Pro)
The Hide widget section lets you automatically dismiss the widget under specific conditions, without the visitor needing to click the close button. By default, the hide trigger is set to Automatically, which means the widget disappears when the Visitor conditions are no longer met.
For example, if a widget is set to appear at 30% scroll depth and the hide trigger is set to Automatically, the widget will disappear if the visitor scrolls back above the 30% mark. In a Shopify context, if a widget is configured to appear when the cart total exceeds $50, setting the hide trigger to Automatically means the widget will disappear if the cart total drops back to $50 or below, and reappear if the total rises again.
Beyond the default Automatically option, you can choose from the following hide triggers to define when the widget disappears. These options are only available on paid plans.
Displaying time
You can set the widget to hide automatically after it has been displayed for a certain number of seconds. This applies even if the visitor has not interacted with it.
Scroll depth
This option hides the widget once the visitor reaches a specified scroll depth on the page, allowing you to remove it after it has served its purpose.
Combining multiple hide triggers
Hide triggers are always connected with OR. The widget will be hidden as soon as any one of the configured conditions is met. For example, you can combine a displaying time trigger with the automatic trigger so that the widget is hidden after a set amount of time or when the targeting conditions are no longer met, whichever happens first.
Stop conditions
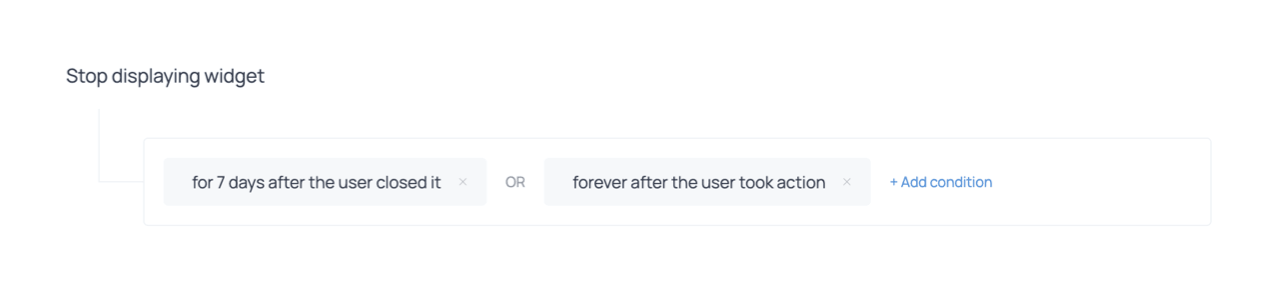
The Stop displaying widget section controls when the widget stops appearing for a returning visitor. By default, a widget is set to stop appearing for a visitor for one day after they close it. You can remove the default conditions or replace them by clicking + Add condition. If no conditions are set in this section, the widget will be shown to eligible visitors every time they visit the site. There are five stop conditions available.
Upon action
This condition prevents the widget from reappearing after the visitor has clicked an action button on it. Action buttons are those performing one of the following actions: Submit, Open URL, Copy to clipboard, Show widget, Add to cart (Shopify), or Apply discount (Shopify). Visitors who only view the widget or close it using the X button or a button with a Close action will continue to see it. You can choose to stop displaying the widget permanently or for a defined period of time.
After closure
This condition stops the widget from appearing for a period of time after the visitor closes it using the X or a button with a Close widget action. This prevents the widget from being shown repeatedly to visitors who have already dismissed it. You can set the period in minutes, hours, or days, or configure it to last permanently.
After hiding
This condition controls how long after being automatically hidden (via the Hide widget triggers) the widget waits before appearing again. You can configure the time interval after which the widget can appear again.
Upon view
This condition prevents the widget from appearing for a defined period of time after a visitor has seen it, regardless of whether they interacted with it. It is particularly useful for informational popups such as cookie consent notices.
Upon X views
This condition stops the widget from appearing once a visitor has seen it a specified number of times. After reaching the view limit, the widget no longer appears for that visitor for a defined period or permanently.
Combining multiple stop conditions
Multiple stop conditions are always connected with OR, meaning the widget pauses for a visitor as soon as any one of the conditions is met. For example, combining Upon action set to stop permanently with After closure set to 7 days means visitors who engage with the widget will never see it again, while visitors who only closed it will see it again after a week.
Schedule (Pro)
The Schedule section allows you to define date ranges, times of day, and days of the week during which the widget will be active. This is useful for time-limited promotions, event announcements, or service notifications tied to business hours.
To add a scheduling condition, click + Add condition in the Schedule section and choose one of the options: Date, Time, or Days of week. Click Done to save the condition. Note that the widget must also be activated from the All widgets section. A scheduled widget will not appear if it has not been turned on, regardless of the schedule settings. The schedule option is only available on paid plans.
Date, Time, and Days of week
The Date condition lets you set a start date and an end date. The widget becomes active at 12:00 AM on the start date and stops appearing at 11:59 PM on the end date, both in the visitor's local time. The Time condition lets you specify a time range and a time zone. The Days of week condition restricts visibility to selected days.
Combining scheduling conditions
Scheduling conditions can be combined using both AND and OR operators. When connected with AND, the widget is shown if all conditions are true simultaneously. For example, a Days of week condition set to weekdays AND a Time condition set to 9:00–17:00 would restrict the widget to business hours on working days only.
When connected with OR, the widget is shown if at least one condition is met. For example, two separate Time conditions connected with OR would show the widget during each of those time windows, which is useful for communicating support availability across different periods in a day.
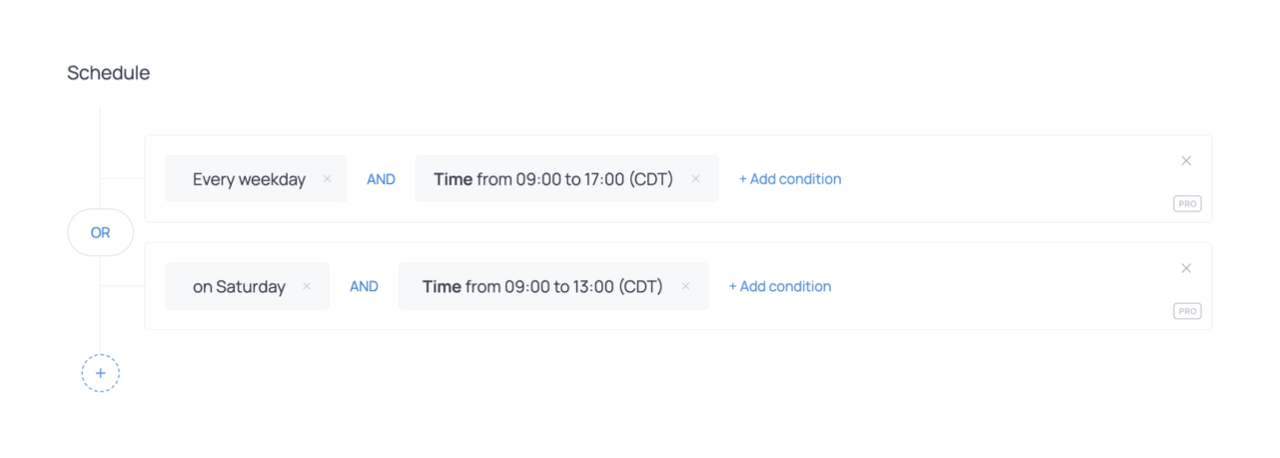
For more complex combinations, such as different hours on weekdays versus weekends, you can use segments. Each segment can contain its own set of AND-connected conditions, and segments are then connected with OR. This allows you to express scenarios like: show the widget Monday to Friday from 9:00 to 17:00, or on Saturday from 9:00 to 13:00.
Within each segment, make sure the conditions are connected with AND. Between segments, use OR, since a visitor can only be in one time window at a time.
Troubleshooting checklist
If a widget is not displayed as expected, one or more targeting settings may be preventing it from appearing. Review the checklist below to confirm that the configured conditions allow the widget to be shown.
| Setting | What to verify |
|---|---|
| Widget activation | Confirm that the widget is turned on in the All widgets section. |
| Start displaying widget | Confirm that the required start trigger has been reached, such as scroll depth or time on page. |
| Pages | Ensure the current page matches the Pages rules and is not excluded. |
| Visitor conditions | Verify that the visitor meets the filters configured under Visitor conditions. |
| Hide widget | Check whether a hide trigger is causing the widget to disappear. |
| Stop conditions | Verify that the widget has not been paused due to closure, previous views, or actions taken. |
| Scheduling | Ensure the schedule settings allow the widget to appear at the current time. |
Common targeting scenarios
The targeting settings described above can be combined in different ways depending on the goal of the widget. The examples below illustrate how several targeting options can work together to achieve common outcomes.
Showing a welcome popup to new visitors
If you want to greet first-time visitors without interrupting them immediately, you can combine a New visitor condition with a short delay. This gives visitors time to orient themselves before the widget appears. With the following setup, the widget appears only to visitors who are browsing your site for the first time and only after they have spent a few seconds on the page.
| Setting | Configuration |
|---|---|
| Start displaying widget | When the user spends on the page 5–10 seconds |
| Visitor conditions | Visit → New visitor = Yes |
Displaying a signup form on blog articles
Content pages are often a good place to invite readers to subscribe to a newsletter or download a resource. By combining page targeting with a scroll trigger, you can display the widget only to readers who are actively engaging with the article. The following settings ensure the widget appears only on blog posts and only after the visitor has scrolled through a meaningful portion of the page.
| Setting | Configuration |
|---|---|
| Start displaying widget | When the user scrolls to 30–50% |
| Pages | Include /blog* |
Offering a discount for a cart value (Shopify)
Shopify stores can use cart-based targeting conditions to show offers when customers show strong purchase intent. With this configuration, the widget appears when a visitor’s cart reaches the specified value, making it useful for promoting free shipping or limited-time discounts.
| Setting | Configuration |
|---|---|
| Start displaying widget | Display widget immediately |
| Visitor conditions | Shop → Cart total price ≥ chosen threshold |
Offering a deal when a product is added to cart (Shopify)
Displaying a widget immediately after a product is added to the cart can be useful for suggesting complementary items, offering a bundle discount, or encouraging customers to complete their purchase. With the following targeting settings, you can ensure the widget appears when a specific product is added to the cart.
| Setting | Configuration |
|---|---|
| Start displaying widget | Adding to cart |
| Pages | Include product page URL |
Re-engaging visitors with an exit-intent popup
Exit-intent popups are effective for re-engaging visitors who are about to leave your website. By displaying a targeted message at this moment, you can encourage them to complete an action, such as making a purchase, signing up, or claiming an offer. The following setup shows the widget on key pages when a visitor signals an intention to leave.
| Setting | Configuration |
|---|---|
| Start displaying widget | When the user is leaving the website |
| Pages | Include key pages (e.g. product, cart, or pricing) |
To make this setup more precise, you can optionally add an audience condition so the widget appears only when the visitor has items in their cart. This can be done using a custom HTML condition that checks for an element present on the page only when the cart contains items.
Showing support notifications during business hours
Some widgets are only relevant at certain times of day, such as support availability messages or service announcements. This ensures the widget appears only when support staff is available to respond.
| Setting | Configuration |
|---|---|
| Schedule | Days of week = Monday–Friday |
| Schedule | AND Time = business hours |
Summary
Each section of the Targeting tab controls a different aspect of widget behavior. Start displaying widget controls the precise moment the widget appears within a session; the Pages section defines on which pages it can appear; Visitor conditions determine who is eligible to see it. Hide rules and stop conditions manage how and when the widget disappears, both within a single visit and across return visits. Scheduling lets you activate widgets only during relevant windows.
Used together, these settings allow for precise control over how widgets behave across your website. A widget shown to the right visitor, on the right page, at the right moment is more likely to achieve its intended goal and less likely to be disruptive.