Create discount popups for free
Offer timely promos in your store and drive more sales.
Discount popups are among the easiest conversion tools available to Shopify merchants. A well-timed offer gives hesitant visitors a reason to act — whether that’s completing a first purchase, returning to an abandoned cart, or joining an email list.
If you’re an online store owner looking for an app that lets you display timely pop-up discounts on Shopify, GSC Email Marketing, Pop ups does exactly that. The app supports click-to-copy discount codes, cart-applied discounts, reveal-after-signup formats, and automated code delivery to a new subscriber’s inbox.
What makes it particularly effective for Shopify stores is the targeting precision: discount popups can be triggered based on cart contents and cart value, the specific products or brands a visitor is browsing, their activity on the page, traffic source, and more. This way, the right offer reaches the right visitor at the right moment.
A welcome discount popup is the most common format on Shopify. It targets first-time visitors and offers a discount on their purchase, often in exchange for a subscription. The visitor enters their email, and the discount code is delivered immediately — either displayed on-screen after submission or sent via an automated welcome email.
We used this app to increase email subscriptions. Immediately — first day — we saw a major increase, and it has not stopped. The options and ideas provided are stellar, so easy to use. Great app!
Furniture & home decor brand shopifyA shopping cart recovery popup targets visitors who are about to leave without completing their purchase. It’s most effective in two scenarios: displayed on the cart page when a visitor shows exit intent, or shown anywhere on the site when a visitor has items in their cart and is heading toward the exit. Both are configurable in the GSC Email Marketing, Pop ups app. For this scenario, you can set up an “Apply discount” button that applies the discount to the cart automatically and takes the shopper directly to checkout.
An inactivity discount popup appears when a visitor has been on the page for a set period without scrolling or clicking. The idle behavior is often a hesitation signal: the visitor is still present but hasn’t moved toward a decision. A timely offer can re-engage them. In GSC Email Marketing, Pop ups, inactivity is a standalone trigger that fires only when the visitor has gone genuinely idle. That distinction means the popup reaches visitors who are stuck or undecided, not simply slow readers.
A cart value reward popup appears automatically when a visitor’s cart total price crosses a set threshold — and disappears if the cart value drops back below it. Copy that works well for this format tends to acknowledge the cart value directly: “Your cart qualifies for 15% off” or “You’ve unlocked free shipping”. The visitor can see why they’re receiving the offer, which makes it feel like a reward rather than a generic promo.
A seasonal discount popup is tied to a defined promotional window — a holiday sale, a seasonal collection launch, or a limited-time campaign. Unlike the evergreen welcome popups, it runs for a fixed period and is built to be retired when the campaign ends. Sitewide display with a short delay of 3–5 seconds works well for this format — the offer is time-limited and relevant to all visitors, not just a specific segment.
GSC Email Marketing, Pop ups has been an absolute game-changer for my website! The app is incredibly user-friendly, allowing me to create eye-catching pop-ups and forms with ease. Almost 3 years using the app.
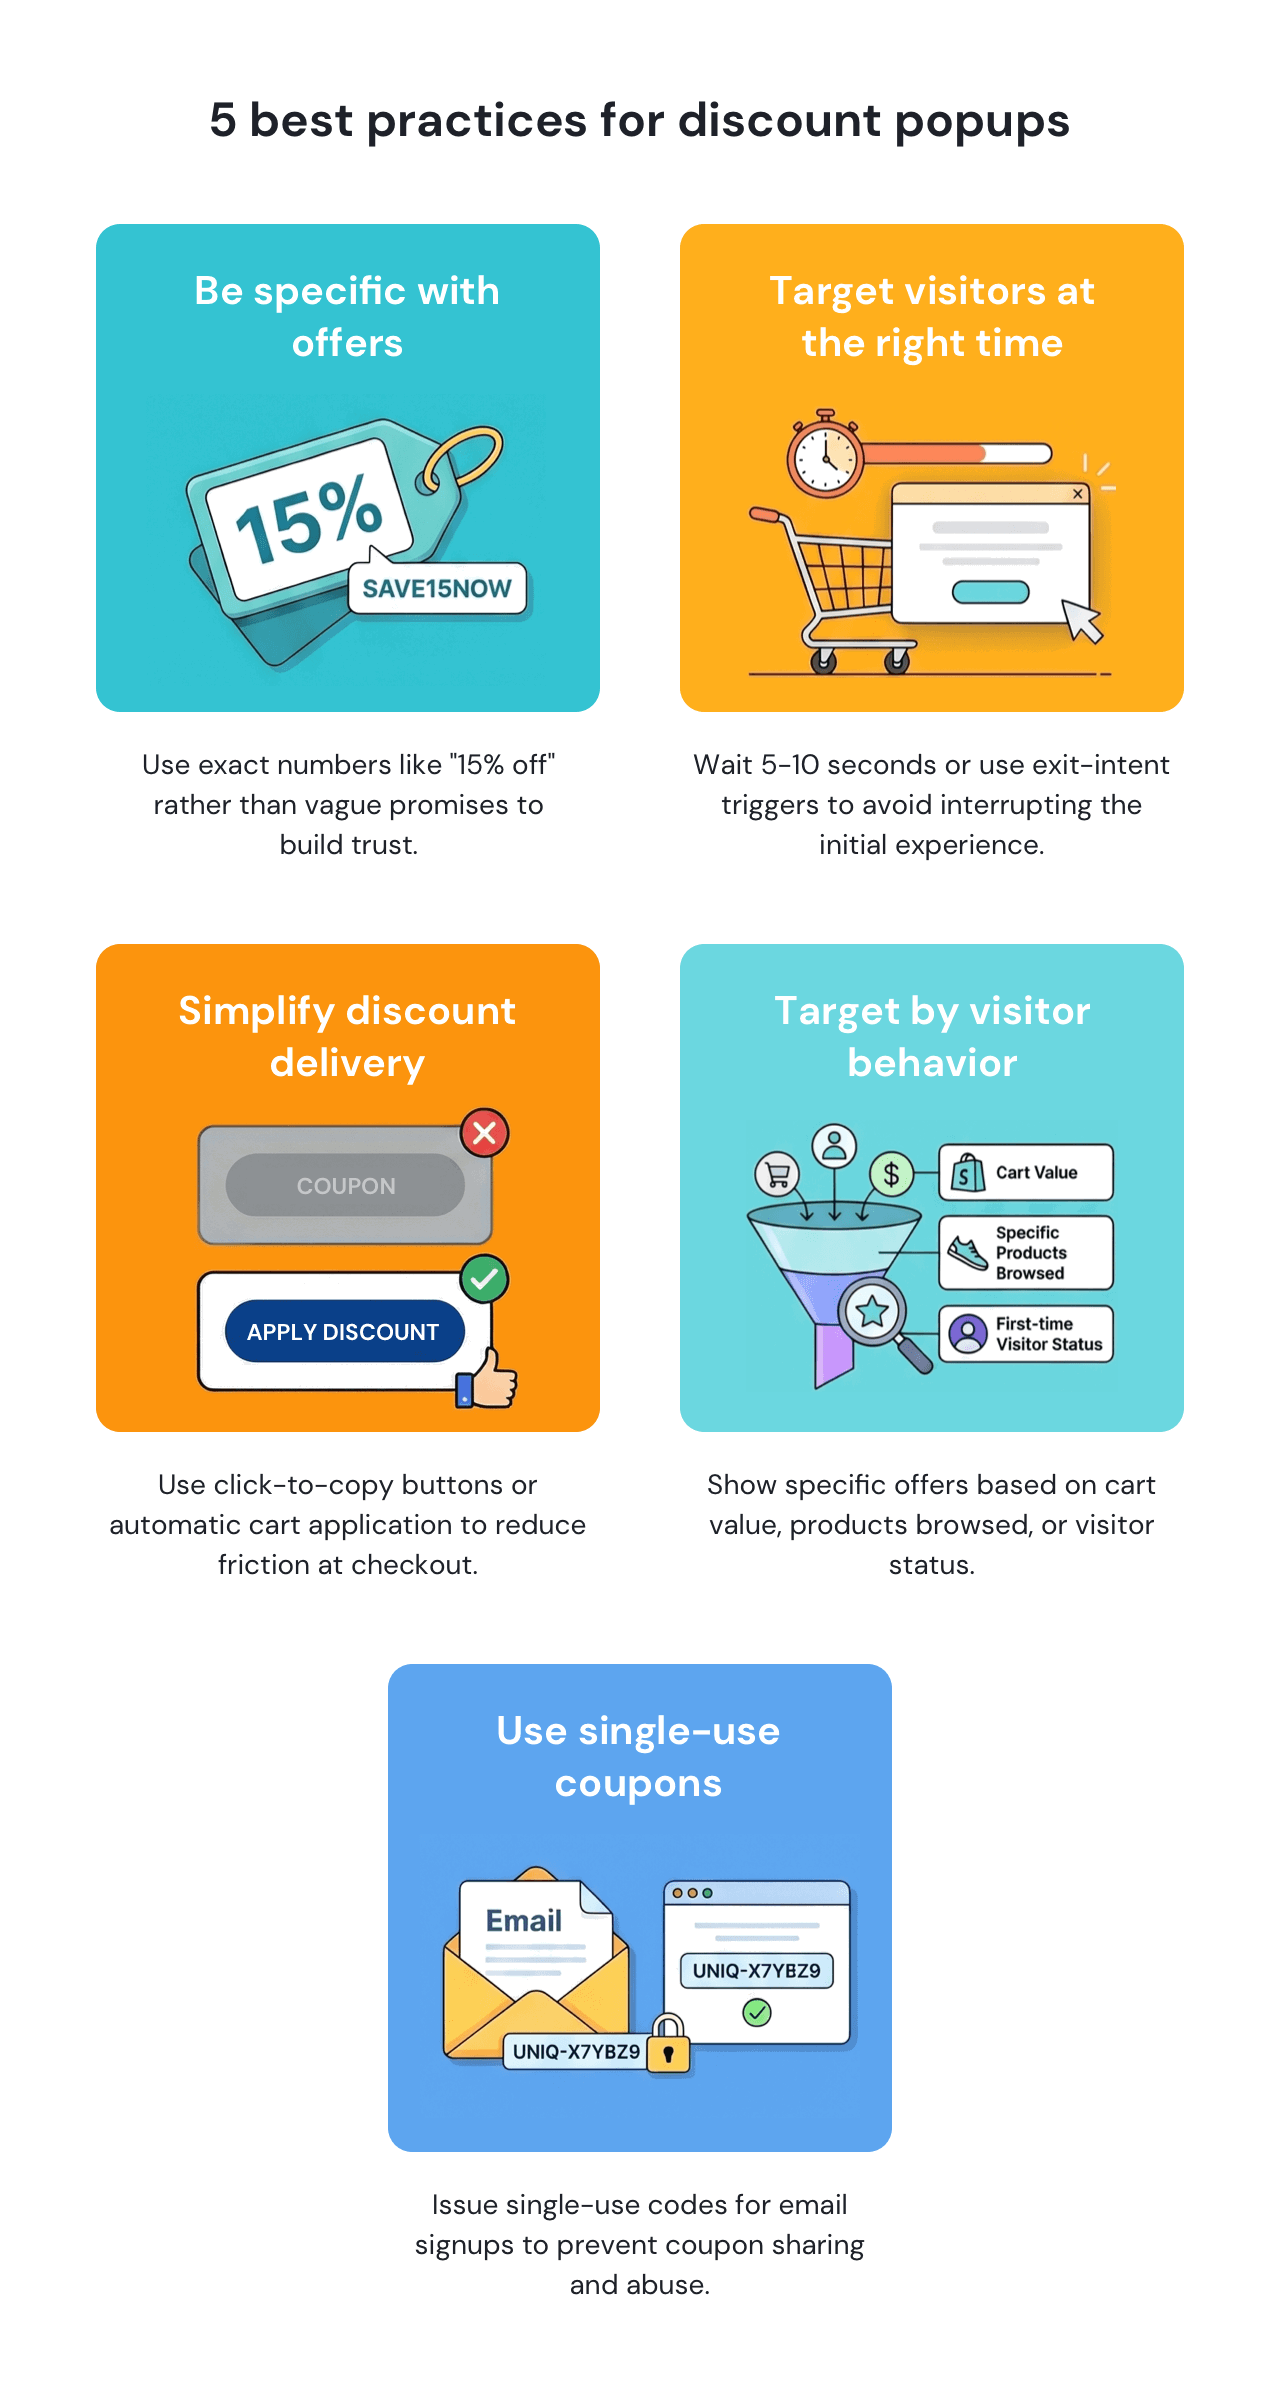
Spice blends & seasonings brand shopifySpecific numbers outperform vague promises. “Get 15% off your first order” converts better than “Save big today” because visitors know exactly what they’re getting before submitting their email. If conditions apply — minimum order value, first purchase only, expiry date — state them clearly on the popup. A visitor who enters a code at checkout and finds it doesn’t apply is unlikely to try again. CTA buttons that name the action also tend to perform better: “Claim my discount” and “Copy the code” give visitors a clearer sense of what happens next than “Submit.”
Showing a discount popup to every visitor trains people to wait for a discount before buying. GSC Email Marketing, Pop ups lets you narrow who sees the popup by visitor status, products being browsed, cart contents, scroll depth, time on page, traffic source, and device type. Two combinations that tend to perform well: first-time visitors who have spent at least 10 seconds on a product page, and visitors with items in their cart who trigger exit intent. Suppressing the popup for returning customers and visitors who have already seen the offer prevents the discount from becoming an expectation rather than an incentive.
| Marketing goal | Targeting setup in GSC Email Marketing, Pop ups |
|---|---|
| Convert first-time visitors | New visitor status — welcome discount popup after 5–10 seconds |
| Recover abandoning shoppers | Cart contents + exit intent — cart recovery popup with Apply discount button |
| Reward high-intent shoppers | Cart total above a set threshold — cart value reward popup |
| Promote a specific brand or product | Product or brand being browsed — product-specific discount popup |
| Re-engage hesitating visitors | Inactivity trigger — click-to-copy coupon after a set idle period |
A countdown timer removes the “I’ll come back later” response that kills conversions. When visitors can see time running out, they make a decision now rather than returning later. GSC Email Marketing, Pop ups supports both fixed-date timers tied to a campaign window and evergreen timers that start counting from the moment a specific visitor first sees the popup — so the urgency is always genuine, regardless of when someone lands on your store.
GSC Email Marketing, Pop ups supports three approaches. Click-to-copy places the code on the visitor’s clipboard with a single click — useful for inactivity or cart value popups where the visitor is still browsing. Apply discount applies the code directly to the cart and, optionally, redirects shoppers to the cart or checkout. It’s a stronger choice for exit-intent and cart recovery popups where every extra step risks losing the sale. For upsell scenarios, the two can be combined: add a product to the cart and apply the discount simultaneously, then redirect to checkout.
When a discount code is delivered via automated email after signup, a single shared code can end up on deal aggregator sites within hours. GSC Email Marketing, Pop ups lets you generate unique single-use coupon codes per recipient — each code works only once, which prevents sharing and makes it possible to track exactly which subscribers converted.
Discount popups are one of the higher-leverage tools available to Shopify merchants. They target visitors at the moment of decision and, when connected to an email automation, continue working after the session ends. The GSC Email Marketing, Pop ups app makes discount popups straightforward to set up and manage without developer involvement.
The fastest way to see how it works is to install the app from the Shopify App Store and pick a pre-designed template. Welcome discount popups are the most common starting point — most stores have one live within minutes. From there, the natural expansion is adding more targeted popups: an exit-intent discount for cart abandoners, or product- and brand-specific offers to boost average order value where it matters most.
I run a small business and the emails I send to my subscribers via this app have really helped it grow. I can see how the click-throughs from the emails drive purchases. The templates are super easy to use and look professional. I just change the colours to fit with my branding.
Mid-Century Furniture Store shopifyNo. GSC Email Marketing, Pop ups installs directly from the Shopify App Store and includes a library of ready-made discount popup templates. Each template is fully customizable in a visual editor that requires no technical or design skills. A built-in preview mode lets you see exactly how the popup will look on desktop and mobile before publishing.
Most Shopify stores find that a 5-10 second delay, or a scroll-depth trigger of 25–30%, gives visitors enough time to evaluate the page before the offer appears. Showing the popup too early is one of the most consistent predictors of a higher bounce rate, particularly on mobile. Exit-intent popups work differently: they’re most relevant on product pages and the cart, where a visitor is already close to a purchase decision, rather than sitewide.
Yes. GSC Email Marketing, Pop ups includes granular targeting controls that determine exactly who sees each popup and when. Targeting options include the specific products or brands a visitor is browsing, cart contents and cart total, visitor status (first-time vs. returning), geographic location, traffic source, device type, and on-page behavior — so a shopper with items in their cart can see a different offer than a first-time visitor arriving from a paid ad.
You can set the display frequency to once per visitor and apply a suppression window of at least 3–7 days. Visitor status targeting can also suppress the popup entirely for returning customers or existing subscribers.
Set up popup displaying frequency at once per visitor to prevent teaching shoppers to wait for a coupon to pop-up. When delivering discount codes via emails, ensure you’re generating unique single-use coupon codes to prevent sharing.
Nina De la Cruz is a content strategist at Getsitecontrol. She is passionate about helping small and medium ecommerce brands achieve sustainable growth through email marketing.
What better place to promote a discount than where shoppers are closest to making a purchase? Product pages are where customers compare options, evaluate products, and decide whether to add an item to their cart. A well-placed popup or banner makes your offer more visible at this critical moment, encouraging hesitant shoppers to take action.
Whether you’re offering a first-order discount, a limited-time coupon, free shipping, or another promotional offer, displaying it on the product page can increase conversions. Instead of manually reducing the prices of individual products, you can promote the same offer across selected products, collections, or vendors with a single targeted popup.
If you run a Shopify store and you aren’t capturing emails before checkout, you’re likely missing out on a lot of potential subscribers.
A well-timed Shopify newsletter popup is an easy way to solve this. It invites visitors to join your list — usually in exchange for a discount offer — so you can introduce your brand, bestsellers, and current offers via email.
If you want to collect feedback from your paying customers, the best moment to do that is right after they make a purchase.
That’s what Shopify post-purchase surveys are for.
Subscribe to get updates
Get beginner-friendly tips for growing your online business.