
Try Getsitecontrol for free
Add custom email & promo popups to your Shopify store
So you have decided to run a BOGO sale on Shopify.
Great idea. That’s one of the most efficient promo types, and Shopify makes it easy to create custom BOGO discount codes.
But how do you promote the offer in your store?
One proven way to do that is by using promo popups and slide-ins. For example, this is how you can notify customers of the offer and encourage them to choose additional products:
The first button will apply the discount code to the shopping cart, and the second button will take customers to the collection so they can select more products.
Sounds like something you’ve been looking for?
With the Getsitecontrol app, you can add a BOGO promo popup to your Shopify store within 25 minutes and zero technical skills.
In this tutorial, we’ll show you how to do it, step-by-step.
Before getting started, make sure you do two things:
Getsitecontrol comes with a basic free plan, and besides BOGO promos, you can use it to create newsletter popups for Shopify, coupon boxes, order bumps, and surveys.
Now that we got that out of the way, let’s see how to create an effective pop-up BOGO offer for Shopify.
Log into Getsitecontrol using your Shopify account and use the Create widget button to get started. Then continue to the Premade widgets gallery and select a sale announcement widget with two buttons, such as this one 👇
The selected template will be automatically opened in the editing mode – from there, you can adjust the copy, replace the image, and most importantly, assign your BOGO discount code to the button click.
For starters, type your title and offer description. Click on the text containers – either on the template or in the right-side menu – and start editing the default copy.

When you’re done working with the offer description, consider changing the default image as well. You can leave it if you want, however, it’s always better to use a creative that aligns with your branding or shows the products you’re promoting.
To change the image, click on it right on the template and proceed to Change image. From there, you can fetch photos from your website, select a stock image, or upload an image from your computer:

If you want to shift the popup to the top, middle, or opposite side of the screen, use the Position menu. To change the font, style, or color theme, use the Theme menu:

Now that you’ve finished working on the design of the popup, let’s move on to the action buttons.
Since you’re promoting a BOGO sale on Shopify, it makes sense to have one button to apply the discount code to the cart and another one – to take customers to the collection of products participating in the promo. Here is how to do that.
First, select the SHOP COLLECTION button. By default, it already contains the Open URL action, so all you need to do is paste the URL of the page where you want to take your shoppers:

Next, select the second button, change its text to something like “APPLY PROMO,” and select a new action: Apply discount. Then paste your BOGO discount code in the corresponding field:
This way, when your customers click the APPLY PROMO button, the discount will be automatically applied to their shopping carts – so there’s no need for them to manually copy and paste the promo code.
💡 To change the order of the buttons on the popup, go to the main editing menu and drag the buttons by the left-side handle.
The last step before publishing the BOGO promo on your Shopify store is to specify when and where it should pop up. To do that, you’ll need to use the Targeting controls.
It’s a good practice to display BOGO offers on the pages of the products or collections participating in the promo.
Keep in mind that widgets from the premade gallery already have default targeting settings. These settings may or may not work for your specific case, so make sure to check them carefully:
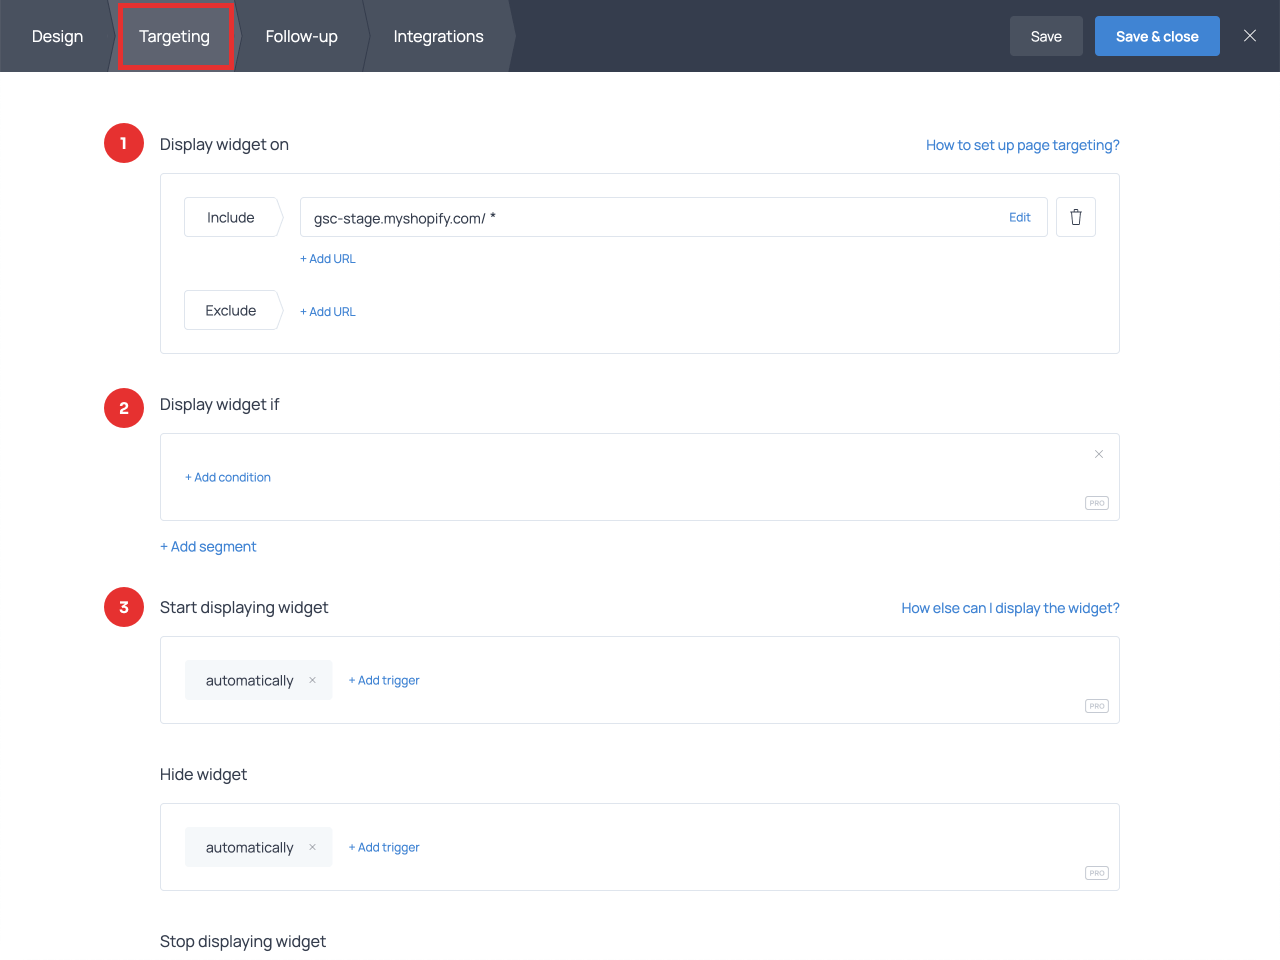
The three highlighted controls define where and when the promo will appear. For example, by default, the offer will be displayed on every page of your website. However, if you want to display it on a specific page only, paste the URL of that page in the first field. Feel free to toggle other targeting controls to define how soon the promo should pop up, and whether it should be available to everyone.
💡 Pro tip: you may want to display the offer only if a customer adds a participating product to the cart. To do that, select Start displaying widget → Product added to cart. Then indicate the products that should trigger the popup.
By default, Getsitecontrol popups are mobile-friendly. This means that they automatically adapt to smaller screens to provide the best UX for your website visitors. However, it’s always a good practice to check the mobile view: you might find that the text is too long or the image is excessive. In the latter case, you can easily remove the image from the mobile version and reduce the size of the container:
At this point, your BOGO sale promo is ready. Go to the top right corner and click the Next → button a couple of times to skip the last two tabs and save the widget you’ve created. Then activate it in the dashboard:
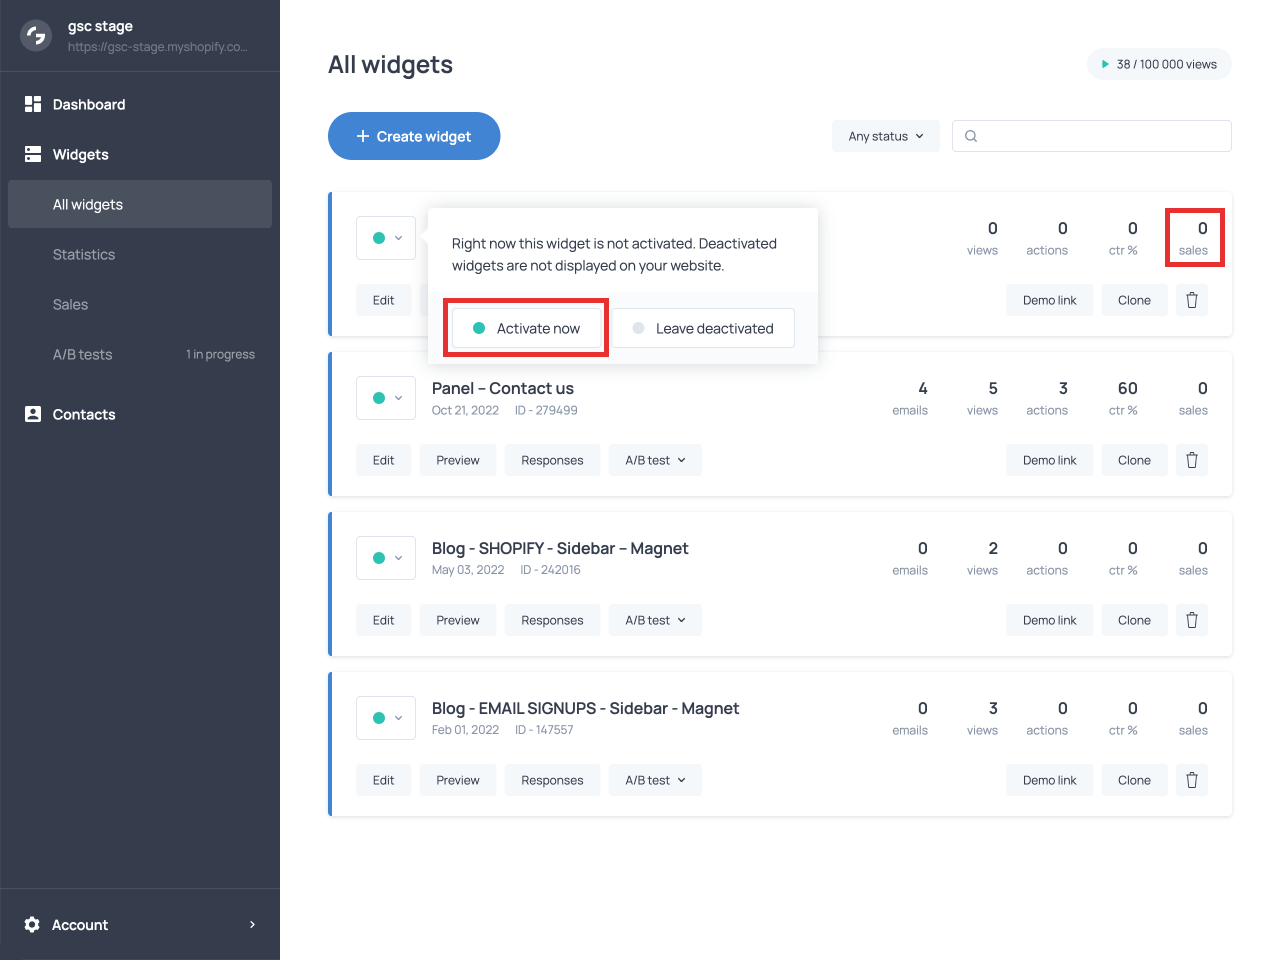
Later, you’ll be able to see how many views and clicks the popup has received since going live. On top of that, using the Sales report on the left-side menu, you can also view the sales that happened after customers used your BOGO offer.
BOGO is a broad term describing promos that suggest purchasing something in order to get a deal on something else. Here are just some of the most popular BOGO variations:
Regardless of the wording, BOGO tends to be one of the most popular bundle offers for Shopify, and it’s a great strategy to drive customers’ interest in certain products or collections.
Want to get even more value out of your sale? Consider offering a BOGO discount code in exchange for an email address – and boost sales while also growing your email list. Here is a detailed guide to doing that.
Nina De la Cruz is a content strategist at Getsitecontrol. She is passionate about helping small and medium ecommerce brands achieve sustainable growth through email marketing.
You’re reading Getsitecontrol usecase collection where we talk about the best practices for using website popups. This usecase is a part of Grow on Shopify section.
Download a PDF version of our use case for easier offline reading and sharing with coworkers.
Download PDFAnnouncement bars are the most convenient way to drive your customers’ attention to anything important happening in your store.
You can easily place a sticky bar at the top or bottom of any page, tailor it to your brand’s style, and even use personalization – displaying different messages to different types of customers.
The cherry on top? You can make your Shopify announcement bar interactive. For example, you can add a CTA button that will take customers to another page👇
If you want to collect feedback from your paying customers, the best moment to do that is right after they make a purchase.
That’s what Shopify post-purchase surveys are for.
Long product descriptions might be great for SEO, but there is one huge downside to them. As your customers scroll down — especially if they are on mobile — they inevitably lose the main ‘Add to cart’ button out of sight.
For you, it means they may get distracted and lose their purchase intention, too.
The solution? A sticky ‘Add to cart’ button for Shopify 👇
Subscribe to get updates
Get beginner-friendly tips for growing your online business.