Create a Shopify newsletter popup
Start growing your email list faster.
If you run a Shopify store and you aren’t capturing emails before checkout, you’re likely missing out on a lot of potential subscribers.
A well-timed Shopify newsletter popup is an easy way to solve this. It invites visitors to join your list — usually in exchange for a discount offer — so you can introduce your brand, bestsellers, and current offers via email.
Popups like this can be created with GSC Email Marketing, an email marketing app by Getsitecontrol. It lets you design on-brand popups and set up automated welcome email flows — quickly, with no technical skills required.
An effective popup does two things: it captures email addresses you can market to later, and increases sales through discount incentives. With the GSC app, Shopify stores see 4% signup conversion rates on desktop and 7% on mobile devices, on average. This translates to 4-7 new email subscribers for every 100 visitors to your online store.
Most brands use one of three timing approaches to display their newsletter popups: soon after arrival, right before exit, or after a page scroll. Each approach is designed to capture visitors at different stages of their browsing journey.
Welcome popups appear shortly after a visitor lands on your website, usually after 5-7 seconds. This timing gives them a moment to scan the page before considering your offer. Welcome popups work best for converting first-time visitors who have found your store via search engines or after seeing an ad. Brands typically promote a first-order discount at this stage, to drive both list growth and early purchases.
Exit-intent popups appear when a visitor’s cursor moves toward the browser’s close button or back arrow, signaling they’re about to exit. This is a great moment to offer a coupon for the next time and convert visitors into email subscribers before they leave. Exit-intent popups are especially effective on product and cart pages, where visitors have already shown interest but haven’t committed to a purchase.
Scroll-based popups appear after a visitor scrolls to a certain depth on the page, usually 25–50%. With this approach, brands target only those who have demonstrated genuine interest in their products. Stores often use scroll-triggered popups on content-heavy pages. For example, on blog posts or detailed product descriptions, scrolling indicates the visitor is actively engaged rather than just browsing. These popups feel less intrusive because they align with natural reading behavior.
We used GSC Email Marketing app to increase email subscriptions. Immediately – first day – we saw a major increase, and it has not stopped.
Furniture & home decor brand shopifyYour signup conversion rates depend on a clear, compelling value proposition. Use concise copy that explains exactly what subscribers will gain after joining your email list.
Online stores achieve the best results when their popups blend seamlessly into the website. That’s why Getsitecontrol templates are fully customizable: you can easily update colors, fonts, and images to match your newsletter popup with your branding.
Two-step popups start with a simple yes/no question before showing the full email signup form. For example, “Want 15% off your first order?” with “Yes” and “No, thanks” buttons. When visitors click “Yes,” the popup reveals a form to collect their email. This design works well because it reduces perceived friction and creates micro-commitment.
Popup teasers offer a less intrusive displaying approach — a small, clickable floating button that expands when visitors choose to engage. Getsitecontrol lets you add teasers to any popup format (modal, fullscreen, slide-in) and customize when they appear: before the newsletter form pops up, after, or continuously. This works especially well on mobile and when visitors want to reopen a dismissed offer.
To make your email campaigns more relevant, add a quick question to your popup with simple checkbox or radio button options. This will help tag and segment subscribers without reducing conversions.
Make sure your popup includes a visible close button or an opt-out button that lets visitors easily decline the offer. Avoid showing the same newsletter popup repeatedly to visitors who’ve already subscribed or dismissed it. Thoughtful targeting creates a better experience and helps prevent popup fatigue. Additionally, if you have European visitors, add a consent checkbox with clear language like “I agree to receive marketing emails” and link to your privacy policy.
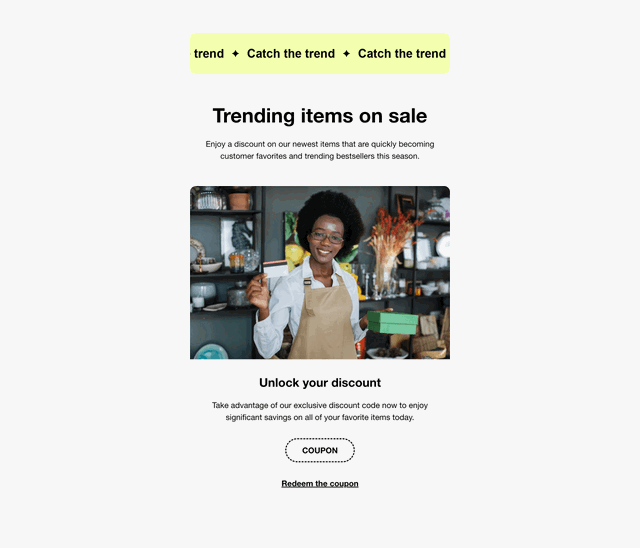
After a visitor signs up, it’s a good practice to send an automated welcome email, also known as a follow-up. It’s the perfect chance to make a strong impression on new subscribers. It’s common to use this email to thank them for joining your list, deliver the promised discount code or another incentive, feature your bestselling products or current promotions.
Getsitecontrol is helping me run my welcome flows, abandoned carts, and email broadcasts — it’s made growing my list so much easier.
Apparel & fashion store owner g2Even a well-designed newsletter popup can usually perform better. Small changes to the offer, copy, visual, or timing often have a noticeable impact on email signup rates. Getsitecontrol allows for running A/B tests, so it’s a common practice to treat newsletter popups as something to refine over time.
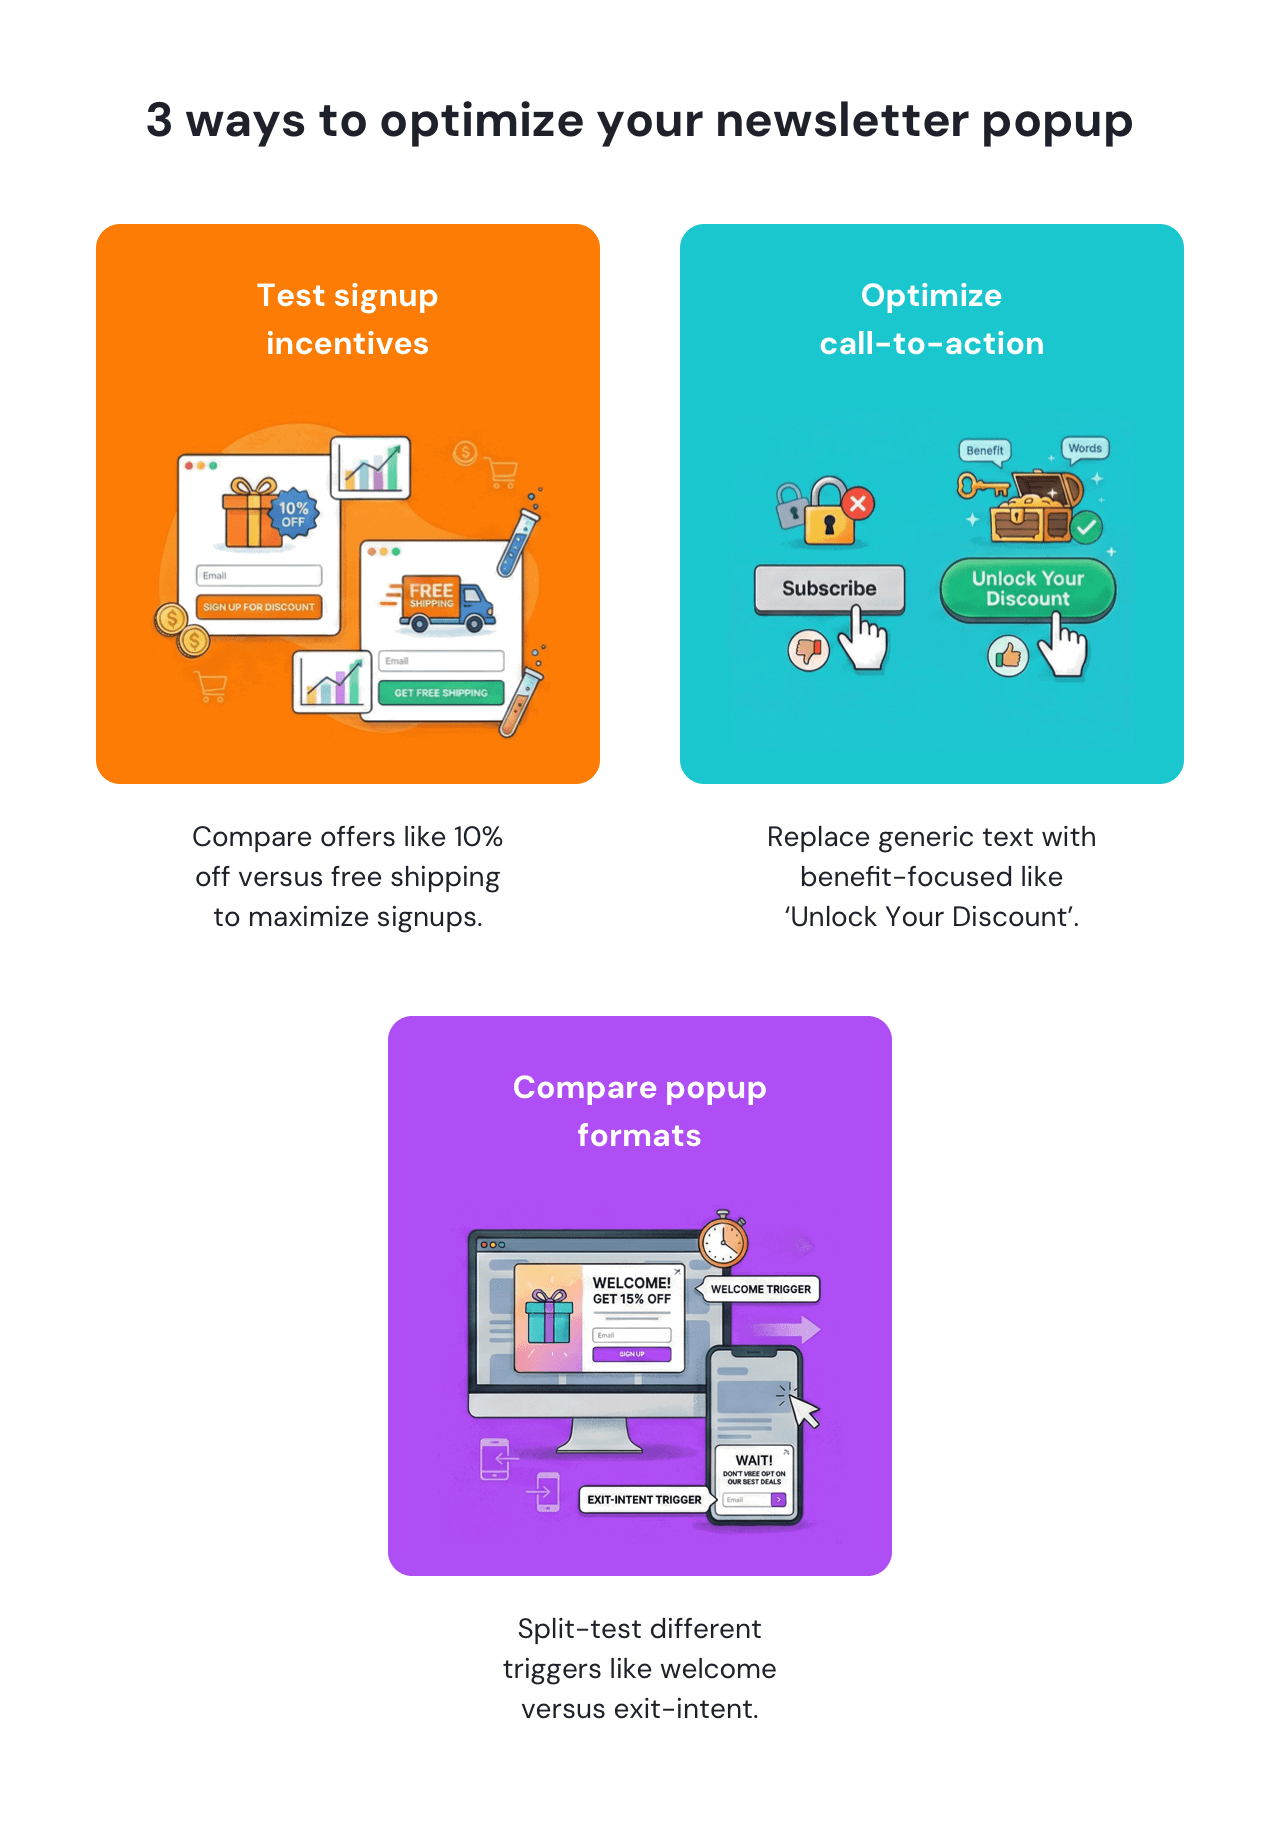
Offer different signup incentives, such as 10% versus 15% off, or a percentage discount versus free shipping. The goal is to find a discount that motivates signups without hurting margins.
Compare generic button CTAs like “Subscribe” with value-driven options such as “Get my 10% off” or “Unlock your discount.” Clear, benefit-focused language often performs better.
Test popup timing, type, and design approach. For example, split-test a welcome popup with an exit-intent popup, or run a two-step popup alongside a traditional single-step popup to see if conversions vary significantly.
Getsitecontrol is an awesome app to get email subs. We hit 30% signup rates on some campaigns, which is wild.
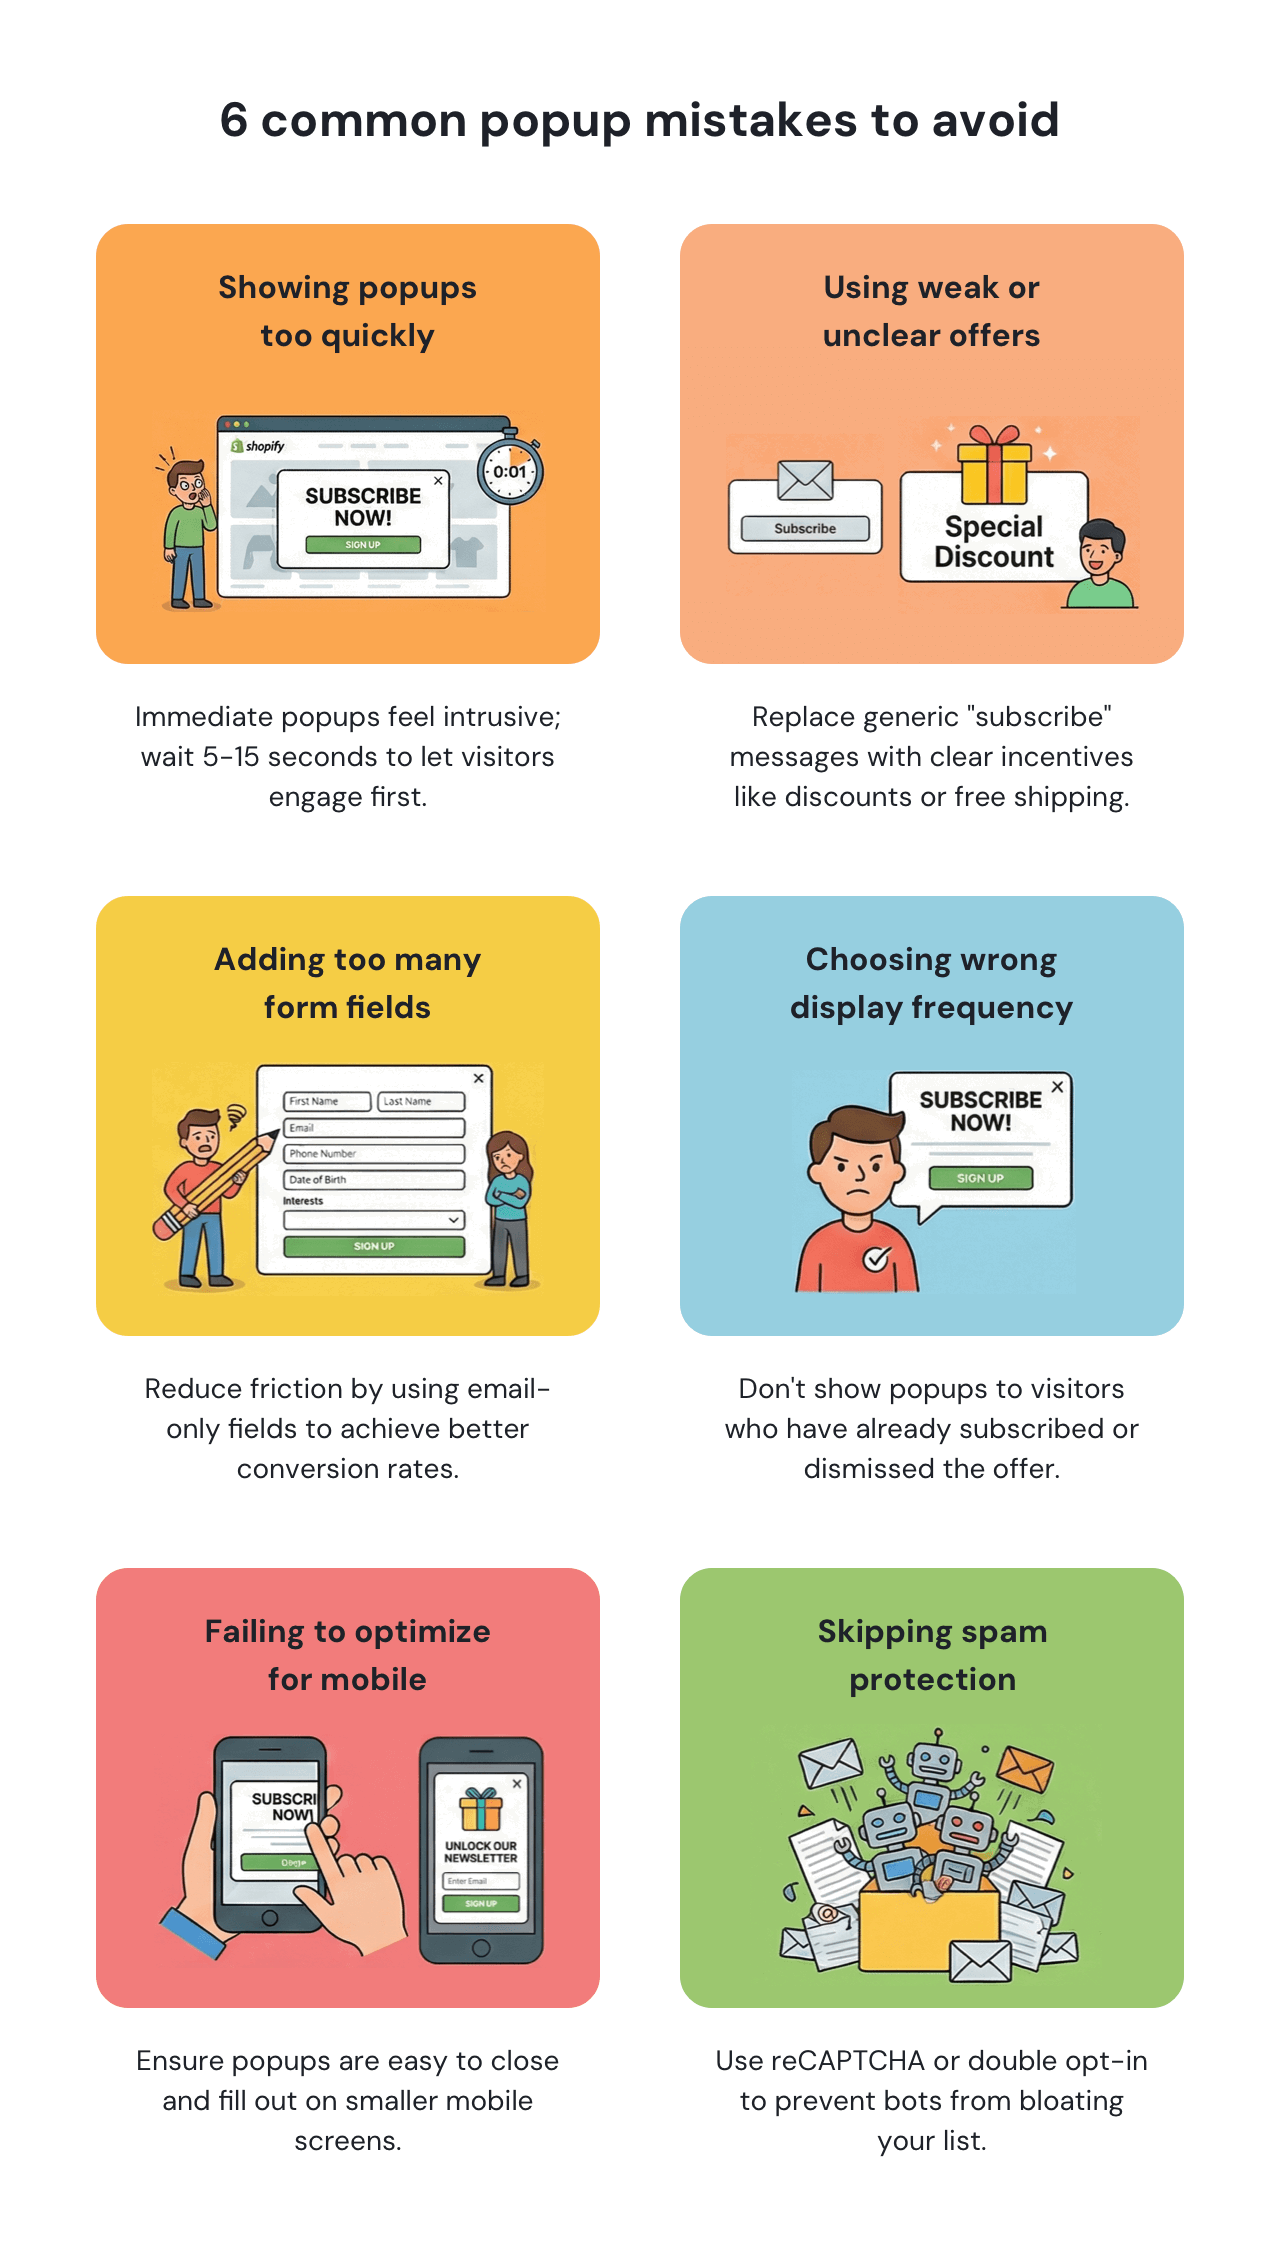
Fashion store founder capterraShowing popups immediately often feels intrusive. In most cases, better results come from waiting a few seconds or triggering your newsletter popup after a visitor has scrolled, giving them time to engage with the page first.
Generic messages like “Subscribe for updates” rarely motivate action. Clear incentives — such as a first-order discount, free shipping, or early access to new collections — give visitors a concrete reason to share their email address.
Every additional field creates friction. Email-only popups usually convert better than forms that ask for names, phone numbers, or birthdays. Add extra fields only when you plan to use that information for segmentation or personalization later.
Showing the same popup to someone who has already subscribed — or clearly declined — creates frustration. Excluding returning visitors and suppressing popups after dismissal helps maintain a positive experience.
A Shopify newsletter popup that looks fine on a desktop device may be difficult to close or fill out on a smaller screen. Reviewing layouts on mobile devices can help catch issues that quietly hurt conversion rates.
Failing to enable bot prevention allows fake email addresses and automated spam to bloat your list. Getsitecontrol lets you add Google reCAPTCHA to email signup forms to block bots without adding friction for real visitors. Another layer of protection you can use is double opt-in. If enabled, it requires subscribers to confirm the subscription via email before adding them to the contact list.
Newsletter popups are one of the most reliable ways to grow an email list on Shopify. Stores that offer a first-order discount often see up to 30% higher signup rates compared to generic “stay updated” messages, with average popup conversion rates around 4.7% on desktop and 7.7% on mobile.
Follow-up emails also play a key role. Welcome emails sent immediately after signup tend to generate 25% higher open rates than delayed messages, helping brands make the most of the initial engagement and build momentum from the first interaction.
A newsletter popup is one of the simplest ways to stay connected with visitors who don’t purchase right away. By inviting them to join your list, you can share new products, exclusive offers, and special promotions, encouraging them to return and shop later.
With GSC Email Marketing, you can launch a polished, on-brand newsletter popup for your Shopify store in just a few minutes. The app is designed specifically for small to medium-sized brands, so you can start with a free plan, enjoy a beginner-friendly interface and 24/7 customer support. The app is available in the Shopify App Store.
A newsletter popup is a pop-up email signup form that appears on your Shopify store to capture visitor email addresses. It typically offers an incentive, like a discount or exclusive access, in exchange for subscribing.
Install an email marketing app like GSC Email Marketing, Pop ups from the Shopify App Store, choose a template, customize it to match your brand, and activate it. The process takes less than half an hour.
Show email capture popups after visitors demonstrate interest: typically, after 5-15 seconds of browsing, scrolling 25% down a page, or viewing multiple products. Immediate popups feel intrusive; timed popups feel helpful.
Most Shopify stores offer 10-15% off first orders or free shipping thresholds. The key is making the discount meaningful enough to motivate action but not so high that it hurts your margins.
Based on Getsitecontrol data, Shopify newsletter popups offering a discount typically convert around 4% of desktop visitors and 7% of mobile visitors into subscribers.
You can create contact tagging rules in the Getsitecontrol dashboard. When a subscriber selects a preference option on your newsletter popup (like “New arrivals only” or “Kids collection”), they’ll be tagged automatically, allowing you to send targeted email campaigns in the future.
You can send different welcome emails based on product preferences – for example, showcasing men’s collection highlights to one group and women’s accessories to another. Each subscriber receives content tailored to their interests.
Yes. Just update the popup copy and call to action, and tag those subscribers so you can notify them as soon as the collection is live.
Nina De la Cruz is a content strategist at Getsitecontrol. She is passionate about helping small and medium ecommerce brands achieve sustainable growth through email marketing.
Create popups for free
Collect emails, offer coupons,
run surveys, stop abandonment.
Most Shopify store visitors leave without buying — and without any indication of why. If you’re a store owner, the moment visitors are leaving is your last opportunity to capture an email address, prevent cart abandonment, or ask them what’s missing. With the right trigger and the right offer, Shopify exit popups can turn a session that would have ended with nothing into a conversion.
If you want to collect feedback from your paying customers, the best moment to do that is right after they make a purchase.
That’s what Shopify post-purchase surveys are for.
Selling alcohol, cannabis, vaping products, or adult content on Shopify means one thing is non-negotiable: visitors need to confirm their age before they can browse. An age verification popup handles that automatically. It appears when someone arrives at your online store, asks them to confirm they meet the minimum age requirement, and either lets them in or redirects them away.
Subscribe to get updates
Get beginner-friendly tips for growing your online business.